Pages

Monday, May 31, 2010

Stampy Monday - Installment #3 (and last)

For my last trick of the long weekend, it was time for a little irreverence. I like this woman, as I can make her say anything I want. When I was rummaging through my irreverent sentiments collection, I found this one, and, well, THIS happened:

The sentiment comes that way - it is not schmeared! It looks kind of Halloween-y to me, but it still gets the point across. (Oh, look. I stuck on the sentiment crooked.)

The patterned papers were in my Scraplet Heap, left over from a trimming effort for a Stamp Camp past, so I used them. I had enough pairs of pieces for 4 cards (two pieces per card). These are a perfect example of SU's wonderful matchy-matchy. If I'd been smart, which apparently I am not, I would have layered a piece of white between the DSP and the card base to have it pop out more instead of blending into the card base. Oh, well.

Here's the other three patterns:


One of the things I hate intensely dislike about close-up shots is how they show ALL the detail that I would mostly prefer you not see. But since I am here, in part, to be an example for others (mostly of what not to do), I felt I needed to leave these close-ups for all the world to see. My work here is done.

In other news, I finally finished listening to a book on CD I started a while ago. I only have a working CD player in one of my two cars, so when I drove that car (which was not often, or for very long), I got to hear bits of the story. In an attempt to finish the durn thang, I brought it inside this weekend to listen while I crafted. It worked fine! Until I got to the last CD. You know, where all the mysteries and loose ends of the previous 15 CDs are all tied up nicely together? Yeah, that CD. Well, IT SKIPPED! IT WAS UNINTELLIGIBLE! I COULD NOT HEAR HALF OF IT! Grrrrrr. I got enough to figure it out, but COME.ON.PEOPLE!

So, I think I'll veg a while, finish some laundry, maybe wash a window or two... I hope you had a nice Memorial Day. Remember to thank a soldier.

Thanks for stopping by!

Stampy Monday - Installment #2

Finally, I think I might have Project #4 for my June Stamp Camps. I started out with a card from a blog as inspiration (I'll update with a link when I find it again), but then I kindof went off on my own and ended up with this:


This is my third or fourth attempt, but I think I like it. It uses my favorite SU color of all time: Sage Shadow, and is my nod to its upcoming retirement. Sage Shadow is the reason I even found out about SU. I plan to hoard it.

I like how easy it was to cut the curves in the patterned card stock using the cutting blade from the SU Cutter Kit. For those who have asked in the past, this Cutter Kit also contains a perforating blade, in addition to a scoring blade and a distress tool.

I wanted to somehow incorporate the Bitty items from the Summer Mini: the stamps, the punches and the buttons, and I've managed to include all three. Yay! Bonus!

Also, The Ladies are getting pretty sick of all the bows I put on projects, so this bow is totally faux. I wrapped the ribbon around the card and stuck it down. Then I folded over a scrap of ribbon:


and secured it with a piece of Linen Thread:


... which I also used to hold the button. The whole faux bow is stuck on with mini glue dots. I hope they like this alternative!

I also hope to get stampy some more this evening. Thanks for stopping by!

Stampy Monday - Installment #1

I apologize in advance - apparently I've mucked up the White Balance setting on my camera, so everything appears blue. ;(

First off today, I'd like to share with you the incredibly stressful life of my cat:

I don't know how she handles the pressure.

I spent most of yesterday evening making 20 magnets. I'm pretty sure I've shown you this before, but I thought I'd do it again, if only to have something, anything, to show you this early afternoon. It starts with a marathon of die-cutting. Here I have 20 of each of the circles:

On the left are die-cut dragonfly body parts - the black bodies and the copper wings. I had to break into my one pack of copper note cards & envelopes and use two of the note cards for the wings. I'm all out of 8.5x11 sheets of the brushed copper. ;(

The first thing I do is attach the bottom three layers together:


Then I wind black thread around the top layers, one at a time:

They all come out a little different, as I don't always hit the same scallop when I start. After each winding is complete, I attach it (with Dimensionals) to the top of one of the bases:

After all 20 are done, I start with the dragonfly parts. I found there was too much "give" in the center, so I stuck a pair of snips under the top layer to give me some support so I could press the pieces and hold them for the glue to adhere:

After all 20 were done, I laid them out on my Dining Room table and attached the magnets to the backs:

Once those were dry, I turned them over and applied the black Stickles to the wings.:

I let them dry over night. Meanwhile, I printed some clear labels and stuck them to small SU cello bags, and I'll pack them up today.

Yeah, when you make more than one of something it turns into work. I love these things, and they sell pretty well, but I do think I need to raise my price for them. There are just too many steps ...

AND, I was going to make a few with crabs instead of dragonflies, but I forgot. ;( I'm also all out of these green coordinating papers (from Prism), so I'll need to figure out something else for the crab version.

While searching for my dragonfly die, I found this bird die that I got at the same time (you know, to justify the shipping) that I'd never used, so I used it:

Yeah, I know, it looks like a blue card, but it really is white. I need to play with my camera and my light. And it's fuzzy. Sorry. Here's a close-up that is a little better:

Okay, his little legs are blurry. I give up.

I think I'll go work on Project #4 for my June Stamp Camps. And maybe replace the light bulb in that lamp. And talk with the photographer. She really needs to get with the program.

Thanks for stopping by!

Sunday, May 30, 2010

Stampy Sunday - Installment #2

This is my second post for my Stampy Sunday. Make sure (if you haven't already) to read my first post from earlier today.

After my first round of minimalist cards, I tried one more. This effort started out innocently enough, then it went terribly wrong. I cut card stock for 6 card bases. Then I decided to break out another one of my Never Used stamp sets:


... and make a simple row of the three images across the center of the card. Like this:


Easy, right? Apparently not in MY world. I colored the first stamp with three markers: Gable Green, Green Galore and Garden Green, then stamped the image dead center on one of the cards. I messed up the second one by not stamping the whole image. I messed up the third one by getting ink on the card before I stamped the image. I was down to three. When I went to stamp the second image to the left of the first one, I misaligned it. Carp. I was down to two cards. I took out the Stamp-A-Ma-Jig and lined up the image on the two remaining cards, then before I could stamp the third image I got ink on one of the cards. I was down to one, and you just saw it.

So my pack of 6 ended up being a single card and I decided to go crazy and add a sentiment. I like to live on the edge.

Well, I looked at my pile of new white scraps and decided to salvage the situation by making cards that needed something die-cut out of white. This is what came out:


I re-discovered my Talyored Expressions "Boys Will Be Boys" stamp set and used the tie image. I've made these before, but I sold my last one yesterday. By the way, why is it that boys and men are automatically associated with golf and camping and fishing and grilling? Maybe that's why it's so tough to make "guy" cards, especially for guys that don't do any of that stuff.

ANYway, I was very proud of these cards, because I also opened and used papers from three of my new Basic Grey 6x6 pads. The Basics Kraft + Basics White and the Basics Kraft + Basics Manila work so well together!

That first one is the White version (I made 3 white) and this is the Cream version (I made 2 cream):


The sentiment has been re-arranged to suit my needs. Here's the actual image:


I inked up the second line and stamped it 5 times, then I inked up the first two words of the first line and stamped it 5 times. THEN, I took my SU Bermuda Bay marker and wrote out the word 'tie' in cursive 5 times. Yeah, when I slow down, I can actually write like I was taught to write cursive back in aught six. I punched it out with the teeniest die of one of the Nesties Labels sets. So M.D., see? It DOES have a purpose! It is NOT too small!

Next up: I'm going to make a big ole pile of dragonfly magnets. It's time.

I hope you are having a wonderful Memorial Day weekend, and that you are doing something fun!

Thanks for stopping by!

Stampy Sunday - Installment #1

I have big plans to be stampy all day today and tomorrow, so I'll take breaks from stamping to relieve my neck and come here to show off what I've managed to accomplish.

First up: I'm still in minimalist mode, trying to make note cards with no sentiments or embellishments. It's killing me, but I'm trying. This one popped into my head last night:

And no, the card base is not blue, it's Vanilla. Really. Remember who the photographer is. I used the Baby Wipe technique with Gable Green, Green Galore and Garden Green re-inkers. I also used some of my hoarded Vanilla raised-edge note cards. Pretty soon I'm going to need to find a new source - my supply is dwindling.

Oh, that reminds me. Many years ago, when SU first discontinued these raised-edge note cards, BR #2 and I were trying to concoct a way for me to make them myself. All we needed was a way to dry-emboss a rectangle onto (into?) some card stock. Well, GUESS WHAT! Someone invented Nestabilities! HA! Now if I could just figure out how to accomplish this and make them come out straight, I might be okay.

Anyway, an added bonus for that leaf card is that I retrieved the stamp from my box of Bought But Never Used items. I inked it, I used it, I cleaned it, and I put it away.

Next up: More of those raised-edge note cards and two stamp sets I had to have but have used maybe once. Here's the cat version:

... and the dog version:

Once again, those are VANILLA note cards. They are NOT BLUE! I also opened and used my Tea Dye Ranger Distress Ink. Wow, man, I'm on a roll.

That's it for my first installment. I have more stuff in the pipeline, and I'll feed it to you throughout the day as my neck needs a break. Right now BR #2 is on her way over. Lord knows what we'll get into.

Thanks for stopping by!

Saturday, May 29, 2010

Market Update (long)

What a fantastic day it was today! The sun was hidden behind clouds, so it was warm, but not HOT. And I think people were afraid to go out and do anything, since it looked like rain all day, so instead, they stopped by the Farmers Market! YAY!

Our Market manager was showing off one of her Amigurumi creations. Isn't this the cutest thing ever?!

She knits hers, where others I've seen are crocheted. Check out his tail:

Also check out the raspberries behind the squirrel. That was part of my breakfast. :-)

One of the first things I do each week is buy new fresh flowers. One of the other artists asked if he could draw them, so here he is in action:

He just brought his chair over and got to work. He taught himself to draw in the Chinese style, and he said he could teach anyone, even moi, to draw. I tried a few years ago, I really did. For now I'll stick to stamps. But he does encourage me to step outside of my box and try new techniques, so I do. :-)

Time for today's food parade, starting with basil:

... and baby Zukes:

... baby eggplant:

... strawberries:


... raspberries:
... romaine lettuce:

... maters:

... peas:


... radishes:

... rhubarb:


... shrooms:


... and onions (or orn-yons, if you used to watch Justin Wilson):

Most of this stuff came home with me.

This week I added something new to my "drag this stuff to market" bag:

... and as you can see, it was well-received by the four-legged critters that streamed through today.

Oh, I spied this little girl wearing a Princess dress over at MaryBeth's booth:

SO cute! They were picking out hair bows. ;-)

And one of our new crafters this year makes pottery. Look at this biz card holder:
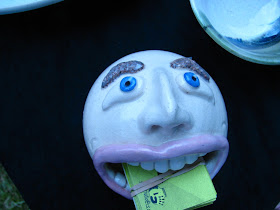

heh heh ... she said she made one for her dentist.

Over at the flower booth, these guys smelled SO good:

There are (I think) double-bloom Mock Oranges. There are a few in my mixed flower bunch. There are also a few of these:

Sweet William. No smell but soooo pretty.

Okay, before we get to the doggie portion of the show, I have a few disclaimers to make:

1. It was cloudy
2. I rarely left my table, and did a lot of zoom shots in stealth mode
3. There were a bazillion dogs out today with their walkers
4. I did not get them all
5. The ones I did get were often hidden by legs and tables
6. The ones I openly tried to photograph would not hold still

With that as my going-in position, I bring you today's dog parade. I was going to comment only where I wanted to share something I learned about the particular pet, but I failed. I got wordy. Sorry.

First up - My fave:

Yeah, it's a butt shot, but I just loooove this dog.

Black fur-ball:

Some friends with their two dogs:

They were going for a walk around the lake. Made me look real bad.

Cavalier King Charles, in motion:

This guy looks so regal and distinguished:

So curly:

A moment of "dogs everywhere":


Another moment of "dogs everywhere":


This guy looks part Corgi, non?


This tiny dog with his not-so-tiny owner:

How handsome:

She later had him sit for me, but I liked this shot better.

Nice:

OMG, an 11-week-old puppy. Here he met that nice white dog:

This puppy was getting quite the socialization lesson today. I think everyone stopped to pet him. Twice. :-)

I don't normally include people's faces, but I love this shot, so I broke my own rule:

Another black fur-ball passing through:


(Oooh, should have edited out that human butt shot. Sorry. )

The neighborhood dog-sitter came by with three of her six weekend charges:

Meet Mr. Big:

He is a Miniature Pinscher.

And he's not shy.

This next one is a Pomeranian mix:

And I forget what this next one was, but he was real cute, too!

Another distinguished gentleman:


Good doggie:

And then we had this guy:

After several failed attempts, I decided to stick with the most in-focus pic I got. I thought he was a Lhasa or a Shi Tzu, but she said he's a Havanese. From Havana. They are originally from the Canary Islands, and brought over by the Spanish. See all the stuff you learn by stopping by my blog?!?!

Well, thanks for reading this far. For the rest of this weekend I plan to get stampy and crank out some cards for next weekend's markets. But before I go, I wanted to mention that I am loving The Pioneer Woman's photography posts this weekend. Her theme is Coming Home, and she is posting pics of ... our troops coming home. I have not cried this much (both happy and sad) in quite some time. It's quite moving, so please stop by and see what she's posted so far - pics sent in by readers, by the way. And Happy Memorial Day!

Thanks for stopping by!