So I had this idea ... isn't it funny how many of my posts start out that way, and then end badly? Or at least very differently than I'd started out? Yeah, this is one of those that went in a totally different direction.
I'm filling in the holes in my inventory AND I'm using up (okay, making a dent in) my stash, so I had this idea to make some baby cards. I knew I had some baby papers in both blue and pink:
... so I cut them into card-sized pieces. I just HAD to use the whole sheet of both, so I got 6 pink and 5 blue. You see where this is going, don't you? ;/ While I was there, I also cut the pink and blue layers.
Then I went in search of images, and I selected this baby T-shirt from Hero Arts:
... and I stamped it on white to receive these, which I stamped on pink and blue:
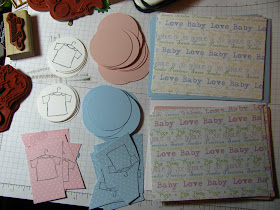
THEN I thought it would be cool to have three across, so I stamped MORE of the white Ts and cut them out, along with the pink and blue circle layers:
This is where I was at that point:
THEN I realized I should have white Ts also cut out to look right on those stamped white Ts, and I also stamped and embossed my onesie stamp. I stamped it in Versamark on white and used clear EP. I almost went blind!
So here's the second iteration of that pile of parts-is-parts, with the white T-shirts and onesies clearly marked:
LOTS of cutting here. Then I started the assembly process, and realized everything was too big to fit three across. Yes, I realized this AFTER I'd done all. that. cutting.
You see, each circle layer would have either this (a colored T-shirt):
or a white T-shirt, or a white onesie. Unfortunately, it all didn't fit, so I had decisions to make. Now my head was spinning in circles on my neck, and I needed to make it stop. So I cut waaaaaay back, and tried this:
I should call this my "Less is More" model. GAH! How simple is it to just use the one image and call it DONE?! WHY do I make this so difficult?!
Here is the end product:
That charm is two baby feet, and the sentiment is from a Lawn Fawn set I actually had to open to use. (yay, me!)
I need to finish assembling these, bag and tag them, and maybe put one of each in my Etsy shop!
In other news, I installed My Digital Studio on my laptop today so I can play with it, and I just made my first digital card. I'm going to try to print it, then I'll post my report and my card next time.
Thanks for stopping by, and Happy New Year!
Pages
▼
Friday, December 31, 2010
Thursday, December 30, 2010
What a Hoot!
In my never-ending quest for projects for my monthly Stamp Camps, I read endless blogs in search of ideas to steal CASE. I don't ever really 100% steal anything, partly because most times I don't have 100% of what the other crafter used, but more-so because I like to make it my own. And I like to sleep at night. I do guilt really well, so I'm much more comfortable with "being inspired" by someone's project than out-and-out copying it.
A while ago, I ran across this project on Diana Gibbs' blog, and then she came back today with all these cool variations. I was already sunk, so tonight I had to try it myself. My Stamp Camps are, after all, next weekend! GAH!
Here is my first pass:
I used SU's Summer Garden DSP so it will be bright and cheery all year long. I did the eyes of the owl a little differently, too, because I could. After I made this, I liked it well enough, but it was missing something. So I enhanced it thus(ly):
... by adding the heart (contrasted with black so you can see it), and adding wings. I'm not 100% happy, but you have to admit: he is pretty handsome, non?
In other news, there is no other news. I need to make two more projects (cards) for next weekend, and get going on my year-end spreadsheet for the biz. Ugh. That will keep me busy for days.
I still owe you my Baby Card saga, and I shall post that tomorrow.
Happy New Year's Eve Eve, and thanks for stopping by!
Monday, December 27, 2010
I'm Baaaaaaaack!
I'm baaaaack! Did you know for $5/year you can buy 20 gig of space on Picasa? Well, you know now! :) In my absence, although I was mostly a slug all weekend, I did get some stamping in. Let's see what came out of that effort, shall we?
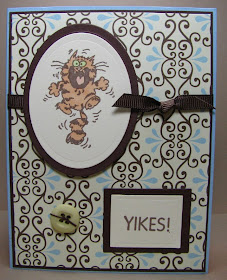
First, in my effort to use the new stuff still in the bags from the LSS, I used two new stamps on this:
The cat and the YIKES were purchased together, so that part was easy. I wandered aimlessly around The Captain's Table - or rather "stepped carefully" around it, and re-discovered a box of patterned paper remnants that included that brown & blue piece, from which I cut 4 pieces. I futzed with this for hours until I ended up with this layout. The first version has blue ribbon to match the base. I like the brown better, and I'm officially no longer in love with the blue base. I'm thinking it should have been a blue layer on a vanilla base, but oh, well. And it took me about an hour to select that button. Seriously.
Next, I finally found my droopy dog stamp (I'd put it away - no wonder!), as I wanted to use it with the Hound Dog sentiment, thus(ly):
Meh. It's okay. I think I should have left off the red layer around the dog. The patterned papers are from the Basic Grey jovial pack, left over from a Christmas Card Extravaganza from last month. The bone embellishment is from my stash.
Lastly (3 of 3), I bring you this:
This is me, trying to layer. The tree stamp has been on The Captain's Table for-ev-er, and I'm just now using it. The blue ink is Ranger's Blue Jeans, and I used a LOT of it. This card caused me much angst, it did. You'll notice the doily layer from the ones I'd cut with my MFT die; I struggled with the many layers of patterned papers and finally ended up with the one horizontal piece behind the circle layers; the blue is all SU Not Quite Navy, except for the ribbon which is PTI (a poifect match, too!) At the last second I added green (!) pearls. I was torn between going mono-tone and adding some color, so I added color you can almost not even see. It's how I roll. The stickles on the tree are Ranger Distress Stickles.
I've also been slaving over some baby cards, but I'll save that epic for another day.
In other news, back in my Time to Make the Buckeyes post, I alluded to a crazed squirrel climbing all over my screens. Tonight, I give you proof. Please observe:
Didn't see him? How about this:
(I have full screens, by the way, so this is physically possible for him.) Yes, in that pic the little bugger is digging (DIGGING!) at the edge of the window frame to ... what ... GET IN?!
Here's another shot of him:
and another:
And one more:
Oh, and yes, I need new blinds. It's been on my list for years. Those handsome rope ties are doing just fine, thankyouverymuch.
I'll say this one more time: squirrels are varmints! VARMINTS! They are the reason I can't put out bird seed for the birds - the squirrels keep the birds away and eat it all themselves! VARMINTS! However, the tree trimmers did cut off the lower branches of the huge tree out front - the one with the squirrel nests in it, but still, even homeless, these guys may NOT come into my house. Nope.
Oh, oh, oh - one more thing! One of my bloggy pals, Lauren (uber-talented with the fussy gene), has started a new blog with a weekly Christmas Card Challenge: JingleBellesRock. Go check it out and join in the fun if you can!
Thanks for stopping by!
Saturday, December 25, 2010
Oops
Slight delay in my next post. Apparently all those Market Updates have sucked up my free Picasa space allocation and I have to beg for more space. As soon as this is all settled, I'll be back with some new craftiness.
Let this be a lesson to all of you.
A Crafty Christmas Saturday
Merry Christmas to all of you who celebrate! Since I do not, I got crafty this morning.
First, I have to tell you I have given up on that purple stuff. It was sucking the mojo right out of me, so I put it away, and immediately the fog cleared. So I'm giving away what's left of this pack of purple papers:
If you want it - it's yours.
I next approached The Captain's Table and addressed this pile of stamped cards:
I'd started them back in November when I had a show in VA, but they never got finished. I stamped 20 (turns out it was only 19) of the single cats (Lawn Fawn - Critters in the 'Burbs), and I did one with two cats, just to see how it looked:
I thought I'd color them with Copics and sell them as 5-packs... but what to my wandering eyes should appear ... THIS:
A pile of s-crap?! Oh, NO, it is NOT! Let's look more closely:
That, my friends, is pretty paper! Look:
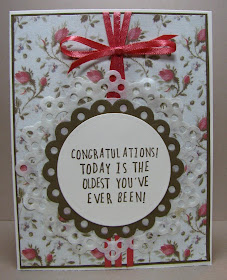
Several weeks ago I received the much-coveted Doily die from My Favorite Things and used it to cut out some mulberry (hand-made) paper, but set it aside in lieu of other, more pressing projects, like my December Stamp Camps. I was immediately inspired to create this:
Yeah, the sentiment was out, so it got re-used. But the thing of which I am most proud is I found that ribbon - almost a perfect match! - in my box of Every Color Orange, Pink and Red Ribbon But The One I Need. SO proud. Can you see the off-white doily peeking out from under the brown eyelet circle? :) I made two of these, bagged and tagged them, then went to work on the kitty cards.
I colored half this color:
... and the other half this color:
No matter what colors I choose, it will be wrong, so I just picked two. I will place bets that someone will ask if I have any blacks, or calicoes, or plain white, or striped. Nope, just tan and grey - sorry.
I also colored the two-kitty card - one of each:
It will either be perfect for someone, or it will languish in my box of note cards for years and years. We'll see.
I'm going back in for more. Thanks for stopping by!
Thursday, December 23, 2010
Purple Haze - Part 2
Have I mentioned how much I detest working with purple? Specifically light purples. I felt the need to qualify that statement because I happen to love Concord Crush and Pear Pizzazz together, or Eggplant and Celery. I'm talking about the light purples - the ones that are impossible to match. Or coordinate. Or tone down.
This is an example of what happens when I'm suffering from excessive exposure to purple:
I tried. I really did. And Ihate intensely dislike this card. InTENSly. (Although you have to admit that sentiment rocks, doesn't it?)
So what shall I do with all those cut-out shapes of purple-ness? Someone suggested I sponge over the purple-ness to tone it down a bit. I suggested using black.
Then the suggestion was to use a contrasting color to draw the eye away from the nauseating, hideous, mojo-sucking pastel-ness of it all. (No, I don't do Easter well. Why do you ask?) The old SU Color wheel lists Olive, Caramel and Not Quite Navy as coordinating colors for Lavender, and So Saffron as a complementary color. Really? Maybe not.
Basic Gray might work. And some shades of yellow do go with a lavender/lilac-y purple. I might try those tomorrow. If I fail, all those cut-out shapes will be trashed. Unless someone wants them. Speak up by Monday or they are history.
Just think. If I can get past all this purple, I might be able to move on with my quest to make a dent in the mess that is The Captain's Table.
I'll try again Friday and let you know how I fare.
Happy Festivus! I guess I've aired MY grievances for this year. ;/
Thanks for stopping by!
This is an example of what happens when I'm suffering from excessive exposure to purple:
I tried. I really did. And I
So what shall I do with all those cut-out shapes of purple-ness? Someone suggested I sponge over the purple-ness to tone it down a bit. I suggested using black.
Then the suggestion was to use a contrasting color to draw the eye away from the nauseating, hideous, mojo-sucking pastel-ness of it all. (No, I don't do Easter well. Why do you ask?) The old SU Color wheel lists Olive, Caramel and Not Quite Navy as coordinating colors for Lavender, and So Saffron as a complementary color. Really? Maybe not.
Basic Gray might work. And some shades of yellow do go with a lavender/lilac-y purple. I might try those tomorrow. If I fail, all those cut-out shapes will be trashed. Unless someone wants them. Speak up by Monday or they are history.
Just think. If I can get past all this purple, I might be able to move on with my quest to make a dent in the mess that is The Captain's Table.
I'll try again Friday and let you know how I fare.
Happy Festivus! I guess I've aired MY grievances for this year. ;/
Thanks for stopping by!
Wednesday, December 22, 2010
Purple Haze - Part 1
Remember how I said I don't really like purple? Well, as I passed the Dining Room table tonight on my way to The Captain's Quarters, with every intent to work on finding the surface of The Captain's Table, I spied these:
... a pile of purplescraps remnants left from making these custom cards. Immediately distracted from my original plan, I decided to use these scraps remnants for good instead of putting them away. Someone must like purple - I know you're out there. And I don't want purple stuff laying around here. I wanted to disappear it.
First, I stuck them all down to pieces of printer paper:
Some of them are in straight-ish lines, and some of them are all wonky, like this one:
Then I spent some time at the Big Shot station with my binder of Nestabilities, and went to town cutting out shapes. I ended up with these:
I am especially proud of this tiny one:
... and I think these birds:
... and these hearts:
... have much potential.
For my next trick, I will attempt to fabricate cards from these purple parts-is-parts. I shall! They say you should step outside of your comfort zone once in a while, right? Okay, I'm there! I'll be back as soon as I figure out what to do with these parts!
Thanks for stopping by!
... a pile of purple
First, I stuck them all down to pieces of printer paper:
Some of them are in straight-ish lines, and some of them are all wonky, like this one:
Then I spent some time at the Big Shot station with my binder of Nestabilities, and went to town cutting out shapes. I ended up with these:
I am especially proud of this tiny one:
... and I think these birds:
... and these hearts:
... have much potential.
For my next trick, I will attempt to fabricate cards from these purple parts-is-parts. I shall! They say you should step outside of your comfort zone once in a while, right? Okay, I'm there! I'll be back as soon as I figure out what to do with these parts!
Thanks for stopping by!
Monday, December 20, 2010
And So It Begins
Welcome to my nightmare: The Captain's Table:
I have declared my Winter goal to be working through this mess, and it began Sunday evening. The ONLY thing I'm going to point out in that pic is this:
Way in the back are stamped images of The Christmas Carol frog. My goal was to have him be my holiday card this year. HAHAHAHAHAHAHAHAHA, omg, I crack myself up. ME? SEND cards!?! HAHAHA. (ahem) So I made one a while ago:
... and last night I made 5 more with those remaining images, but I used a Souffle pen instead of FlowerSoft on the white parts. I bagged and tagged them, then put them in my box of Christmas cards for next year.
Then I moved something on the table and found three stamped ornaments that didn't even make it as far as the UFO pile, so I made this:
The sentiment isn't stuck down yet in that pic. I actually mounted that set just to use the image. (I am so proud.) But it's too big, so I cut off the top and bottom parts and ended up with this:
Not too shabby. This will also land in the Christmas box for next year.
I'll be working my way through the stuff on the Captain's Table, finishing things, putting away the supplies used, and eventually I shall see the table top. I SHALL!
After I'm done with that effort (I predict it will be some time in February), I'll start on my second Winter goal of using every object purchased and still in the bags in which they traveled to chez moi. Then I will put them away. By April I hope to have some elbow room in there! I know, it is a lofty goal, but I really, really reallyreallyreally want to make it happen. We'll see.
Thanks for stopping by!
Sunday, December 19, 2010
Hugs & Kisses
It's pink. And next to purple, I don't "do" pink. I struggle with both, but, well, for Valentine's Day, you just need to do "pink".
A while back, I came into about 2845 sheets of 12x12 Mellon Mambo card stock, and I've been pondering what project to do to make a dent in it. It's pink, so naturally I thought of Valentine's Day. And what better way to take advantage of 12" paper than with one of the Bigz XL dies. So I made this:
I used the (gets the book out for reference so she gets it right) Fancy Favor Bigz XL die to cut the Melon Mambo card stock. The stamps are all from the "XOXO" set from the upcoming Occasions Mini catalog. The pom pom ribbon is new, as well. Actually, as soon as I saw it, it pushed me towards making this box. It was kismet.
I plan to score additional points with The Ladies by providing Hershey's Hugs and Kisses to fill their boxes. :)
Here's a side view of the box for the uninitiated:
The die cuts and scores so all you need to do is fold, tape and decorate. Wow, that's one project planned for January, and it's still December! Yay, me!
In other news, my customer came to pick up her special order cards today and they loved them. That makes me so happy. :)
Thanks for stopping by!
PS: Please ignore the ink that shows above the left edge of the white layer. I originally stamped the image directly on the Melon Mambo, and I intensely disliked it, so I did my best to cover it up. :/
Saturday, December 18, 2010
A Commission, and SYFY # 15
I should have titled this post "You just never know". Because it's true - you just never know when someone will contact you for a special project. Yep! I had a special request, and it was only possible because I hemmed and hawed and finally decided to do a show in Virginia last year.
Short back-story: I was at the farmers market, stationed behind my tables, and a woman came up to me to ask if I'd consider doing a show in Arlington. My immediate response was No, partly because it's FAR (okay, only about 45 minutes), and partly because I didn't want to deal with the sales taxes in another state. She told me to think about it, then "stopped by" several more times over the next few weeks to see if I'd changed my mind. Long story short, I decided to do it last year, and it was a GOOD show for me ... totally worth the trip.
The show is all about Chesapeake Area Alaskan Malamute Protection (CHAAMP), though the craft vendors are free to sell whatever they normally sell. Last year I made some special cards for it, and also donated what I had left for the organization to use for a fund-raiser. And of course, I did the show again this year, too. People come from all over - even other states - to support the rescue. LOTS of dog people!
A few weeks ago, the woman that talked me into doing the show asked me to make a special card for the organizer. Seems she is responsible helping hundreds of dogs through her fund-raising efforts, and they wanted to do something for her. She likes purple (I don't) so I was asked to make it purple with lots of pretty purple papers. She also wanted it BIG, like legal-size big, but I talked her down to 8.5x11, which I actually HAVE. :)
This is my first mock-up:
She sent me a photo of a Malamute wind chime which I printed (explains the weird lines on it). I decided the color-blocked papers (Memory Box Making Memories, sorry) would work with some retired Lavender Lace card stock as long as there was a black layer between them.
Once she blessed the mock-up (first one, too! Woo-hoo!), I realized I had no way to bind it, so I left a 1/2 inch of space on the left edge, then fit everything into the remaining 8-inch space.
Note to self: measure twice, cut once.
I punched holes with my Crop-O-Dile with the intent of using Jumbo Eyelets along the spine, and weaving ribbon between them to pretty it up. But after I'd punched the holes, I realized that the eyelets were too big:
I should have measured them before I assumed 1/2" would be wide enough. :( But that gave me a SYFY moment to share, and we know I'm all about sharing, right? :) So here is my SYFY tip #15.
I had already layered the card front with the back and stuck them together with red sticky tape. Can you say "permanent"? So I decided I needed to cover up that boo-boo and start again. I cut a strip of card stock 1.5" wide and scored it down the middle at 3/4":
Then, again with the red sticky tape, I wrapped it around the left side of the card to make a new spine:
Then I got stuck. Now that the jumbo eyelets would fit, I wasn't sure I liked them any more. :( I took a break from all this futzing and tweeted the above picture to ask my crafty tweeps for assistance. They liked the idea, but one of them suggested I didn't really need the eyelets. GENIUS! So I carefully punched more holes and wove some taffeta ribbon thus(ly):
Then we collectively decided the bow was a bad idea, so I moved it down a little and just did a knot:
Plus, this way there is an equal amount of purple showing above and below the ribbon.
She actually wants TWO of these, and they are both done now. I'll get large white mailers from the office supply store to use as envelopes, and she'll come pick them up from me so I don't need to mail them to the next town. :)
That's my story. You just never know when someone will think about you and your craft and ask you to make something special. I'm pretty happy about it! :)
In other news, I made these today:
These are Cheese Cookies, and the recipe is here. They are a perfect snack, or better yet, a savory addition to a holiday table that is heavily laden with sweets. I suggest you make them according to the recipe the first time, then enhance it the next time. I think I might add some rosemary. You could also add chopped-up jalapeno. :) These are SOOOOOO good.
That's all I have for today. Thanks for stopping by!
Short back-story: I was at the farmers market, stationed behind my tables, and a woman came up to me to ask if I'd consider doing a show in Arlington. My immediate response was No, partly because it's FAR (okay, only about 45 minutes), and partly because I didn't want to deal with the sales taxes in another state. She told me to think about it, then "stopped by" several more times over the next few weeks to see if I'd changed my mind. Long story short, I decided to do it last year, and it was a GOOD show for me ... totally worth the trip.
The show is all about Chesapeake Area Alaskan Malamute Protection (CHAAMP), though the craft vendors are free to sell whatever they normally sell. Last year I made some special cards for it, and also donated what I had left for the organization to use for a fund-raiser. And of course, I did the show again this year, too. People come from all over - even other states - to support the rescue. LOTS of dog people!
A few weeks ago, the woman that talked me into doing the show asked me to make a special card for the organizer. Seems she is responsible helping hundreds of dogs through her fund-raising efforts, and they wanted to do something for her. She likes purple (I don't) so I was asked to make it purple with lots of pretty purple papers. She also wanted it BIG, like legal-size big, but I talked her down to 8.5x11, which I actually HAVE. :)
This is my first mock-up:
She sent me a photo of a Malamute wind chime which I printed (explains the weird lines on it). I decided the color-blocked papers (
Once she blessed the mock-up (first one, too! Woo-hoo!), I realized I had no way to bind it, so I left a 1/2 inch of space on the left edge, then fit everything into the remaining 8-inch space.
Note to self: measure twice, cut once.
I punched holes with my Crop-O-Dile with the intent of using Jumbo Eyelets along the spine, and weaving ribbon between them to pretty it up. But after I'd punched the holes, I realized that the eyelets were too big:
I should have measured them before I assumed 1/2" would be wide enough. :( But that gave me a SYFY moment to share, and we know I'm all about sharing, right? :) So here is my SYFY tip #15.
I had already layered the card front with the back and stuck them together with red sticky tape. Can you say "permanent"? So I decided I needed to cover up that boo-boo and start again. I cut a strip of card stock 1.5" wide and scored it down the middle at 3/4":
Then, again with the red sticky tape, I wrapped it around the left side of the card to make a new spine:
Then I got stuck. Now that the jumbo eyelets would fit, I wasn't sure I liked them any more. :( I took a break from all this futzing and tweeted the above picture to ask my crafty tweeps for assistance. They liked the idea, but one of them suggested I didn't really need the eyelets. GENIUS! So I carefully punched more holes and wove some taffeta ribbon thus(ly):
Then we collectively decided the bow was a bad idea, so I moved it down a little and just did a knot:
Plus, this way there is an equal amount of purple showing above and below the ribbon.
She actually wants TWO of these, and they are both done now. I'll get large white mailers from the office supply store to use as envelopes, and she'll come pick them up from me so I don't need to mail them to the next town. :)
That's my story. You just never know when someone will think about you and your craft and ask you to make something special. I'm pretty happy about it! :)
In other news, I made these today:
These are Cheese Cookies, and the recipe is here. They are a perfect snack, or better yet, a savory addition to a holiday table that is heavily laden with sweets. I suggest you make them according to the recipe the first time, then enhance it the next time. I think I might add some rosemary. You could also add chopped-up jalapeno. :) These are SOOOOOO good.
That's all I have for today. Thanks for stopping by!