Pages

Thursday, September 29, 2011

Clean & Simple 159

Here's this week's Fall-to Layout (FTL) 159 at the Clean & Simple blog:

I've seen quite a few people go for this one since it's been posted, and tonight I got a crazy idea to open one of my OMG I MUST OWN THAT Sizzix dies and actually use it. This particular one is a 3-circle Mover & Shaper, and if you look at that sketch, I could see them punched twice, side-by-each.

Here's my card:

I put a piece of grid paper in the opening of the Movers & Shapers base, then it was easy to align the die piece for the second cut. And, believe it or not, I got it right the first time! (go, me!)

The top layer is popped up on Dimensionals (ha - every time I type that I think "hopped up on drugz") and the piece of music paper underneath it is from the Heaplet - 7 Gypsies, I do believe. I only wanted to use one color with the vanilla, and decided on Cajun Craze, but I don't have that color ribbon. However, I do have Vanilla seam binding and Cajun Craze ink, so I dyed the ribbon. It's very uneven, and I decided I liked it that way. :)

In other news, did you know it's Banned Book Week? That's right! You can read about it here. Go back to that pile of books we HAD to read in High School, and half of them are now banned, somewhere. I plan to start with 1984 (that's a book, not a year, but it is a book about the year 1984) and then I'll move on to Tom Sawyer and Huck Finn, then maybe even Catcher in the Rye. Oh, yeah, baby. I love being a rebel! :)

Thanks for stopping by!

Wednesday, September 28, 2011

Another Paper Smooches Inspiration

In my blurfing this week I ran across this photo on the Moxie Fab blog:

and I immediately thought of another idea for the current Paper Smooches SPARKS challenge image:

... so I made this:

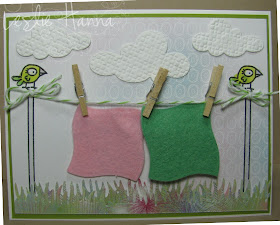
I wanted to make baby blankets hanging from a clothes line. Now let me explain a few things... Yes, we had clothes lines when I was a kid - in the back yard, the kind that were square, with many rows of "line", and it had a central metal post. We used to hang out sheets and towels, and to save space (and clothespins) (and our arms), we used to double up the corner of one towel with the next one so they shared a single clothes pin. See what you young whipper-snappers are missing? OMG, there was nothing better than getting into bed with sheets dried in the breeze. Okay, maybe they weren't as soft as the ones that came out of the dryer, but they sure smelled nice. :)

But I digress.

I used stamps from the Paper Smooches Hang Ups set for the poles and the birds. The papers are from the Basic Grey euphoria 6x6 pack (I was going for the pink & green thing again). The grass was cut with the MFT grass die. The felt was cut with Wonky Squares Nestabilities. The clouds were cut out of an embossed remnant with A Muse | Studio dies. Lastly, I thought I had smaller clothes pins, but alas, they are well-hidden in The Captain's Quarters, so these are way out of scale. ;/ However, this is ART, and I think I can get away with it. :)

Okay, okay, one more. Because that one was so busy, I went with "not busy" and wrestled with my fear of white space to make this:


The sentiment is from Pretty Phrases, and I used some Washi tape I bought in BRIGHT colors and rarely use. It's simple, and it's green and pink. I called it done.

So as much as I intensely dislike (gah!) pink I've sure used a lot of it lately. Maybe I'm over that. Or not.

Thanks for stopping by!

One Less UFO

The other day I ran across this card in my bloggy travels and decided I needed to make one like it. I usually cut the whole Top Note Die out of one color, or else I pattern the whole thing. I liked that she only patterned the bottom half.

While cleaning & purging in The Captain's Quarters this past weekend, I ran across a die-cut piece of patterned paper, so it was perfect to make two cards. Just cut it in half, cut another one out of a neutral - done!

Here's what I made:

Pretty easy, though it did take me about 2 days to decide on that flower. Sigh. Oh, and I only made one "good" one, since I chose poorly and place the flower over half the words on the second card. And no, it's glued down, so there's no moving it. Double-sigh. It was tragic, but I must move on. Please note that while her flower is gorgeous, mine can be mailed, in a normal envelope. I'm willing to make sacrifices for my art. :)

Now then, I've disappeared another UFO, and I have a few more waiting in the wings with a stack of current sketches ready to go. I'll be back!

Thanks for stopping by!

Tuesday, September 27, 2011

WOTT 09/27/2011

I thought I'd play along with this week's What's On Tap Tuesday (WOTT) where we show what's in progress on our crafty work tables. I decided to play because I now have a standing desk, and it's still mostly clean. A MIRACLE, I KNOW! Here she is:

So. Much. Space. And because it's kindof a smaller work area, my original table (cleverly out of camera shot) holds things like my Memento ink pads, stamps that need cleaning along with their associated stamp sets, etc. It's actually fairly cleaned up, too. I will say I've been putting things away more after I use them instead of just pushing them aside. Once I get The Captain's Quarters a bit more organized I'll post some full-view pictures of my new desk.

Now, about the WOT part. There are remnants here of various projects from last night. The acrylic block and sponge brush are from an experiment with glaze and reinker (also still out) that I used to paint that piece of paper on the right. I cut out a circle and that funky-looking thing on the left is the beginning of what I hope will be one of these posies. You can see an earlier one I tried next to the Copics - I'm not real happy with it.

The Copics and clothespins are still out from cards I made that will automagically post on Wednesday and Thursday. Working ahead is good for the soul. :)

Oh, there's also a card part propped up against the tools container - it is a failure since that orange flower obliterates part of the sentiment. I chose poorly with its placement. I haven't the heart to toss it yet. I may still try to save it. Maybe.

So that's it. Now go take a pic of your own crafty space and show us what YOU have in progress. :) (I dare you!)

Thanks for stopping by!

SOS Challenge #19 - B&W + One Color

This week's challenge over at Shopping Our Stash is to use Black & White plus one color (skin tones and hair tones okay). Here's my card:

I went waaaaay back into the stash to dig out this SU Night & Day paper. Hey, the card has to be black & white - no one said we have to use black paper and white paper, so I used B&W paper! They have lots of patterns which makes them way less work, and we all know how lazy I am. heh heh But seriously, with paper this pretty, why not just use it? I used black card stock as the accents and layers and a textured white for the card base.

Now, about that ribbon... Red is a very traditional color to use with B&W, but you know I'm not even close to traditional, so I avoid red on purpose. I originally wanted to use turquoise, but I think this Marina Mist satin is just fine! I will say I futzed with that bow for a while. It looks okay, but it's not anchored real well, and the loops would come undone if given the chance. So that piece of skinny black taffeta? It's another anchor across the top of the blue loop - just for a little insurance. I cut two slits and pushed the black through to the back and pulled it really tight. So no, I haven't invented anything new - I'm just trying to keep the bow from undoing itself when I'm not looking. *glances over shoulder to glare at the card*

So now it's your turn! Go dig out some black and white papers, pick a color - just one!, make a card, then link it up over at Shopping Our Stash so we can see what you've made!

Thanks for stopping by!

Monday, September 26, 2011

Playing Around

I read a LOT of blogs, both for inspiration and education, as well as supporting my friends who read MY blog. :) We won't talk about the underhanded and not-so-subliminal enabling that goes on, awakening our internal want-monsters. *ahem*

So the other day I watched this video by the very talented Tiff of iheartart and you know what? I TRIED IT! I DID! She used "glaze" and mixed it with a marker to create a tinted glaze for her papers. Go ahead and watch her video, then come back and see what I did. I'll wait ... ... (insert Jeopardy music) ... ...

Now all of that may be old news to some of you, but to those of us who got degrees in computers or Marketing or something NOT ART, it's news. Okay, here's my card:

Looks the same as another one I've made recently, and it is, with one exception: I stained the blue horizontal strip of paper. See if you can tell here:

It's very subtle, but you can see the white part is not all white, er, vanilla. I used some Claudine Hellmuth gloss gel medium and mixed it with some Lucky Limeade I scribbled on an acrylic block with the marker. It was soooo easy.

I tried it again later with the matte gel medium and some Cajun Craze reinker and it colored a lot deeper. Still crazy-easy. New skill! I need to play with this some more. Thanks, Tiff!!!

So if you still haven't watched that video, please do, and leave her some love while you're there. :)

Thanks for stopping by!

Sunday, September 25, 2011

What Was I Thinking?

Every week I print out sketches from the challenge blogs I follow, and every week I don't get to very many of them. During the Captain's Quarters purge and re-org this weekend I tossed a bunch of dusty sketches from months ago. But today I had a current stack, and I needed a sketch with a large circle element; this one from Taylored Expressions fit the bill:

Now what you are about to see isn't pretty. Nope. I almost tossed the whole thing, even though it took me hours to make. Crafting is HARD, people! Sigh. So okay, here it is:

This might also be classified as "it seemed like a good idea at the time". You see, during the purge-athon, I found this sheet of Bargello-esque ribbons I made many years ago:

This is not nice ribbon. It's the really cheap stuff that you can't tie into a bow and is only good for weaving or using in long strips across a card. I got a squillion yards of it at the ribbon outlet many, many years ago, and that might be another "it seemed like a good idea at the time" episode. Just sayin'.

Here's a close-up of the cheap ribbon thingie:

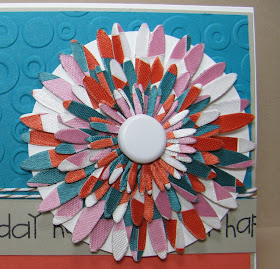
It looks nice, but it's not. So anyway, I also just finally bought the SU Flower, Daisies #2 die and thought I'd open & use it while disappearing that sheet of ribbon. Thus was born the Retro Flower:

I actually cut out two sets and stacked them so this is a very tall flower. That brad, which is huge, barely reached through the center.

I declared the colors to be SU Taken With Teal (retired) and Poppy Parade. For the neutral layer I used Sahara Sand. The sentiment is from Paper Smooches.

Here's the card again:

Yeah, a little bright, but I've disappeared that sheet of ribbon paper and I'm moving on. I have a few more salvaged remnants that need attention, so it's back to the sketch challenge stack for me!

Thanks for stopping by!

Hambo Hoedown - Operation Write Home

This week's challenge at Hambo Hoedown is to us their image to make a card for :


They gave us this pig-in-a-sub-image to use (free if you played last week and remembered to email them your card):
Since I am in the midst of a major shake-up in The Captain's Quarters (i.e.: I cleaned and organized and put some stuff away), I found some blue papers that were perfect to use for the water for my cards. Yes, I made two. Here's my first one:

I was boring and colored the sub grey. To make up for it, I added some brightly colored fish (A Muse image). The swirls are from an embossing folder. I printed the sentiment and after die-cutting it with an oval, I decided it was too white, so I cut it up. I had planned to use the heart on the die-cut oval, so I just used it instead of the "heart" word.

My second card is the same as the first one except for the blue paper:

This is a piece of card stock from one of the first SU Scrappin' kits I ever bought. Found it at the bottom of the Heaplet and decided I was too tired to put it away anywhere. I really like how it embossed, and since it's white core, this would sand up so nicely. Hmmm, after all these years, I may actually use the rest of it! We'll see.

If you want to play this week, make sure to read the Operation Write Home Card Guidelines. You can find all the details for the cards and this week's challenge over at the Hambo Hoedown.

Thanks for stopping by!

Saturday, September 24, 2011

Jingle Belles Rock #39 - Snowflakes

This week's theme at Jingle Belles Rock is to use the Suzy Snowflake song as inspiration for our cards: snowflakes, wintry landscapes, snowmen, sledding, sleigh rides... LOTS of options, so I chose snowflakes.

Let me preface this post by saying I had a minor craft room purge event today, wherein I got tired of climbing over things, and decided if it was in a scrap box that I hadn't touched in three years, I didn't need it any more. Let's just say there was a trip to the recycle center with a ton of paper and boxes. One of the boxes was rescued by one of my customers who'd stopped by to pick up her order, but the rest are gone gone gone.

I tell you this because along the way I re-discovered all sorts of "things" that didn't get purged. Things like packages of rub-ons I thought I'd "lost", but I knew they were just in a safe place. *wink wink nudge nudge*

So here's my card:

The GOR-JUS paper is from Webster's Pages, and I was enabled to buy it when Lisa (Papergrace Designs) used it on a card earlier this year. The seam binding and red layer are SU Rose Red. The shiny sparkly snowflake was die-cut using an SU die and SU Silver Glimmer paper. The red bling in the center of the snowflake is from a bag of bling discovered along today's cleaning journey.

Did you notice the stickers I used? Look below the ribbon:

Even the "Let it snow" stickies have snowflakes in them! hee hee BONUS!

I need a hot bath now. Cleaning is hard work, and cleaning a craft room is even harder, which is why I almost never do it. The Heaplet has grown a bit, but I plan to use that stuff first. It's so old it's new again! :)

Thanks for stopping by!

Friday, September 23, 2011

Gettin' Sketchy

Tonight I actually had a plan, which is highly unusual in my world, especially on a Friday evening. You see, today I saw this inspiration piece on the Paper Smooches SPARKS Challenge Blog:

and it inspired me. Yes, I know it's (gah) pink, but just hang on a sec, k?

Then I saw this sketch over at Create with Connie and Mary:

and the plan came together. I would use up a bunch of my pink and green Basic Grey scraps remnants and use Paper Smooches images to qualify for the challenge. Since I have a whole lotta Paper Smooches stamps that don't see enough love, my evening was set.

I may or may not have gotten a little carried away, but I made three cards. Let's get this show started!

First card:

The Basic Grey papers are from the out of print 6x6 pack. The stamped images are all from the Paper Smooches Hang Ups set. I am particularly proud of the squirrel; his fluffy tail is popped up on a Dimensional, and it's covered in brown Flock. I have a love/hate relationship with squirrels: they are varmints and have wrecked every bird feeder I have ever owned, but then there's those fluffy tails ...

That sun was cut from some A Muse | Studio felt, and it hides an unfortunate schmear that happened AFTER assembly. :/

Next card:

These Basic Grey papers are from the sweet threads 6x6 pack, and the stamped images are from Hang Ups (branch) and Birthday Buddies (bird and sentiment). For this one I stamped the bird on the white piece and also on another scrap remnant of paper from the same pack and paper pieced him. (I think he's a little tipsy.)

Last(ly) we have this:

A MONSTAH! These papers are also from the Basic Grey sweet threads 6x6 pad, and the stamped images are from the Falling For You set. This one got a little heart border punched with the SU Pinking Hearts Border punch. The three hearts next to the monstah are from the border punch-outs. Sooooo tiny.

Not bad for a Friday night, eh? I usually have craftastrophes when I stamp after work on a Friday, but I'm pretty happy with all three of these.

I'm off to link these to the challenge blogs. Thanks for stopping by!

Redux on the Redux

It doesn't pay to be efficient. Or else I need to get better at technology. You'd be hard-pressed to tell I'm technical in my Day Job after I tell you what happened. ;/

You see, I found a link that was VERY cool, and I wanted to share it with you, my beloved 3 (maybe 4) readers, so I copied some information into a blog post and SAVED it. Last night I completed the post with a related project and PUBLISHED it, thinking it would end up at the top of the heap based on the PUBLISH date. Nope, it's buried based on the DRAFTED date.

Let this be a lesson to all of you.

So the blog post is here, and you really should read it - it contains a most-awesome tutorial (done by someone else).

Thanks.

Tuesday, September 20, 2011

Jingle Belles Rock #38 - Hybrid

This week's Jingle Belles Rock challenge is to make a hybrid card. For you non-stampers out there, that means a combination of a digital/printed/computer-generated component plus "real" stuff like paper and ribbon. I've technically been doing this a LOT since I have a bunch of digital images I use on my cards, but to make a holiday card? That was a challenge! :)

Since cards have to be posted by 6 pm Wednesday, and I'm not home by 6 pm on Wednesdays, I have to get my card posted by Tuesday night, which is TONIGHT! *panic set in for a while there* So I thunk and I thunk and I finally decided to use a Hambo image of Drooly and some retired SU papers to make this:

The layout is based on last week's Sketchy Thursday at Eat Sleep Stamp:

I colored Drooly with Copics and used glitter pens for his tag and drool. His hat is an A Muse image I stamped onto both red and white felt (from A Muse | Studio) and also onto a scrap of paper. I cut out the hat felt parts-is-parts and glued them to the paper image, then stuck the paper image to the card with a dimensional. Believe me: in my world, this was easier than anything else I could have tried.

Oh, and the sentiment? I actually have a stamp that says that, but it's gone missing, so I had to computer-generate the sentiment, too. :/

Did you notice this is week #38? THIRTY EIGHT WEEKS of at least one card per week = over 40 holiday cards DONE, and only 10 - TEN - more challenges to go! EEEEP! Hard to believe! What's even more difficult to believe is I'll have enough cards to fill a whole rack with one-of-a-kind holiday cards for my craft shows this year before the end of November! SQUEEE! Yeah, I'm pretty pleased with myself, I am. :) So why don't YOU stop by over at Jingle Belles Rock and join us? It'll be great fun!

Thanks for stopping by!

SOS Challenge #18 - No Coloring

This week's challenge at Shopping Our Stash is No Coloring! In the words of our leader: put down the Copics and prismas ... think of dragging out your colored ink pads and/or sentiment/quote stamps for this round! Or how about stamping an image and NOT coloring it in? Use your imagination along with your neglected stash!

For my card I chose to do paper piecing:


I love this Hero Arts stamp! I stamped it three times on white, then once on each of three coordinating papers, cut out the birds and voila! Three cards! The sentiment is from A Muse.

I did have a minor craftastrophe, though: my Memento Black ink is drying up, and I've er, misplaced the re-inker, so I opened and used my Memento purple. This, in turn, forced me to use papers with purple in them, so I chose Basic Grey euphoria. Unfortunately, they also have a lot of (gah!) pink, so I used SU Bashful Blue as the bottom layer to break it all up.

No coloring. None.

So there you go! Now it's YOUR turn. Go make a card with NO COLORING, then link it up over at Shopping Our Stash so we can see what you've made!

Thanks for stopping by!

Sunday, September 18, 2011

Doily Card - Redux

One of my peeps came over for a crafty night last night after work, and we used the last 2 kits from my September Stamp Camps. During the inevitable chatter, I showed her a cool trick I learned watching this video by Patty Bennett and told her I'd planned to blog about it to share the love. Well, then, believe it or not, I stamped one of my sentiments crooked, and she said, "Why not use that cool punch thingie as your cover-up?" so I did! Lookie:

See that mini shape on the bottom right? I made it with the Decorative Label Punch! It's so easy! Go ahead and watch Patty's video because she did an EXCELLENT job of explaining things, and it's only 2+ minutes long.

It's so cool because it not only uses a punch that a bunch of us already have, but it's a great alternative to the Word Window Punch for all those Teeny Tiny Wishes sentiments. Plus, it will fit a lot of other sentiments, like the one she used in her demonstration! Gotta love a good multi-tasker! :)

I hope to get to stamp something for a few challenges this weekend, so I should have something to share. :) Thanks for stopping by!

Not Big On Pink

Most of you know by now that I'm not big on pink. Imagine my joy when I saw the challenge over at Our Creative Corner is Not Big On Pink. HAHAHA! It's like they were calling my name! In their words: ... for this paper craft challenge, I want you to use any shade of blue, and just a touch of pink. If you need a number, think 1/5 or less in pink. You must also incorporate some texture, (i.e.: fabric, ribbon, floss, etc) and a metal piece (i.e.: brad, push pin, charm, etc.). Make something pretty without going over the top in pinks! Um, okay, no problem!

So I made this:

I'm still in love with these SU Beau Chateau papers, and I still have a bunch of them, still out, so the blue part was easy. I went with my latest go-to seam binding treatment ("treatment" - HA! I crack myself up) but this time I used one of my hoarded and "now WHY did I buy these?!?!" (gah!) pink brads from SU. The sentiment is from my go-to Paper Smooches set of most-excellent sayings.

So I think I've got all the requirements: Mostly blue, just a little pink, texture (seam binding) and metal (brad).

Now if someone could please explain to me how it got to be Sunday evening, I'd appreciate it. I need to go craft some more to try and forget that tomorrow is ... dare I say it ... no, I can't ... I just can't. Sigh.

Thanks for stopping by!

City Crafter + Paper Smooches SPARKS + Random Acts Sketch

This card is a three-fer - I used input from three challenges to make one card. And yes, my brain is tired from keeping it all straight. :)

It started when I saw this bracelet at the new Paper Smooches SPARKS blog:

which gave me the color inspiration. I then chose this sketch from Random Acts of Creativity:

and the theme of "hearts" from City Crafter Challenges:

and out of all that I made this:

I love the colors in this DSP, and they worked with two of the colors I wanted to use for the hearts, so it was poifect! Here are some details on what's in the card:

Stamps - Verve
Papers - Domestic Goddess DSP, Calypso Coral, Pool Party, Peach Parfait, Lucky Limeade, Basic Black, Whisper White
Accessories: SU small heart punch, SU Scalloped Heart of Hearts embosslit, SU Large Oval punch, SU Scalloped Oval punch, MFT border die, SU pearls, SU Calypso Coral Ruffled Ribbon, SU white baker's twine, staple

Yes, I added the ribbon element in the upper left, and yes, I used a staple to hold it there. The card seemed to need something, so I took the liberty of adding it, and the stapler was out, so, well, you know ...

Okay, off to craft some more! Thanks for stopping by!

Card Patterns + Play Date Cafe

Today I combined this sketch from Card Patterns:

with this color challenge from Play Date Cafe:

and made this card:

I wanted to use just a light purple with yellow, but this was as close as I could come - Basic Grey wisteria papers. I stamped a sentiment from SU's Perfectly Penned set with Memento purple ink onto another piece of paper from the wisteria papers and cut it out with my Petite Ovals Nestabilities. The border punch is from Martha Stewart, and the brads are Basic Grey, and may even be wisteria - they certainly match! The card base is from a pack of Bazzill cards & envelopes I bought years ago and have never even opened. (go, me)

I'm off to link this up to the two challenges, then I'll be back with a three-fer!

Thanks for stopping by!

Friday, September 16, 2011

Sing Your Art Out

Welcome to "Sing Your Art Out" sponsored by Hambo Stamps! Today Hambo friends, customers, and the Bacon Bits Design Team (Bacon Bits - I love that!) are bringing you fun creations that depict song titles! It might be our favorite song, or just one that was fun to design. If you arrived here from Marcie's blog you are in the right place! If not, you might want to start back at the beginning at the Hambo blog to make sure you are eligible for the hopper prize!

A prize will be awarded to one participant whose song-themed creation tickles the Bacon Bits’ fancy in a singin' wingin' way! Another prize will be awarded randomly to a hopper who comments on all the blogs along the hop. The winners will be announced on the Hoedown blog, as well as on the Hambo company blog, Talk to the Ham, on Wednesday, September 21.

My creation had to cook in my brain for a while. I got a clue when out of nowhere, one of my tweeps linked to Van Morrison's "Moondance", and an idea was born. Once I had "moon" on the brain, I knew I could do this! This would also work for "Fly Me to the Moon", or Cat Stevens' "Moonshadow". I could milk this. I could. But I won't.

So here's my moon-inspired card:


I used the Hambo moonscape image, turned it upside down and had it shining down on the Earth. Yes, those trees and "grass" are supposed to depict the Earth. In a brainiac moment, I thought I could sponge a moon beam, and I think it looks okay, though it may be in Los Angeles - you know, dirty air? I used SU Going Grey for the center and Basic Grey for the edges (dirt). I went back and added some So Saffron to the very center of the "moon beam" to make it look less ... grey. Then I went back over the grey with some blue. I need to learn when to quit.

For bonus points I added some flowers from last week's Hambo Hoedown digi. The right side of my card needed something, and the left-over printed images were just sitting there in my UFO pile ... you see, I really had no choice. None.

So hum along now ...

It's a marvelous night for a moondance,
With the stars up above in your eyes,
A fantabulous night to make romance
'neath the cover of October skies.


You're welcome for that ear worm. Now hop on over to Pat's blog for another great sing-along song!

Thanks for stopping by!

PS: Yes, I know the top corner is cut. No, I don't want to talk about it.

Thursday, September 15, 2011

Hambo Hoedown - Home Is Where ...

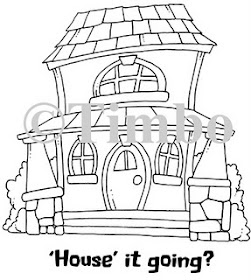
This week's Hambo Hoedown image (free if you played last week and remembered to email them your card) is this adorable house:

I immediately saw a Dr. Seuss house. :)

This week's challenge is to incorporate something from around the house that you don't normally see on a card! Um, well, I kinda stretched this a bit, and used something you won't normally see on one of MY cards. First, here's my card:

See those trees? They came from this household object:

Yep - a tissue box. So I guess my title would be "Home Is Where The Tissues Are". :) Now, I know a lot of crafters that would say this is a "normal" item to incorporate into a card, but not in my world. I just don't ever do that, unless someone challenges me to do so. I thought the pattern on this box would make cool trees for the Dr. Seuss house, so that's what I did. The strip of grass behind the house is a piece of the flap that I ripped off the side of the box. It's jagged and I think it's perfect. I also used some of the blue dot thingies. Please don't ask me what they represent, because I honestly don't know, but I do think they look cool there.

Other stuff I used: SU sentiment, SU Pacific Point card stock, A Muse Studio cloud dies, and ribbon from my Every Color of Green and Blue Ribbon But The One I Need box. Oh, and both SU markers and Copics for coloring.

I'm now going to link this over at the Hambo Hoedown, and email it to them before I forget. :)

Thanks for stopping by!

Tuesday, September 13, 2011

Jingle Belles Rock # 37 DECK the Halls

This week's Jingle Belles' challenge was DECK the halls! We were asked to incorporate a "card" into our card:

make a freestanding (2.5 x 3.5") xmas-themed Artist Trading Card
OR
add an ATC-sized element to your holiday card
OR
incorporate a playing card into your design
OR
use a recycled xmas card (or an element from
one!) on your (newly made) holiday card!


So many options. So many. And believe it or not, I just a few weeks ago ordered a mini deck of cards, but I was stumped as to how to incorporate it into a holiday card, so I didn't. Instead, I went with an ATC-sized piece of something-something, and after 4 or 8 false starts, I ended up with this:

DO NOT ask me what happened here, because I'm still trying to figure it out. What possessed me to go with acetate for the base?! WHAT?!?! And it's the thick stuff, so it is very stiff and weighs about 3.7 pounds. The ATC element is the piece of SU flocked red&white DSP. The piece of striped flocked paper under it is from the same pack of hoarded and unloved papers.

The acetate base is 5" square, and the front square of DSP is 4", so I could slop over the other elements onto the clear parts of the card front. I put the red piece at an angle, then added the two green die-cut pieces to get them off my table. Same with the lace - it was left over from something else, and it looked like it would work, so I used it.

The flower + snowflake + snowflake brad add a circle element with all that horizontal and vertical stuff. I was stumped about what to do for a sentiment, because I didn't want to cover up the center of the red ATC thingamabobber, so I went with a die-cut piece of vellum that I stamped with a Paper Smooches sentiment. Ever-challenged with adhering vellum, I used a MS glue pen and glued it to both the green flowers. There's not much holding it on! :)

That's it! I declare it "finished"! Now watch: next week's challenge will be to make an acetate card base. :)

Thanks for stopping by!
SOS Challenge # 17 - Shabby Chic, Distressed or Vintage

This week's challenge at Shopping Our Stash is Shabby Chic or Distressed or Vintage. --> Do you have a plethora of Tim Holtz supplies longing to be used? Or how about some vintage findings, or shabby chic trims? Dig out your vintage-themed papers, stamps, embellishments or go shabby chic. Or you can just distress the edges of your papers!

Well, most of you know by now I don't have the vintage gene, and I couldn't tell you the difference between "vintage" or "shabby chic" (pron: sheeeek), but I have a huuuuuuuge collection of goods from Webster's Pages, and they know vintage, or is it shabby chic? ;/

So here's my card:

I tried about 4 different things before I just gave up and let the paper be the focal point. No matter what I did, it covered up those pretty clocks, and I wanted them all to show. Ergo, I opted for lace since it's see-through. The top two laces are from my Webster's Pages haul, and the bottom piece of lace is from this roll:

Yes, it's a lot. It's kindof stiff, so it won't do much but lay there, so it was perfect to add to this card. Only about 2 miles of it left now ... The vanilla seam binding, antique brad and Blue Bayou card base are all SU.

Now go into your stash and find something vintage-y, or shabby-sheek-y, or distressed, or make it look distressed, then make a card with it and link it to this week's Shopping Our Stash post so we can see what you've made!

Thanks for stopping by!

Saturday, September 10, 2011

Happy Holidays?

Yes, I know it's not even Halloween yet, but I decided to include a Christmas Card with this month's Stamp Camp projects. Just because. I mostly CASEd this card by Jan Tink, but of course I made a few changes, just to make it my own. Here's mine:

I used the same papers (Frostwood Lodge) from the Holiday Mini - I think it's brilliant how she got 4 different patterns in there with tiny strips of each. I would have been loading this thing up until it weighed 3 pounds. ;/ What I changed: I don't have that snowflake die* (yet), so I used the Northern Frost Sizzlit Decorative Strip die and cut just one from some of the Silver Glimmer paper. It's a really detailed die, and the paper is kindof thick, so I didn't bother punching out the little bits in the center - just around the outer edge:


Something else I did differently - I added a piece of the velvet ribbon to the bunch, and put a rhinestone brad around all of it and put that through the snowflake to hold it in place. Last month The Ladies had such a swell time with the brad-around-ribbon thing I thought I'd hit them up again with it. :)

That's project 4 of 4, so now it's time to cut the card stock and make up the kits. I have a few more things up my sleeve, and if I get my act together, I may even get to make them today. Wish me luck! :)

Thanks for stopping by!

ETA: She used the snowflake punch, not a die, and yes I have it, but I just broke it, so we still won't be using it tomorrow. ;/

Friday, September 9, 2011

Hambo Hoedown - Fall Colors

This week's Hambo Hoedown image is this cute bunch of flowers:

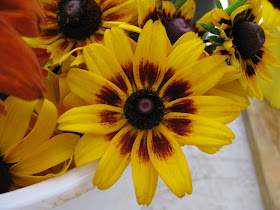
Our instructions were to use this image to make a card using "Fall colors", whatever that meant to us. Well, one of the things I love about fall are the sunflowers and Gloriosa Daisies at the market. Like these:


Another influence was a photograph of a whole field of sunflowers that our resident photographer sells. So, based on the glorious coloring of these Gloriosa Daisies and the "field of flowers" idea, I made this:

I split up the image and printed the two bigger flowers a LOT, colored them, then cut them out. Yes, I did. Ow. But I think it was worth it. I really like how this came out. :) The sentiment is from an MFT set, and the clouds are cut with an A Muse Studio die set. (I love how tiny they are!)

And yes, I know, I need to work on my blending skillz. I told you stamping on a Friday night after a loooong week at work was not the best idea I've every had. I think I'll take a Copics class, and soon!

Alrighty, then, I'm headed over to the Hambo Hoedown blog to link this, then I'll email it so I'll get next week's image, then I'm going to bed. I need my sleep so I have the strength to stamp some more! :)

Thanks for stopping by!