Pages

Monday, March 31, 2008

A Card Is Born - Part 1

It is official: I am a business. No, I still have not made any money, or more truthfully, I have not taken in more than I have spent. BUT, I did just buy Commercial insurance. COMMERCIAL! I am now officially covered for when people come over for classes, or if someone trips at one of my Farmers Markets and lands on my table, or if my car is in an accident (with or without me) and my stuff is damaged. I feel so good now. But I'll need to sell something in the neighborhood of 50 more cards to pay for it. Whine, whine, whine, I know. Maybe I'll get my Online Store going. Right.

My card for today is an example of the card evolution process. If you are a stamper reading this, you already know this stuff, so you will probably be bored to tears. If you are not a stamper and you are reading this, first let me say THANK YOU, and you will hopefully see that this whole card creation thing is a labor of love. (Actually, THANK YOU to everyone who is reading this. Really!)

One of the take-away, partially-finished cards I made at Sunday's get-together was this piece of very pretty paper on which I had stuck a scrap of brown textured card stock.

The paper is very "artsy" and old-looking, and poorly photographed, and I saw a lot of potential with the green and blue and brown dots. I just KNEW I had card stock and ribbon at home that would match it and make it complete.

I started with my Papertrey box o'stuff that is still out and needing to be used up. These were actually the two colors I had in mind when I thought I had something to match.

I took out the Moss and Aqua satin ribbons, put them on the paper, and did one of those hmmmmm things where you tilt your head to see if it looks any different (it never does, it just looks crooked.) I opted for the Moss, though the Aqua does have potential. I thought the Moss looked better with the brown.

Next decision: Satin or Grosgrain? Since the look was "old", and the brown scrap had a rough texture, I went with the grosgrain.

I know some people would not have these dilemmas, as they would either have only one of the colors, or only one of the textures, but nooooo, not moi. I had to get them all. Sometimes I think if I had less stuff this would be a whole lot easier. .... .... Nah, don't think so. :-)


Put it all together and you have .... a half-finished card. This is where I usually get stuck in the creation process. The papers and ribbon look great together, then what? Then, my dear readers, I do one of two things. Sometimes I set it aside and look at it for a few days, or else, as I did today, I head on over to StampingCritique.com. No, this is not a commercial, but I do love that site. Most of us do get stuck at some point and just need some constructive suggestions for all those questions rolling around in our heads: Wrong colors? Should I have gone with the Aqua? Too busy? Not busy enough? Ribbon too wide? Needs brads? Needs another layer? Speck of dirt in this photo? Whatever - you will get lots of great feedback there.

End of Part 1. Once I get some feedback, or stare at it for a few days, or maybe get a good night's sleep, I'll think on it some more and finish the card and post the final result. There will probably be some in-between versions, too, so stay tuned. Oooh, did I just create a cliff-hanger? Yeah, like you were hanging on my every word...

To kill time and use more bytes, I thought I'd share something I learned today. I now bring you: Blogger trick du jour. One of the things that makes me crazy about Blogger is the time it takes to edit the durn thing! Yeah, I know, it's free, so you get what you pay for. One of the more irritating things is uploading an image after you have already typed some text. The image always appears at the top of the post, then you drag it to where you want it. This is fine by me! But once you do that, you get a lot of extra mystery space between paragraphs, and you might even end up with so much blank space that you think your next sentence rolled off the face of the earth! This is where I spend a lot of time - reformatting a post to eliminate that unwanted space.

Today on SCS I learned how to fix that! Once you do your initial post creation, and it looks pretty good, go into "Edit HTML" mode and type an open div tag as the first line in your post and then type the close div tag as the last line of your post. For those not conversant in the ways of the Web, here it is in writing:

The first line (which I cannot actually type in the context of the blog or it will mangle the whole post) is the "open div tag", and the last line is the "close div tag". Enough techno-babble.

These two tags effectively wrap your whole post in a snug blankie so any more editing you do will not skew your previous content beyond recognition. I love learning these sorts of tricks!

I also learned that if you run the washer so you have clean clothes for tomorrow so you can go to work, you need to remember to put the stuff in the dryer. Sigh...gotta go be domestic now. Hopefully I will figure out how to finish that card in the next few days and I'll show you how it ends up!

Sunday, March 30, 2008

Busy Sunday

I spent the afternoon with several fellow stampers creating birthday cards. We get together once a month and this month's coordinator decided we all needed a collection of birthday cards, and now we have them! The interesting thing about these get-togethers is experiencing other people's stashes. She had brought along paper, ribbon and stamps, and since I brought her latest Stampin' Up! order to her, we also used her Photo Corner punch. And that punch turned out to be the theme of the day!

Here is a sampling of some of the cards I made:

I have always had to take a second look at cards that use the Photo Corners in all four corners. At first glance it looks like they cut the paper really neat, but that's when I see the photo corners. So today it was my turn, and I went to town! I really like how this one came out!


Somewhere along the way I took a break and dipped into the stuff I'd brought with me - all Wild Wasabi. I have the Hostess Set Prints Pack and have never used it, so I brought it plus some Wild Wasabi card stock and ribbon. I could get into one-color cards! This one was too easy! (No corners on this one - it was spared.)

Oh, I did sneak in my It's Your Birthday set because I just knew I'd need that horizontal sentiment. ;-) I shared.

The idea for this one was stolen completely from one of the other ladies. I just stamped the sentiment on this pretty paper, and when I got home I mounted and embellished it. Notice I continued the Photo Corner theme. It just worked, ya know?

This card was a total accident. I had a piece of pink-and-blue striped paper in my hand, then I picked up the piece of pink argyle and tried to put them together. Then the green striped piece distracted me (I love green) and this is what I ended up with. The sentiment is from a set of vertical sentiments our gracious hostess had on hand (sorry, I forget the company...) I added the ribbon when I got home.
I have a bunch more, but these were my favorites (and they were finished.) All in all, a very productive day.

Oh, on the scary side, I may be going to the Offray ribbon outlet very soon. It's only an hour away, I drive past it every time I leave Maryland for points West (which is a lot), and in the five years I have known about it I have resisted going ... like I need more ribbon! But alas, April may be the month I cave. More on that as we get closer to The Day.

Saturday, March 29, 2008

A Flurry of Activity

It is Saturday, and I am in my usual flurry of creation. First I set some must-do activities for myself... move some IRA money around, fill in the deposit slip for some checks, do some insurance paperwork ... you know - stuff. Once that was all done, my reward was to play!


I am proud to say I used a piece of ribbon that has been sitting on my table for far too long! When I first took it out I thought it was green (I love green), but alas, it is a bright yellow and blue so it just looked green. Bah, I said, and tossed it aside. Until now!

These cards are also a bonus, because not only do I use one of my new stamps, but all the cards stock except the card bases are scraps. Double-yay! And the brads are from the same pack I used for my dog cards; they are just about half gone. Now all I need to do is figure out a way to use up the purple ones. Another day, another day.

Here's a close-up of the sentiment. Love her!


Then I tried a few different things with my Whine Journal cover. I replaced the paper flower with a punched jobbie; I printed the sentiment on the computer. I like that I can pick a font and change the look of a sentiment any way I want. I am such a control freak.

I am not sure if that ribbon will work if I also use Jumbo Eyelets as a closure for the book. I'll keep playing with it.

For this version I changed the printed message under the the title since I thought it sounded more whiney. The original Wine (without an 'h') Journal says "Because life's too short to drink bad wine." which is how the original Whine (with an h) saying came about. This new one just seems more appropriate for a good whine.

I also spent some time playing with the binding aspect of the book. Turns out my friend no longer has her RubiCoil, so I am trying to get better with the tools I do have. I have not bound any more, and I will not until I think I have a saleable version or two.


Then, on a break from the action, I did some blog reading and I found this item on Heather's blog: Is this a mumu? First, I had to laugh because I have not heard that word since I was a little kid! We had a neighbor that wore mumus all the time, and one year for Halloween my Dad wore one when he took the usual passel of kids around house-to-house. What a hoot! Anyway, I was impressed with Heather's variation of Lauren Meader's Onesie that I also did in an earlier post, so I had to go off and try it and then make it my own.


Here's my first pass, and it is sooo not "me". It's got flowers, and it's turquoise! I used two flowers from Stampin' Up!'s Fabulous Flower set, inking the larger one in Tempting Turquoise and the smaller one in Taken with Teal. The belt is a strip of Turquoise card stock and I just tied a small knot in some turquoise ribbon to make it look like it was a tied belt.

The one on the left was my attempt to make a square neckline. Unfortunately SU does not have a scalloped square punch, so I used a Marvy one. But the one on the right is all SU and therefore may find its way to a class one of these months. You just never know.

Next I tried it with Barely Banana textured card stock. Love it! I also used up - USED UP - that piece of ribbon from my stash. Yay! Baby steps.

It still needed something, so I had A Moment and thought to use the flourish from the retired Noteworthy set in my Glue Pad that I almost never use. I did that because I wanted to use the green SU Fine Cosmo glitter to tie in the green in the ribbon. I really like how it turned out!


These are the two yellow cards side-by-each. I decided to round the corners of the shoulders to make them more feminine.


And this is my attempt at "a little black dress". Not so sure I like the ribbon belts, but they were really boring with nothing. I used Stickles to make "gems" near the neckline. Eh ... I'll see if they sell. I will have to make a template for a piece of white for the inside. Later.

Moving on, here is another one of my new stamps. I am also trying to use my Papertrey shipment of paper and ribbon so I have less to put away next week. There's gotta be a plan in there somewhere ...

I am getting better, I think, with pairing the two greens...they at least offend me less and less. I got lucky looking for brads to use in the bottom corner. I thought I had some white flower brads I could use up when I discovered a pack of retired SU floral brads that had a color that looked like it matched the Papertrey Moss. They were Barely Banana, but I think they look great! And I only mangled two pieces of card stock before I got them aligned. They are not quite straight (surprise!), but you will also notice I only used two, not three. I decided to stop while I was ahead!


And here is a closeup of her shirt, which is the whole point of the card. I laughed out loud when I saw it and I had to buy it!


That's all for tonight. I think I need a break and will go to bed and read for awhile. Tomorrow is another day!

Friday, March 28, 2008

Whining, Irreverence and Drunken Pot Roast

Yep, those three phrases pretty much sum up my Thursday. 'Twas quite a day! I think I will address the topics in reverse order from the title of the post, too.

Drunken Pot Roast, you say? A total spur-of-the moment thing, as are most of my Kitchen adventures...there is just so much "planning ahead" I can tolerate. Last weekend I decided I needed to make a pot roast this week, so I bought a hunk o'beef (sorry to any non-carnivores out there), some carrots, a few taters, an onion - you know, the fixin's for a Crock Pot stew. I generally do not eat much red meat - like once a month - so I must be low on iron. Hmmm. Anyway, Thursday morning I decided it was finally time to slice and dice, and I got everything cut and in the crock pot, all ready to go. I added my water, then I remembered I usually add some Burgundy for flavor, and is it ever m-m-good that way! But alas, no Burgundy was to be found. No red wine, for that matter, since I do not drink red wine. I had some white on hand, but the bottle was not open and that sounded like work. Right next to the white wine is an open half-gallon of Tequila. (That is a story in itself, but for another day.) As The Mind Turns ... Tequila ... Pot Roast? ... aw, what the heck! In it went!!! I have to tell you, that was one yummy Pot Roast!

Okay, on to stampin' stuff. As I revealed the other day, I am the proud owner of eleven new stamps, ten of them irreverent. Since I actually made all the red cards I had planned to make, I celebrated by breaking out the new stuff. So here we go!

First up - something for dog lovers. One of the other vendors at my summer Farmers Market wanted to know why I had so many cat cards and not so many dog cards. I told him it was because cats are so much easier to make fun of! He told me he'd buy any - ANY - dog card I made, and that sure sounded like a challenge to me! True to his word, he would check back every week to see if I had any new dog cards, and he did buy them!

So when I see a stamp like this one, it goes into the shopping cart. This is a bonus card for me as, except for the card base, all the materials are from my stash! The papers are from a Dog Kit I had to have (to go with the Cat Kit I also had to have), and the brads are part of a lonely collection that just needed to be used. Isn't he sweet?


Next up are the irreverent sayings. All of these cards follow the same layout because, well, basically I am lazy, and after a day at work the ole brain slows down to a dribble, and, well, it worked. I like how it makes the sentiment the focal point of the card, and that's the whole idea, anyway!

The lady is Sassy Suzie from Stampin' Up!. I love her, but stamping the whole image with her sitting on a chair means soooo much coloring. I saw someone on SCS had done something like this - where she just inked and punched out the top part of the image. I wanted a little larger circle to get all her hair, but that is the one size punch I am missing in my Marvy collection, of course. So I tried the 1 3/8", and it is passable. And Suzie is much easier to color this way!

The ribbon is from one of the SU Ribbon Originals I had to have but never use. Use 'em up, use 'em up! Yes!


Same layout, same colors, same ribbon, different sentiment.


Same layout, different colors, different SU Ribbon Originals, different sentiment.


That card base is really Creamy Caramel...just blame the photographer.


Ditto.

(See that blue handle behind the card? That is my Bind-It-All. I am now officially double-parked in the tools category with the Bind-It-All on top of my paper cutter.)

This is the last irreverent saying for today. The remaining six stamps have images with the words, so my next project will be to make mock-ups using them.


Before the next photos, a short story is in order. Last summer I decided to see if I could make wine journals. All the wine stores sell them, and I know people who keep detailed records of what wine they had, where, with whom, and what they thought about it (the wine, not the with whom). A friend of mine had just purchased a RubiCoil and she said I could use it any time I wanted, so I had the binding part all figured out. I worked on the book idea for a while and finally made up a Wine Journal mock-up or two. Then I never made any. I even sent away for some special Laura Ashley grape vellum to use as page separators! I still have all that, somewhere, too. If I stumble across one of the original mock-ups, I'll post it for posterity.

During this development process, my friend with the RubiCoil was having a hectic summer, and I got a nightly call that allowed her to let off some steam, and the stories were pretty amazing. One day I told her she should write this stuff down in a journal, because it would make a good book! The next thing I knew, I had re-printed my Wine Journal as a Whine Journal. Each page had a Rant Du Jour title instead of the Country of Origin and With Whom entries. Sooo, this year's version of that journal follows:


Okay, I know, it still needs work, a LOT of work. In fact, if I could, I'd rip off that flower, but it is hermetically sealed under an oval, not round, epoxy thingy. And it is a real, dried, flower (from the stash) so it would fall apart anyway. It's a mock-up, so whatever. I really need to get some big round epoxy thingies.

This is made from two coasters (from my stash, of course), covered, punched with a Bind-It-All, sporting a too-big coil (but the first one I used was too small)...like I said - needs work.

The eyelets and ribbon, also from the stash, were a last-second thought, but I think they add a little something to the effort. By the way, the larger hole punch on the Crop-O-Dile is not large enough to take the SU Jumbo Eyelets. Paper is forgiving - chipboard, not so much. I had to punch a few extensions to the original hole to get the buggers in, but that was all covered up nicely when I set the eyelets.


This is the inside. A miscellaneous piece of purple paper covers the inside of both coasters, and I printed the same cover title on the first linen paper page. And yes, I punched all those page corners to round them. I think it looks better that way, but it is a lot of mindless work.

Perhaps this has potential if I dress it up a little, maybe put in some pretty paper dividers or something ... I dunno. I thought being so small it might be a good, inexpensive gag gift for someone to buy along with a card. I'll probably play some more with this idea. What do you think - am I crazy. Wait - don't answer that. Do you think this project has merit? Inquiring minds want to know!

Wednesday, March 26, 2008

Not A Pretty Sight

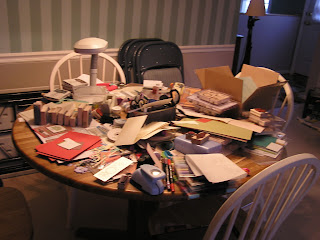
I guess it's been about two weeks since my last workshop based on how my table looks. I got out of bed this morning, walked out into the other room and saw this:


The first word that came to mind was "Ugh". Then I turned around, took my shower, and got to see it again on my way to the front door. Ugh, again. I just kept walking.

But when I got home tonight and looked closer, I really have been busy! And I've even made some progress. No, really! Check it out!

This little pile of card stock is a staging for my next task. I rescued the stack of card stock from my cut-but-never-used-so-it's-left-over workshop kits from many years ago, and I'll make six more of that tree card. Why six? Because that's how many pieces of the brown patterned paper I could cut out of the remaining piece. Very scientific how I do this.

Oh, and those pastel-colored scallop pieces on the right? Those are left over from my batch of Baby cards, and, well, I cannot seem to toss them. I just might need them some time, ya know? If they are still there when it comes to Clean Sweep time for the workshops, they might get tossed then, but not a moment sooner!

Er ... um ...right next to that project is a stack of eleven (yes, eleven) stamps that arrived on my doorstep today. They are all ready to use, but not until AFTER I make the red cards. Each one of those stamps is more irreverent than the next, so I hope to get to them this weekend.

Yes, I know they are taking up space on my work area, but so what. It should make me work harder so I can get to USE them.


This is an example of how bad the table is right now. See that acrylic block (carefully balanced on the lamp base since there was no where else to put it)? See how I have that small sentiment stuck to the very large block? That's because somewhere on that table, under all that stuff, are my smaller acrylic blocks. I may not find them until I clean up for the workshops.

By the way, I made my boys some cookies (good, college food, ya know), packed them up in boxes, threw in some oranges (to make up for the cookies), and decided I should include a card. So that stamp is out to make them each an "It's A Thinking Of You Cod". No, that is not a typo, so forget it.

Okay, just to show you that all is not lost, I really WAS working on stuff over there. First up is a Flap Fold Card from this week's SCS Monday challenge. I started making it according to their directions, then I took off on my own variation. The template provided to us makes a square card, and I wanted to see if I could make it as a 4 1/4 x 5 1/2. I tried.

This is the front of the card when it is folded. I used that purple flower paper I had out the other day, and this is why I like SU so much: I had a heck of a time finding purple card stock to coordinate with the patterned paper. I ended up using Perfect Plum, and it is okay. But the ribbon is Eggplant, and it is not so okay, but it's close enough for right now.

I used the retired Fancy Flexible Phrases set again for the sentiment and the flourishes around it. I like how that came out.

The original pattern had you score and trim an 11" piece of card stock. Since I wanted to make mine 5 1/2" tall, I needed a piece of card stock larger than 11, even larger than 12, so I was reduced to piecing. Piecing, as you may know, requires a lot of "hiding" for the seams. I cut two pieces and had them meet in the middle of the back of the card.

Here is a shot of the outside of the card, all stretched out, with cheesy lines and arrows.

The top part of the card in this photo is the flap that folds up and becomes the front of the card. The bottom curved part is what folds down and becomes the top flap.

In the center of the middle section is The Seam. It is cleverly disguised by a piece of paper that goes all the way to the edges of the card back. VERY clever, I thought.

Until I turned it over and had to deal with the inside.


The seam showed on the inside of the card. I cut the piece of paper (the reverse side of the purple, thank goodness, so I did not have to match it!) and layered it on a piece of Perfect Plum that was cut a little smaller than the card stock so there is a border around it. I think it would have looked weird without that border... Unfortunately that left the seam showing on both sides. But never fear! The Cuttlebug was still out, and I had an unopened pack of flower dies needing justification for having been purchased! I cut one in Perfect Plum and one in a scrap of Papertrey Moss that just happened to be lying on the table next to the Cuttlebug. (Can you tell I love justifying the whole not-putting-it-away-just-yet thing?) I used the punch-outs from the green flower as leaves for the halves of the purple one. And thus the seams were hidden!

Just so you can get an idea of the sizes, here are my two cards side-by-each. The one on the left is the A2 size, and the one on the right is the one made according to the instructions in the challenge.

Let me just say that if I ever think about making this card again, it will be of the challenge size, not the A2 size, especially if I use it in a class. It needs to be easy and the challenge pattern was just that - easy. I have a newfound respect for people who noodle around with an idea until they get it to work.

Aaaand, here's more finishing something I started and set aside! This is that wedding card I made with the Versamarked background that was really difficult to see, even in person, even in the magic light. Since I had used Sahara Sand on the sentiment, I decided to wheel one row in the Sahara Sand, too. The rest of the card is wheeled in Versamark, but you cannot see it! At least in the right light it looks not-so-plain.

The other day I had posted the card using the Together Forever sentiment, but this one uses the circle image from that same set and a sentiment from the retired Fancy Flexible Phrases.


Wow, I guess I did do stuff this week! I am off to finish making those red cards so I can play with my new stuff! Look for some irreverence coming your way very soon!

Monday, March 24, 2008

Too Many Choices

When my kids were little, they attended a Montessori school. Even though they did not finish out their educations there, I think we all took away a lot of valuable lessons from the years they were there. One of these is the word "lesson", but I digress.

One of the lessons learned by the parents is the concept of choice. Even a very young child is capable of making choices and then dealing with the consequences of those choices. The key is not to overwhelm them with options. You should not ask them something as open-ended as "what would you like for lunch", but you could ask them if they would like Grilled Cheese or PB&J. This involves the child in the decision-making process and you get buy-in at the same time.

This concept was extended to the area of toys. At home, a child generally has toys available with which to play. If you have ever walked into someone's house and the floor was strewn with toys, and the child was complaining he/she had nothing to do, that is a perfect example of a child with too many choices. It was suggested that we did not need to reign in our purchases, but that we only make available a fixed number of toys (read: options) at any one time. If you have 6 toys on a shelf, then the child has 6 toys from which to choose. You can certainly swap out one toy for another every once in a while to keep the inventory moving, but there should not be more than that fixed number of options at any one time. It is all about limits.

So why am I blathering on about Monetssori? Because I think, as stampers, we are often overwhelmed with our choices, and then we get nothing accomplished and we feel frustrated and maybe even feel we need to go buy something new, when that is not the case - AT ALL.

Check out my current situation.


This is a card that looks better in person, but it is a piece of Very Vanilla wheeled with the Forever Flowers wheel and Versamark. It makes it look like patterned paper, and was the subtle look I wanted. I think. (If you click on the photo you can kinda see it ...) I added the sentiment from Together Forever in Sahara Sand, and tied a piece of swirly ribbon from my stash. I liked it, but then I thought it was too plain, so I set it aside where it still sits on my work table.


The cat? She does not worry about too much at all. Ever.

Also out on my worktable are these papers from the Ginger Blossom set that are just crying to be used together, but I have not gotten to them yet.

Oh, and those envelopes at the top of the photo? Those are the prizes for the last Spot The Mistake Contest, almost ready to mail.


This was an idea I had that is just not working out, but all the materials used are still within reach on my table. Still nigglin' about this one. It may need a plain-front card instead of the raised-edge variety. And yes, I hoarded these when they retired...I have a whole drawer full of them.

If I can get some variation of this idea to work for me, I'll have justified the purchase of the Lovely Letters Alphabet and the Together Forever sets, plus use up those packs of card stock in my drawer. A girl can dream.


And then there is this pile of mock-ups on the corner of the coffee table. They landed there during my last Clean Sweep prior to my March workshops, and there they still sit. I see them every day, and I tell myself I simply MUST make more of them for selling, but I have not gotten there yet.

Aaaand, this is a piece of paper from my stash that just screams "Very Vanilla card stock with some purple ribbon", but it is just sitting there, waiting in the wings.

On top of all this, a friend of mine emailed me asking if I could bring some Birthday cards and some generic Any Occasion cards to our next get-together in April. Uh, yeah, sure, once I MAKE SOME! Don't get me wrong - I love it when my friends like my cards, but I am just a bit behind this year in the inventory-building exercise.

So you see, this Montessori concept of Too Many Choices now bleeds into our adult lives. I think we (or at least *I*) need to get a grip and get some focus. I just have SO MUCH STUFF that I want to use, that I just cannot seem to focus on any one thing long enough to finish it before I feel the pull to move on to something else. I think my lazy Winter months make me like this, I really do. I am much more organized during the Summer months, as I have to keep the inventory moving and interesting each and every weekend.

Oh, well, enough whining for one sitting. I am home today to take care of a ton of financial things - taxes, IRA funding, investment adjustments, auto and home insurance calls to make ... all the things you cannot do easily from Cubeville. This was just a break in the action, so I am off to make some more phone calls. Perhaps later today I will pull myself up by my bootstraps (if I were actually wearing boots, or ever shoes) and get some FOCUS. I'll let you know how that goes.

Sunday, March 23, 2008

Headline News: Crooked Stamper Sustains Minor Injury in a Bizarre Stamping-Related Domestic Moment

Don't worry...I am okay, just wounded and slightly disabled. Yesterday afternoon I was finally fed up with the sticky gunk on my scissors, so I decided to clean them. Strange, I know, but that cleaning thing hits me once in a while, and I just go with it. So anyway, I have a humungous bottle of Un Du from one of my Florida trips, and it lives on my Kitchen counter, always at the ready when I am. I grabbed a paper towel, dumped some Un Du on it, and began to rub the gunk off the scissor blades. I was just about done when the perfectionist in me (she's in there, somewhere) decided to rub a little harder at a pesky spot right near the edge of the blade - that would be the sharp part. [CAUTION: GROSS-OUT ALERT.] Apparently I use my index finger to rub, as I soon discovered I'd rubbed a little too close to the edge and I had sliced open the pad of my finger. I immediately switched to the clean side of the paper towel so I could apply pressure to the wound. That bugger would not stop bleeding! It took me a while to get a bandage on it because between the time I released pressure from the paper towel to when I could slap on the bandage (we are talking a split second, here...I am a Mom, after all), I had to go back to the paper towel. I seriously thought "stitches". I finally got a pressure bandage on, but I still cannot touch it - ouch! (Whimper...whimper ...)

As for the title of this post, that goes back a loooong way, to my college days. My roommate and I would be walking somewhere, deep in conversation, when she'd break out into headline-news speaking mode. One time we were walking past the building where she had a lot of classes, and she had been talking about an upcoming exam, when she suddenly said something like, "College Sophomore Found Dead Outside McGuffey Hall, After Jumping Off The Roof, Apparently Despondent About An Upcoming Exam." Much of my first two years of college were experienced through news headlines.

I spent most of yesterday in stamping mode as I decided it was time got get my butt in gear and make cards to sell this summer. Making mock-ups is fine, but I need something finished, packaged, inventoried, and in the box if I think I am going to be ready the first weekend of May. I have soooo much to do. In fact, I realized that I had not even completed my card photo inventory from 2007, much less started on the one for this year. Yikes! Yes, I keep a card inventory - I photograph each and every card I make before I put it in the bin for sale (or mail it, when that happens.) That way if I find a particular card is very popular, I know what I did and I can make some more. Therefore, much of last evening was spent finding photos in the 'puter and printing off the remainder of my 2007 cards and watching Beetlejuice for the umpteenth time on TV Land. Love that movie!

Change of topic. On the way home from the grocery store this morning, I was driving by the farm near where I live and I heard Joni Mitchell's "Big Yellow Taxi", the one that has the line "...pave paradise and put up a parking lot...". So instead of posting a card today, I thought I'd post a little piece of history that will soon disappear from the face of the earth: the local farm. I'll post my ramblings next to some of the photos I took a few years ago when I heard it had been sold.

This is (was) one of the remaining farms in the county that had not been sold for development, and it was a blessed natural green space in the midst of all the building that never ceases in the area. It had been in the same family for over 100 years, and there were four homes on the property that included 187 acres of land. When the owner passed away several years ago, I guess the land was inheritance-taxed at its current development value, not as farm land, and the remaining family could not pay it, so the farm was sold. Personally, I considered taking up a collection, but I think we were talking millions, so it would not have worked, anyway. ;-(


One summer day in 2006 I took my camera and walked the perimeter of the farm, hoping to capture for posterity images of what was soon to disappear. This is a shot from the edge of the property nearest to where I live, looking across (down) the length of the property. That house was not the main one, but it was the most visible. Today, all those out-buildings are gone, and the house was recently classified as Historic by our wonderful Historic Society, so it will be saved from demolition. It will be moved, but saved. Personally I thought it should stay where it is and be refurbished as a Community Center of some kind, but that's just me, and what do I know.


See? Wouldn't this make a nice community space? A friend of mine got married in CT last May and the reception was in an old, restored Victorian-era home that was supported by the community for the community. It would have been nice here, too. (Please ignore that pesky utility pole right in the middle of my shot.)


Here is a shot across the middle of the property, near the driveway to the main house that will be preserved, but more on that later.


And some beautiful rolling hills, with a creek and everything ...


And sometimes I get distracted by the little things. I do this a lot. I'll be taking a picture of some big scenery thing and suddenly drop to my knees and take a picture of a flower, or the pattern in some brick, or a bug...like I said - easily distracted. But we need to see these things, so I am sharing.


More distraction.

Towards the other end of the property are two houses, and this is one of them. Sadly this house is no longer standing. It is just a big empty.


Smack dab in the middle of the property is the main house and barns, all of which have been classified as "Historic", so they will be preserved. That other house I mentioned above will be moved to the area of the property being preserved, but as to why it is being moved I am still perplexed. It is probably in the way of some massive high-density housing or something. Or a parking lot.


This is the actual historic farm house next to the barns.


What I did not know when I took those photos in July of 2006 was that the farm was still being worked. Look what I saw in November of that year - a harvest! Sadly, I call this next series of photos "The Last Harvest."


This shot was my attempt to get some 'perspective' into my picture. But it does show the big expanse of green, and a nicely-harvested field.


The rolling hills section with harvest evidence.


More rolling hills...it was a beautiful day!


And here is a shot from the near side of the property, pretty much where I stood to take the first one I posted.
This is a shot of the far side of the farm, pre-harvest, so far over the hill that you cannot see the rest of the property. I use this photo when I make cards and I need a picture of a field. The one I have used it for so far is a cheesy clip-art picture of a man (or woman) stuck in the middle of the field with the sentiment "For a man outstanding in his field." Corny, I know.

I plan to keep these photos for when that first bulldozer hits the farm, just so I can remember how things used to be. And if you have lost a farm to development where you are, feel free to come on back here and reminisce with me.

Now please excuse me while I go work on my taxes. Hopefully my head will not explode and I can stamp something later. I may even mount one of my new sets and make some Anniversary or Wedding cards. We'll see.