There's a new challenge blog coming very soon to the Blogosphere, and it's called Shopping Our Stash.
The plan is to challenge us to use our hoarded goodies. You know: the stamps that have never seen ink, or the embellishments you just HAD to own but are still in the package. Or, as in my case, in addition to all of that stuff, I have 700 miles of ribbon and 3584632 pieces of hoarded 12x12 papers. Uh-huh. I think this one will be QUITE motivating.
Last I saw, they plan to have some launch candy that you can enter to win - details are in this post on their blog. (Psst: I spied some Basic Grey papers in there. Sweet!)
There is also a DT call (details here), so if you're interested, check that out, too!
And because I've been blathering about using neglected stash, I thought I'd dig through some of my cra... er, treasures and make something. You know me, always being an example for others. Though I must admit, where I normally act as an example of what not to do, this time you should do it. You should use your stash.
Let me ask just one quick question: WHO MADE MAY 1ST A SUNDAY?!?!?!?! Do you know what this means?!?!? It means Mother's Day is the second Sunday, which is NEXT WEEKEND, PEOPLE! And next Saturday, the 7th, is the first day of our farmers market, so that means I have one day - ONE DAY to sell Mother's Day cards. IT IS SOOOO NOT FAIR! I deserve at least two weekends to do this. I mean, if I have to store these things for the rest of the year, I should have more than one shot at selling them, right?!?!? Sigh.
I grumbled under my breath and went to my cache of "you only get one day a year to sell these" cards, and pulled out ... wait! How can I have only 2 Mother's Day cards in there?!?! ACK! I have ONE WEEK! ONE WEEK!!!!!
So in light of this crisis, I dove into my paper stash and used a few pieces of DSP to make the following Mother's Day cards.
First up: Some current papers that just happened to be already cut to the right size. I made three of these:
Next up: some retired DSP and I have maybe 3 packs left. Whole packs. I used one sheet of paper from the open pack to make 6 of these:
In addition to the DSP, I used some retired and hoarded Groovy Guava card stock and ribbon. Yes, I am very proud. Oh, yes, there are two cards here, because I wanted to show you that when you hack a piece of 12x12 paper into 6 pieces, depending on how the pattern runs (perfectly even and repeated, or random, like this one) you could get different designs for each piece. I used this to my advantage and placed the ribbon and sentiment where it looked best on that particular piece of DSP. It also kept me from going stark-raving mad making 6 of the exact same thing. I am so over mass-production.
Last, I found a piece of this DSP:
and I got two cards out of it. I love this paper. I've hoarded this paper (no big surprise there.) BUT, I've just used all hoarded papers and ribbons and made 11 Mother's Day cards in no time flat. I think I'm going to like this new blog. I do.
So come on over and join the fun!
And thanks for stopping by!
Saturday, April 30, 2011
More Bright Colors
I don't know what's come over me, but my customers may need to bring their shades to the May Stamp Camps. I wanted to CASE this card by the Uber-talented Mary Fish, but as usual, I went off on my own. Go check out her card, then come back. I'll wait. ... ... ... Okay, now please look at mine, then we'll talk:
I resisted using the turquoise. I did. I wanted to resist, anyway. I wanted to find another color that "popped" to use with the Rich Razzleberry and Pumpkin Pie. I tried reeeeeeal hard, for days, to find another color that worked as well as turquoise, but alas, I decided it really was the best color. But I didn't want as MUCH turquoise as Mary used, so that's why it took me for-EVER to make this. Finally today I started playing for serious, and this is what came out. I'm not sure it's the final pass, but it's the first one that worked all the way to a whole card.
I'm not sure that flower works - maybe it's too small? And I'm not sure about the stark white base. I'm open to suggestions. (Sure, I'm using "sure" a lot. Sure am. :) Okay, sure, I'll stop.)
For my next trick, I opened my package of Beyond The Garden DSP from the new Summer Mini (starts tomorrow!). I fell in love with the blue & green, so I tried this:
I am sooooooooo happy they brought back Pacific Point as a permanent color. (The only thing better would have been if they brought back Kiwi Kiss instead of Wild Wasabi. Just sayin'.) The colors in this DSP are Pacific Point and Wild Wasabi. I'm afraid both of the patterns on this DSP are too busy for that also-busy peacock image (Proud Peacock stamp set, also from the Summer Mini), but I was determined to try and make it work. I may need to add a bit of orange or red or something to the feathers. Or maybe some silver smooch paint. Again, ideas are welcome.
In other news, I retrieved my tent and standing card rack from storage today, and everything fits in my car so far! The only thing I still need to do is make tent weights. In years past I've used empty kitty litter containers filled with water, but alas, I no longer have those. :( I'm thinking buckets with 40-lb bags of sand in them (left in the bags.) I can't believe the farmers markets start next weekend. I can't believe TOMORROW IS MAY ALREADY! But it will be good to sit outside again and get fresh air and talk to my farmer and crafty peeps. Can't wait!
Thanks for stopping by!
Friday, April 29, 2011
Pink + Orange
Tonight I was just playing with some of my new SU schtuff, desperately trying to come up with some ideas for my May Stamp Camps. There has been a plethora of red + orange + pink on the Interwebz lately, and I'm trying to work with it. I took my first step with this ribbon wreath, then I ordered the Sweet & Sour Specialty papers from SU to give them a spin. I also wanted to somehow incorporate the leaf image from the Fabulous Florets stamp set from the upcoming Summer Mini (starts tomorrow!). This is what came out:
The polka dotted paper is embossed in spots and is all shiny (it comes that way, which is why it's called 'Specialty" paper); the fleur is embossed with some Melon Mambo EP (available starting tomorrow); the ribbon is Pumpkin Pie taffeta; the leaf is stamped in Pear Pizzazz; and the pink layer is also Melon Mambo. If I use this project for my Stamp Camps. I might just use up the remaining 3 or 4 sheets of Melon Mambo I have. ;)
ETA: I forgot to add that I broke out my gold Smooch paint and added a few specs around the flower's center. (good demo moment)
I have a bazillion more ideas floating around in my head, and I hope to actually make some of them this weekend. Right now, though, I need sleep. I woke up at 4:15 am, and not on purpose, but I still couldn't get back to sleep, so I got up and watched the wedding on the Royal YouTube Channel (for realz - they have one!) Tomorrow I get to retrieve my tent and standing card rack from my storage unit and try to fit them into my new old car. My markets start NEXT weekend. Whoot!
Thanks for stopping by!
PS: I don't think there is one single thing straight on this card. Just sayin'.
The polka dotted paper is embossed in spots and is all shiny (it comes that way, which is why it's called 'Specialty" paper); the fleur is embossed with some Melon Mambo EP (available starting tomorrow); the ribbon is Pumpkin Pie taffeta; the leaf is stamped in Pear Pizzazz; and the pink layer is also Melon Mambo. If I use this project for my Stamp Camps. I might just use up the remaining 3 or 4 sheets of Melon Mambo I have. ;)
ETA: I forgot to add that I broke out my gold Smooch paint and added a few specs around the flower's center. (good demo moment)
I have a bazillion more ideas floating around in my head, and I hope to actually make some of them this weekend. Right now, though, I need sleep. I woke up at 4:15 am, and not on purpose, but I still couldn't get back to sleep, so I got up and watched the wedding on the Royal YouTube Channel (for realz - they have one!) Tomorrow I get to retrieve my tent and standing card rack from my storage unit and try to fit them into my new old car. My markets start NEXT weekend. Whoot!
Thanks for stopping by!
PS: I don't think there is one single thing straight on this card. Just sayin'.
Thursday, April 28, 2011
An A-Musing Evening
I have a new love. My new love is the Eucalyptus color of paper and ink from A Muse | Studio. I am also impressed that I can actually spell it.
When A Muse decided to pull out of retail stores, I was sad. Then they announced they were going into the Home Party Model biz, kinda like SU. I figured I'd never see A Muse again. Then, one of my bloggy and tweety pals, Mary Dawn, signed up as an A Muse | Studio Consultant! SHE DID! That meant I actually knew someone I could contact and ask questions and ... and ... I was soooo happy.
Then I placed my first order with her. THAT was when I discovered the Eucalyptus paper and ink. They arrived a few days ago, and tonight I went into the craft room to introduce that rubbah to some ink. Here is the card I've kinda had in my head for 2 days:
I wanted to make it 100% a|s (A Muse Studio), but I blew it with the branch punched from some SU DSP with an SU punch, but everything ELSE is a|s. What do you think of those teeny clouds?! DIES! Teeny cloud dies. Love them!
Here is the second one I made:
So fun!
While I was messing with the supplies, I had a happy little discovery. Lookie:
Those light blue remnants are parts of some SU Lattice die-cut pieces I've been playing with (with which I've been playing), and I think SU's Baja Breeze will coordinate with a|s Eucalyptus just fine!
Also in that corner heap are some poppy-colored fleurs I made last weekend using some clay I had laying around and molds I got on etsy. I'll blog about those when I actually use one. ;/
So if you need to scratch your A Muse itch, head on over to Mary Dawn's blog and check out her schtuff. While you are there, check out her card stock shares. You want to do this. Why? Because *I* am in that Shimmer Couture Damask Share, and we need more peeps to fill it up, that's why! I WANT MY PAPER! (heh heh Sorry about that. )
You will probably be seeing some more of my a|s haul over the next few weeks as I use 'em, then put them away. I might even use some of the SU Baja Breeze die-cut parts, and one of those poppy fleurs. Then I won't have to put them away. :)
Thanks for stopping by!
Wednesday, April 27, 2011
WOTT & WOYWW (my crafty desk)
(I accidentally hit publish before I actually WROTE anything, so I apologize if these shocking photos landed in your Reader or email without any words to explain them. Please click through to my blog for some blah blah blah. I thank you.)
Good morning! Once again I'm taking two for The Team. When we left my desk last Wednesday, it looked pretty much like this, but I've added a bunch more stuff since then. Lookie:
I need a moment of silence.
...
...
Okay, let's do those numbers:
1. One of the many failed attempts to "trim" my Hambo kingly image for this card.
2. Copics and glitter pens used to color the one kingly image that finally worked for that same card.
3. Embossing powder (old old old) used for one of many failed coloring attempts for a kingly image.
4.1., 4.2 and 4.3. Punches and stamped images I'm playing with for a card I'm CASEing for my classes next weekend.
5. Another kingly image.
6. Remnants from the sock I used on my Jingle Belles Rock card.
7. The container of embossing powders from which I retrieved #3. (Told you they were old.)
This is bad, people. Real bad. I actually need to put something away in order to have a 6x6 space in which to work. That means tonight I shall clean this space and see if I can get it back to maybe even 12x12. Hey, it could happen.
I'll be posting these at both WOTT and WOYWW so more people can feel better about their own crafty spaces. Hey, it's what I do.
Thanks for stopping by!
Tuesday, April 26, 2011
We Have A Weener!
Last Friday marked the 4-year anniversary of my entry to the Blogoshpere, and I posted a list of questions for you to answer for a chance to win a pack of two embossing folders. That post got 21 responses - TWENTY ONE! And most of you got the answers right, even. Am I that transparent? Were the questions too easy? :)
Here are my responses, or at least the ones in my head when I made up the questions:
1. What is my favorite thing to put on a card? RIBBON!
2. What do I do every Saturday in the Summer months? Farmers Markets
3. What's my favorite kind of card to make? Irreverent/snarky
4. What is my favorite color? green
5. What is my favorite snack? (trick question - I don't snack.)
6. What is your name? (most of you got this one right)
Okay, just to be clear, for those of you who answered "jalapeno poppers" for my snack, that was a good one, but when I make those, they are "dinner", not a snack. Close, but no cigar.
Luckily for you, though, the answers do not even matter! Nope! I decided to use random.org to pick a number from 1 to 22*, and here's the result:
Comment #4 belongs to ... drum-roll, please ... Mary Dawn! Woo-hoo! (The crowd goes wild.) I shall get that off to you shortly. :)
I want to thank you ALL for playing, and for sticking with me these past four years. THANK YOU!
But wait, there's more. heh heh I have to show you a little something I made last weekend. Remember how I said "okay, just one more" ribbon wreath? Well, I tried to disappear some of my Every Color Pink Ribbon But The One I Need hoard. It didn't work, though I will say: as much as I don't like pink, I do use it for little girl cards.
Here is my girlie pink ribbon wreath under glass:
The photo is crooked and poorly lit, sorry. I'm pretty sure the letters are mostly straight. ;/ The letters are wooden, and colored with my new-to-me white acrylic paint marker. I kinda like this, even if it is GAH pink.
Okay, that is all. Thanks again for playing, and I hope to be back soon with something other than a ribbon wreath. It just might be possible for me to get tired of ribbon. ... ... Or not.
Thanks for stopping by!
* Luckily for me, random.org didn't select #22, because with 21 responses, that could have been awkward.
Here are my responses, or at least the ones in my head when I made up the questions:
1. What is my favorite thing to put on a card? RIBBON!
2. What do I do every Saturday in the Summer months? Farmers Markets
3. What's my favorite kind of card to make? Irreverent/snarky
4. What is my favorite color? green
5. What is my favorite snack? (trick question - I don't snack.)
6. What is your name? (most of you got this one right)
Okay, just to be clear, for those of you who answered "jalapeno poppers" for my snack, that was a good one, but when I make those, they are "dinner", not a snack. Close, but no cigar.
Luckily for you, though, the answers do not even matter! Nope! I decided to use random.org to pick a number from 1 to 22*, and here's the result:
Comment #4 belongs to ... drum-roll, please ... Mary Dawn! Woo-hoo! (The crowd goes wild.) I shall get that off to you shortly. :)
I want to thank you ALL for playing, and for sticking with me these past four years. THANK YOU!
But wait, there's more. heh heh I have to show you a little something I made last weekend. Remember how I said "okay, just one more" ribbon wreath? Well, I tried to disappear some of my Every Color Pink Ribbon But The One I Need hoard. It didn't work, though I will say: as much as I don't like pink, I do use it for little girl cards.
Here is my girlie pink ribbon wreath under glass:
The photo is crooked and poorly lit, sorry. I'm pretty sure the letters are mostly straight. ;/ The letters are wooden, and colored with my new-to-me white acrylic paint marker. I kinda like this, even if it is GAH pink.
Okay, that is all. Thanks again for playing, and I hope to be back soon with something other than a ribbon wreath. It just might be possible for me to get tired of ribbon. ... ... Or not.
Thanks for stopping by!
* Luckily for me, random.org didn't select #22, because with 21 responses, that could have been awkward.
Monday, April 25, 2011
Hambo Hoedown - Announcing
Time for another episode of Hambo Hoedown! This week we played with the following image:
and we were told to use it to announce something. Well, when I first spied the image, I immediately thought it would be great for my milestone birthday cards. Last year's design didn't fly off the table, so it's time for a new idea. THIS, my friends, was IT.
First, here's my card:
and now I'll go into the weepy blow-by-blow. This took me ALL DAY to make, people. ALL DAY! ONE CARD! And it's not like I'm a perfectionist or anything. Seriously. No, my challenge was a hair-brained idea to try the "outside the box" technique, which is where you trim your image and use a die that is actually too small for the image. The trimmed part sticks out from the die shape, thus the "outside the box" name.
Let me try to explain. Check out this Failed Attempt #5:
See how the end of his robe sticks outside the rectangle die cut shape? THAT side worked. What didn't work, you might ask? Well, when *I* get a hair-brained idea, I take it to another level. I wanted to have not only the robe sticking out over the die cut, but also the trumpet thing. Uh-huh. Not as easy as it looks. I did say this was Failed Attempt #5, right?
Allow me to illustrate. See that handsome red circle? --> See:
As I was fussy-cutting the right side of the die-cut image, I got a little carried away and cut into the die cut part! It was ruined! RUINED! I tried 1 or 2 more times before I just gave up and cut out the whole dang image. Sigh.
Okay, for my next trick, I needed Copics that were close to SU's Rich Razzleberry. I thought Razzleberry would be a good "royal" color to use. Trouble is, I don't have a Copic marker that color*. My reds were too red and my purples were too purple, so I got creative and combined two of them, coloring the red first, then going over it with the purple.
I used these two colors:
That's R39 and V17, which is way less blue than this poor photo shows. You can see in this next pic that it's pretty darn close in color to the Razzleberry card stock layer:
Next crisis: gold patterned paper. I just knew I had some old old old SU paper. You know, the ones we once sold in DSP and matching vellum? Yeah, those. I found two packs of Silver and two packs of Copper (what part of "hoarding" has not been clear to you?) but no Gold. None. Boo. Heck, maybe we only sold Silver and Copper. Who even remembers back that far?
I resorted to going through my room full of DSP until I found some retired SU Christmas papers with gold:
Poifect!
I cut the oval layer and the numbers (Cuttlebug Olivia Alphabet) out of SU Brushed Gold.
For my final touches, I colored all the white "fur" with a white Souffle marker:
and those shoes are colored with a black Sakura Glaze pen (Oh, shiny!) sent to me by my tweep and bloggy friend, Libby. She's the BEST!
Once again, my finished card:
So there you have it: one kingly 50th birthday card, or a 50th anniversary card. One of these days I'm going to get a clue and figure out this two-sided "outside the box" thing, but not today, and probably not tomorrow, either.
Thanks for stopping by!
* Yeah, I know, I could have used the Rich Razzleberry marker, but that would have been too easy. And I wanted it less opaque than the marker would have been. And using a blender pen sounded like work.
and we were told to use it to announce something. Well, when I first spied the image, I immediately thought it would be great for my milestone birthday cards. Last year's design didn't fly off the table, so it's time for a new idea. THIS, my friends, was IT.
First, here's my card:
and now I'll go into the weepy blow-by-blow. This took me ALL DAY to make, people. ALL DAY! ONE CARD! And it's not like I'm a perfectionist or anything. Seriously. No, my challenge was a hair-brained idea to try the "outside the box" technique, which is where you trim your image and use a die that is actually too small for the image. The trimmed part sticks out from the die shape, thus the "outside the box" name.
Let me try to explain. Check out this Failed Attempt #5:
See how the end of his robe sticks outside the rectangle die cut shape? THAT side worked. What didn't work, you might ask? Well, when *I* get a hair-brained idea, I take it to another level. I wanted to have not only the robe sticking out over the die cut, but also the trumpet thing. Uh-huh. Not as easy as it looks. I did say this was Failed Attempt #5, right?
Allow me to illustrate. See that handsome red circle? --> See:
As I was fussy-cutting the right side of the die-cut image, I got a little carried away and cut into the die cut part! It was ruined! RUINED! I tried 1 or 2 more times before I just gave up and cut out the whole dang image. Sigh.
Okay, for my next trick, I needed Copics that were close to SU's Rich Razzleberry. I thought Razzleberry would be a good "royal" color to use. Trouble is, I don't have a Copic marker that color*. My reds were too red and my purples were too purple, so I got creative and combined two of them, coloring the red first, then going over it with the purple.
I used these two colors:
That's R39 and V17, which is way less blue than this poor photo shows. You can see in this next pic that it's pretty darn close in color to the Razzleberry card stock layer:
Next crisis: gold patterned paper. I just knew I had some old old old SU paper. You know, the ones we once sold in DSP and matching vellum? Yeah, those. I found two packs of Silver and two packs of Copper (what part of "hoarding" has not been clear to you?) but no Gold. None. Boo. Heck, maybe we only sold Silver and Copper. Who even remembers back that far?
I resorted to going through my room full of DSP until I found some retired SU Christmas papers with gold:
Poifect!
I cut the oval layer and the numbers (Cuttlebug Olivia Alphabet) out of SU Brushed Gold.
For my final touches, I colored all the white "fur" with a white Souffle marker:
and those shoes are colored with a black Sakura Glaze pen (Oh, shiny!) sent to me by my tweep and bloggy friend, Libby. She's the BEST!
Once again, my finished card:
So there you have it: one kingly 50th birthday card, or a 50th anniversary card. One of these days I'm going to get a clue and figure out this two-sided "outside the box" thing, but not today, and probably not tomorrow, either.
Thanks for stopping by!
* Yeah, I know, I could have used the Rich Razzleberry marker, but that would have been too easy. And I wanted it less opaque than the marker would have been. And using a blender pen sounded like work.
Sunday, April 24, 2011
Okay, Okay, One More (But This One Is Different)
Back when I first started playing with ribbon wreaths, my pal MB, who had assured me I had the skillz to attempt this in the first place, was inspired by my meager efforts to make one of her own. Now remember, this woman HAS ribbon skillz, where I do not, unless you count tying a bow on a card. THAT I can do.
Here is her "I think I'll try this" result:
*thud* I KNOW! GOR-JUS! Seriously. Oh, and that's a 22" frame, where my first few attempts were 3". Uh-huh. See how nice and densely packed her ribbons are?
So I had this hair-brained idea that I could maybe make a dent in my boxes of Every Color Blue and Green Ribbons But The One I Need and USE THEM to make a door-sized wreath. Yeah, I thought that.
Here's the result of my labors:
Now let's talk about this. First, it's a 12" frame. I'm not THAT crazy to go up to 22". Second, it's already had two hair cuts. Third, those ribbons are naturally curled because of my "I must store all these ribbons on wooden clothes pins" project of several years ago. Yep, tightly wound, like their owner.
It still looks straggly, so I'm sure it needs some filling in, but right now my back hurts too much to think about it any more today.
As for those Every Color Blue and Green Ribbons But The One I Need, and why I even have them? Back in my neophyte crafty card-making days, I bought them because I thought they would inspire me to use them with the colors contained therein, or because they would certainly go with something, but alas, they go with nothing. This wreath is my attempt to use all the "goes with nothing" and "gah, what color is that green?" ribbons TOGETHER so now they go with each other. Here's a sampling from the top of the wreath:
Sadly, I have not made a very big dent in the Every Color Blue and Green Ribbons But The One I Need cache, though the size of the spools has diminished considerably. I only emptied 6 spools; the rest are just smaller. Sigh.
In other news, thanks for all the entries on my Blogiversary post. I'm working on a method to select the lucky winner. Hopefully later today I'll get a clue.
Thanks for stopping by!
Saturday, April 23, 2011
Jingle Belles Rock - Week 17 - Recycle!
Here we are again with another Jingle Belles Rock challenge. This week we were asked to re-use, re-purpose, re-cycle or up-cycle something for our card in honor of Earth Day.
Okay, I must tell you I am not good at this. I see all these people who take scraps of a brown paper bag and make something AMAZING out of it, but me? Meh. I'll recycle the bags, or return with them for my next shopping trip and re-use them, but I have very rarely ever used packaging or anything not specifically made for a card to make mine. I KNOW it's efficient and not wasteful and ... ... what can I say? I don't do it.
So last night I was chatting with some of my tweeps to get a clue, and finally came up with a really crazy (CAH-RAZY) idea that you'll see here in a second. First, My card:
I think it still needs something else, so I reserve the right for a re-do. That said, let's examine the parts-is-parts, shall we?
Check out these scallops:
See that white scallop layer? It's cut from a discarded SOCK! A SOCK, PEOPLE! I had just tossed it yesterday since it had a gaping hole in the heel, and I have a bazillion pairs of white socks, so it became trash. I pulled it out, cut across the sock from the hole in the heel, and cut out the straight section, leaving this:
Yes, it's clean. No, it's not white any more. It's 15 years old. Gimme a break. ANYway, that cross-section was sliced up the side and placed on my Big Shot with a border die:
Ta-da:
I went back and cut a scallop instead of that pointy one so more of the sock would show. Let's look at the center section of the card now:
The two other scallop layers are Wild Wasabi and Brushed Gold that I ran through the Big Shot with the Square Lattice embossing folder. And those green letters? From my stash, and at least 2 years old. I colored them with one of these that I picked up today:
Acrylic paint markers. I'd heard of their existence, but never owned any, until today. I used the green one to color the wood letters.
Now, for my next trick, I also used a "left-over" item on the card base. See the textured background here:
I painted some white card stock with tan, then green Claudine Hellmuth Studio paint. Then while it was still wet, I pressed a paper towel into it to create the texture. How does this count as re-use/re-cycle? Back in January, when I was packing up stuff from my Dad's house, I had brought a roll of paper towels to wrap and protect some of the smaller stuff. When I un-packed the box at home, I ended up with a pile of used paper towels. I have them stacked up in my kitchen, and I use them for cleaning or whatever. So I used one on the card to create texture. It totally counts. :) Think of it as packing material and you'll do fine.
So that's it - my card for this week's Jingle Belles challenge:
Wanna play? Find something to re-use/re-cycle, use it on a card, and join us! This is week 17, so I now have over 20 Christmas cards made already for this year. (Some weeks I made more than 1.) How many have YOU made? :)
Thanks for stopping by!
Friday, April 22, 2011
Four Years!
Four years. It was four years ago today that I dipped my big toe into the Blogosphere. Who knew I could blather on about crookedness and vegetables for four whole years?!
As a little something-something to thank my three (maybe four) readers for sticking with me, I have my latest duplicate purchase:
This handsome set of two embossing folders can be yours! All you need to do is leave a comment and answer one of these questions:
1. What is my favorite thing to put on a card?
2. What do I do every Saturday in the Summer months?
3. What's my favorite kind of card to make?
4. What is my favorite color?
5. What is my favorite snack?
6. What is your name?
Just leave me a comment by Sunday noon (East Coast US time) with the answer to one of these questions, and I'll pick a random name from all the responses. I reserve the right to use something fair like random.org, or to instead use a highly unscientific and unfair process, as yet to be determined.
Answering more than one question may or may not entitle you to extra chances to win. That would be part of the "unfair process" decision.
So enter now, and enter often! Thanks for reading!
Thursday, April 21, 2011
Sketchy Sunday {TG016}
I jumped all over this challenge because I am incapable of cutting two of anything exactly the same, and when you throw in the fact that it's a circle, and I've never made a circle card, well, that's why it's called a "challenge", right?
Here is Tiff's Sketchy Sunday sketch for this week:
Yep - a circle card. Sigh. After totally destroying several pieces of card stock and almost giving up completely, I went back in and ended up with this:
Yeah, I know, I didn't follow the actual sketch, but even so, it IS a circle. :) I actually like how it came out. :) The textured card stock base is a random piece I thought was blue but may, in fact, be a very light purple. I may never know. The white circle is a remnant of SU shimmer white. The sentiment is from a now-opened Hero Arts set of GIGUNDO sentiments (not the official name...), and this one just happened to fit this space. :)
The black thing is an old Cuttlebug die that I have now finally used after many, many years. The red bling is from a pack of red & orange bling I had to have since it was 49 cents.
We may be looking at my Dad's birthday card. :)
Okay, if *I* can do this, so can you! Now go on over to Tiff's post and link up your own circle card!
Thanks for stopping by!
Tuesday, April 19, 2011
WOTT & WOYWW
Here I go again ... taking another one for The Team. If nothing else, I should make you feel good (better) about your own stampy work space. Here is mine as of this very moment:
Looks pretty much like last week's, with a few additions, right? Do you see a pattern here? ;/
All that red and orange and pink ribbon is out because I made this framed ribbon wreath last night. The ribbons are piled up on top of and next to the yellow and blue and poppy and white ribbons I used to make this ribbon wreath over the weekend.
Over on the left you can see some Die-namics I may or may not have used yet, and a NIP (New In Package) Hero Arts sentiment set.
On the right I have the same stack of not-yet-used stamps, plus the Charlie Brown Christmas Tree I used to make this week's Jingle Belles Rock card. Also, some more pink-orange-red ribbon, a failed paper doily, my Fiskateer scissors, and some MS gel glue (blue cap) that Lydia of Understand Blue enabled me to purchase, and she's right: I want to marry this adhesive.
I'm going to post this at both the WOTT (What's on Tap Tuesday #2) and WOYWW (What's on Your Workdesk Wednesday #98) blogs. Taking TWO for The Team, I am! :)
NOW do you feel even a little better about your own desk? I thought so. My work here is done.
Thanks for stopping by!
Monday, April 18, 2011
Okay, One More Wreath
Last night I made another ribbon wreath in red + orange + bright pink. I've seen these colors EVERYwhere on the Interwebz lately, and I was given a little push by my pal Mary Dawn when she made this card. As an added bonus, I broke into my box of Every Color Red, Orange and Pink Ribbon But The One I Need and used a bunch of them to make this:
Tonight I gave it a trim, layered it on a piece of A Muse red gingham paper, put it in a black shadow box frame, and ... took a glaringly poor photo of this:
Thank you for your comments on my previous attempts. I used thinner ribbons on this one and I like how it lays better. I agree the wider ribbons need a bigger space.
In other news, I'm planning a trip to Wal-Mart on Saturday, because one alert tweep told me they have the shadow box frames I need to make these, and they are less expensive than Mike's. The Wal-Mart near me makes me itch, but the one about an hour North of here is newer and cleaner and NICE. I never feel like I need to just get out of that one. That's also where I got the container thingies I use to hold all the accouterments for my Stamp Camps; you know ... scissors, rulers, adhesives, bone folders, etc. I might pick up another one if they still carry them. And I also need some BIG post-it notes. And I am SURE there will be things I didn't know I needed that I need. You know, to justify the gas burned to drive up there.
So, yeah, a trip to Wal-Mart is big news in my world. That's just sad.
Thanks for stopping by!
Sunday, April 17, 2011
Hambo Hoedown #11 - Feeling Distressed
Moi? Distressed? Nope, but that is this week's theme for the Hambo Hoedown challenge. (See, I read the directions this week before I started stamping! Yay, me!) *ahem*
Moving right along, here is the image we were given to use (free if you played the previous week):
... and since there were two sentiments, I made two cards. Here's the first one:
Oh, dear card, how did I distress thee? Let me count the ways... I inked up the edge of the die-cut shape around the ogre; I distressed the edges of both the DSP (Basic Grey basics kraft) and the Old Olive layer; both the Basic Grey basic kraft and the Basic Grey eerie papers are ... distressed; I distressed the ends of the ribbon; I distressed the top of the DSP by tearing it. (Psst: It was already distressed with the edging tool, but I'd cut it too long - yes, I measured, leave me alone - so instead of cutting it and re-distressing it, I tore it. It totally counts.)
I printed the ogres thrice - once on Kraft*, once on a remnant of patterned paper, and once on Old Olive - with the intent on paper piecing the clothing, which I did. I became ... wait for it ... distressed when I realized how fussy that endeavor would be.
Yeah, I didn't go over his skin to make it stand out from the Kraft background, but I did do something else. Can you tell what it was? ... ... ... Timbo missed an opportunity with this image. He gave the little guy arm hair, but no chest hair or toe hair. I fixed it, though.
Oh, carp, I totally forgot to go over his suspenders with my Old Olive marker. Please pretend that they are green.
Here is the second card - different clothes (with suspenders) and the other sentiment:
So there you have it - two distressed ogre cards, and one distressed stamper.
In other news, I got a new car today! I love CarMax. They gave me a good price for my old car, and I found another Forester on the lot, and it only has 10,000+ miles on it. Sweet. I love it already. :)
Thanks for stopping by!
* I got the idea for printing on Kraft from Carla. :) Thanks!
Moxie Fab World: Tuesday Trigger - Porch Play, Part Deux
Last night I played with a ribbon wreath, and I liked it enough to try it again with this week's Moxie Fab colors. Here's their photo:
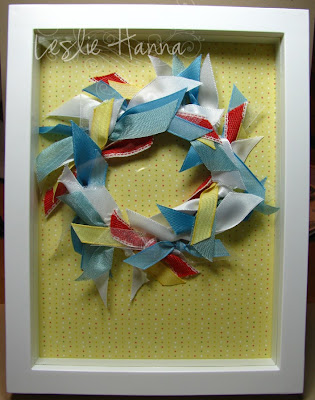
and here's my wreath:
I'm out of that white polka dot paper I used last night, and this is my last white shadow box frame. The yellow paper is from the same SU Sunny Garden paper pack. I either need to find more sources for the frames and paper, or I need to start hoarding at least the papers. Grrr, isn't that always the way things go? You FINALLY find something you like, then you can't find any more of it?
Now that I look at the photo, the ribbons look messy to me. I may go back in and re-arrange them, or maybe they just need a trim.
In other news, there is a strange orange orb in the sky I think is called the sun. As we dry out here from last night's storms, I think I'll go buy a replacement car for the Forester. I love Car Max. I bought this car there 10 years ago, and I'm going back for another one. Depending on what they offer me for the old one, I'll either sell it to them or take it home and donate it for blue book value. Either way, I hope to have a new old car by the end of the day.
Thanks for stopping by!
Saturday, April 16, 2011
I Tried Something New
I left the house today. I did. It was pouring rain, so I went out. Actually, I went to see MaryBeth at a local craft show that I chose not to do, since it's not May yet, and I can't get my brain around doing a craft show before May. I just can't.
She does a lot of ribbon work, so I asked her how tough she thought it would be (for me, not her) to make something like this:
(from page 190 in the 2010-2011 Stampin' Up! Idea Book & Catalog) I have been in awe of this project since I first got my paws on the catalog. And ribbon? Hello! You've come to the right place. :) But how to begin?
First you need a circular something - like a ring. I stopped at every freaking store within 10 miles of here and found NOTHING. Zero. Zip. Here was my basic route:
You see, if I ever (EVER) leave the house to go somewhere that's not to work, I make darned sure to plan my day in a circle. So in that squiggle above, my house is the black X at the bottom. Moving to the right was the path I took today.
My first stop was the top right, to see MaryBeth and the craft show. Every. last. stinkin'. other. black. x. is a stop I made, IN VAIN, to find something, ANYTHING, that passed for a metal ring. I'm talking craft stores, dollar stores, hardware stores. NOTHING!
Oh, that tiny blue line? By the time I left the hardware store, I stopped in at Chipotle, which was only 20 paces from my car, to get a salad to go. Then I came home and ate it.
Dejected, I went searching for knowledge on the Interwebz. First, I found some metal rings online for not too much moolah, so I ordered a few to try them out. Then I found this video on YouTube to get a clue about how to make the actual wreath. She used a way different ring than I plan to use, but I was no longer completely clueless, so I started to play.
I started with my much-neglected circle cutter, and cut 3 circles from some scrap cardboard at about 3", and again at about 3.5" so I ended up with three cardboard rings that I then glued together for a practice ring. I pulled out some of my 1249563 miles of ribbon and went to work.
This is not as easy as it looks. I cut, I tied, and I tied some more. Then I trimmed and trimmed some more. Finally, it looked passable, and I made this:
My first attempt. Not too bad. I have some other ideas up my sleeve, too, but this was one of them. What do you think?
Gotta keep trying new things, right? :)
Thanks for stopping by!
Friday, April 15, 2011
Jingle Belles Rock - Week 16 - DIE CUTS!
It's time once again for another Jingle Belles Rock challenge, and this week's Guest Belle is my lovely bloggy friend June of Simply Elegant Paper Crafts. She was one of my very first readers, like EVER, and we've even met several times in person. I KNOW! She is REAL!!!
June has asked us to use die cuts to make our card this week. Well, duuuuh. I have a bazillion of them. In fact, I have one or two or ten that aren't even opened yet, including this one from MFT that I purchased one or two orders ago:
It's a 3-fer - 3 dies in one. And they nest perfectly, which is one of the reasons I got them. I opened them and used them on my card:
Okay, I used 2 of the 3 dies. I was going to use the third long-ish die ... well, never mind, I changed the layout and it no longer worked, so I used punches for the sentiment and layer. BUT, to make up for cheating on my dies, I used the SU Top Note Die on the blue layer.
Both the stamp and sentiment are from A Muse. I call the tree my Charlie Brown Christmas Tree stamp. :) Since the real Charlie Brown tree had a few leaves on it, I colored the branches with my Old Olive marker so they weren't totally nekkid.
The papers are all from the Basic Grey eskimo kisses 6x6 pad. They are soooo fun, but then I have yet to meet a BG paper I didn't like.
And now, I have a confession to make. It pains me to inform you that I am slipping. Yes, I am. I went looking for my Cherry Cobbler seam binding ribbon, and I couldn't find it anywhere. When I buy ribbon, I rarely buy only one, because you just never know when I'll need it for a class. Then it hit me: I did not buy all of the colors. I DID NOT! I didn't even buy into my own ribbon share!!!! What is wrong with me?! How could this have happened?!?!
Did you feel that? I think the Earth just tilted out of it's orbit a little. THIS DOES NOT HAPPEN IN MY WORLD! And the Occasions Mini ... WAIT!!! I have 2 more weeks! I could order some! I COULD! OMG, that was close. I thought it was May already. Okay, everyone calm down. Take a deep breath. (Don't scare me like that!)
Now that we've all calmed down, I want you to grab your dies and go to the Jingle Belles blog (hahaha! I typed that Jungle Belles... I'll bet Stef and Lauren would ban me from the blog for that one...) and play along!
Thanks for stopping by!
Subscribe to:
Posts (Atom)