Saturday, December 31, 2011

Jingle Belles 2012 #1 - Gift Wrap

Wow, tomorrow is January 1st, 2012! I'm sure those Jingle Belles have some fine challenges cooked up for us this year, and it's time for the first one: No Time Like the Present(s) wherein they asked us to use some wrapping paper on our card. It could be a piece of wrapping paper, or an image cut out of wrapping paper - whatever, or even a theme of presents! LOTS of options.

Little do they know I have rolls and rolls of SU wrapping paper from when we sold it a few years ago. Each roll would wrap like 18 shirt boxes, so yeah, I have a bit of it on hand. Here's what I made, then I'll explain:

The card is on an angle since the paper is shiny and reflected the lights and it was making me stabby, so I turned it to save myself. I do have a bit of 'splainin' to do here. It doesn't look much like a Christmas card, does it? That's because once I got past the black layer (gots to use black with River Rock) I spied that UFO city scape die cut (Skyline Border from MFT) and decided I needed to use it on this card. Now it's no longer on my desk. WIN!

That star burst is from SU's Bursting With Joy, and is stamped in purple StazOn. I colored some bling with a purple Sharpie and added them to the "sky". I didn't intend for them to be in a circle, but ... whatever. And you should know by now that if I had intended for them to be in a circle, they wouldn't be.

The sentiment is from the SU Bright Hopes set (Holiday Mini - only 3 days left to order it!). I stamped it in Memento black, then I remembered it would never dry on glossy paper, so I clear-embossed it. Done!

Side note: I have a personal challenge for the Jingle Belles prompts this year: I hope to mix it up a little bit. And by "mix it up" I mean like using a skyline as a Christmas card. I may also make some tag sets instead of cards (if the Belles will allow me to do so). Who knows? But I DO know it's gonna be a fun ride, no matter what!

Oh, and the prompts are every other week now, so we have 2 weeks to do each one! This fits perfectly with my schedule. :) Won't you join us?

Thanks for stopping by!


Hambo Hoedown - Happy Newt Year!

No, I'm not getting political - not even close. I played the Hambo Hoedown challenge, and they gave us this image to use this week (free if you played the last challenge AND remembered to email it to them, which I miraculously did!):

This is Hambo's Reptile digi image, and the wheels are turning as to what I can have this guy say in the irreverent category. My options are many. But for this challenge we were supposed to use not only one of the provided sentiments, but also something NEW that we have acquired in the past three months. Too easy, people, too easy. I mean, I have bags I trip over every day in the paths of The Captain's Quarters. Seriously.

For my new item, I chose to unwrap my Tim Holtz Limited Edition Holiday Inks and I used the Ice Spruce color to ink the raised portions of the embossed background. Here is my card:


Given that my mission in life is to use my s-crap, the rest of this card is all stash. I paper pieced his shirt from a manly piece of paper in the Heaplet. The images were printed on a left-over half sheet of white from ... someone. The ribbon is SU Taupe (hoarded), so you know how old that is! Even the card base is from a stack of bases I am working to disappear. Oh, and the misguided idea to add the red heart bling? I don't know what came over me, but I now have 5 fewer of them, so I call that a WIN! :)

I'm off to work on a few more challenges. Thanks for stopping by!

The Crafty Part of my Road Trip

When this road trip was first planned (see my previous post for details), one of the reasons was to show my friend how to use the crafty stuff she'd scored at a yard sale, and that she'd added to with more scores on Craig's List.

What did we have? A Big Shot, a bazillion Sizzix dies and Sizzlits, and some other stuff we didn't ever get to. Let me just say: this was a major SCORE.

I had brought along a few boxes of old class kits and some stuff for actual projects, in case the mood struck us. I showed her how to use the Big Shot and we made a card and a few other things until she felt comfortable with the process. She is VERY crafty, and has all sorts of ideas for things to make for the house.

This is what the table looked like after three women were finished "playing" and being crafty:

I'm showing you this so you can contrast it with how things looked after we added four 20-somethings the following night for Arts & Crafts Night:

I had actually planned projects in case they were needed, but once they saw they could make paper dolls with clothes and hair and accessories, the night kindof set its own course. Plus, the quantities of wine consumed prior to the crafting might have had an impact on that decision.

But what a hoot! We had the best time!  Following are their completed projects. First, an example of the paper doll theme of the evening:

A blue person with bunneh slippers and a cat. Next we have someone who actually broke with the paper dolls mode and instead focused on frogs and punctuation:


Then the young lady who made the Blue Girl With Bunneh Slippers made this fabby card:

Then, back to the paper dolls. There were two unattended people in the corner who may or may not have (a) lost control, or (b) embraced the true meaning of getting your craft on. They made this:

 Looks tame enough, right? But the inside is the true masterpiece:

Blue people. Hair. Hats. Clothes. CORNER ADORNMENTS. Nature (a tree ON THE FOLD). HAND-CRAFTED accessories: sun glasses, hoop ear rings, a boom box, music notes. I'm telling you, it was so much fun watching them make this!

(The blue scribbles above the card are my attempt at the infamous Blue Dot of anonymity. Or, in my case, the inability to get the Blur feature to work, so it was all I had, people. I think I've invented the Blue Scribble of Anonymity.)

So there you have it: a fun time with crafts, and lots of happy people. I can't imagine a better way to spend a few days, can you? :)

Now that I'm back home, I have some serious catching up to do. I hope to tackle some challenges so I'll have some cards to show you later. Hey, it could happen.

Thanks for stopping by!

Road Trip Report

I've just returned from a 4-day trip to visit a friend in CT. This trip had three purposes: drag me out of the house, visit her and the 1740s house in which she lives, and show her how to use a pile of crafty stuff she scored at a yard sale. This post will be about the house and a few adventures, and I'll do a separate one about the crafty part.

[Please excuse the fact that I used the word "cool" in almost every sentence here.]

For starters, here is the house:

This is the front of the house - the part built in the 1740s. In the mid-1800s the owners added an 'L' in the back. Here is part of it (the shorter part behind the main house):

The house and property was owned by the same family until 1996 when it was sold and the house was converted to a B&B. Being an old house, there are a lot of cool things about it that I love. For starters, check out this closet:

This was in my room - The Green Room (of course). I chose this room because it was on the main level and I didn't need to climb the very steep stairs. :)

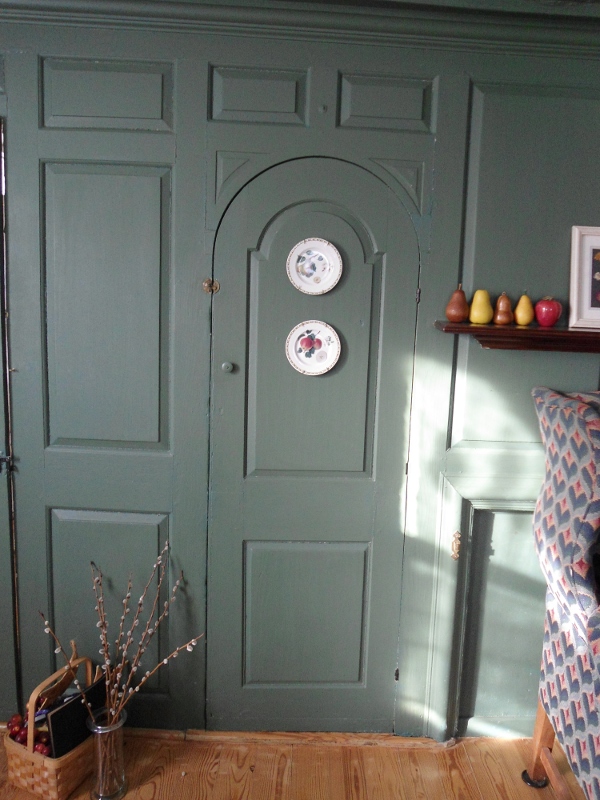
A few other cool things are the ghost doors in all doors leading upstairs (and there are a few):

The purpose of these is so when someone dies upstairs, their spirit can get out. Seriously.

Also, check this out:

That's an old old old soapstone sink, and it's sitting on top of the original 1740s hearth stone. Before the addition was built, the kitchen hearth stone was "out back" and not part of the main house. This was to reduce the chance of fire for the wooden main house. When they built the addition in the 1800s, they enclosed the old kitchen and kept the hearthstone - just built around it. I think this is VERY cool!

One other feature: Indian Shutters:

See that handle to the right of the window? That whole panel slides over the window. There is one on each window. They slide on a track. Very cool!

A couple of other cool things ... there is a fish pond out back:


This is just one side of it, and you can't see the fish, but there are 8 fish - some koi, some regular pond gold fish, and all are named "Olivia", so we went out to see the Olivias. :)

The last house feature I'm going to share is her dogs. She works with the Malamute Rescue, so naturally she has Malamutes. May I introduce Charlotte:


and Benson:


I couldn't decide which pictures were better, so you got both, at no extra charge!

We were mostly slugs while I was there, but we did have one adventure that I caused. I needed to go get new glasses before the end of the year (nothing like waiting until the last moment, eh?), so we went to ... The. Mall. ... ... I KNOW, and I survived! But it took so long for the eye exam and getting the frames and stuff that I took my friend to Mystic for lunch. See:


We ate at the Ancient Mariner, and had the BEST potato & bacon soup and pastrami sandwich. It really hit the spot! The first thing that caught my attention when we walked in was their decorations:

Aren't these the coolest?!

Check out this drink that we did not have:


A Bloody Mary with LOBSTAH! OMG, I must go back!

Okay, that's enough road trip sharing. I'll post some pics of our crafty sessions next.

Thanks for stopping by!

Friday, December 30, 2011

So Artful Challenge

I'm on another DT! Whoot! I'm now part of the So Artful Challenges Design Team! I liked the challenges because they are not company-specific, which means I can mix and match all my stash, like I usually do! Sweet!

The challenge for today is to create a card inspired by the following images, with an optional theme of dragon or New Year:

 Source: http://www.saragilbaneinteriors.com/travelfordesign/2010/03/f-schumacher-chiang-mai-dragon-fabric-for-sale/


 Source: Pinterest
Source: http://eighteen25.blogspot.com/2011/12/subway-art-new-years.html

And here's my card:

  I took the obvious road and used some Japanese paper I have in my stash. I had to buy it (HAD to) when it screamed POPPY at me, and it does totally match that Poppy Parade card stock! I got the dragon image from the Silhouette online store, and cut it out of both gold and black. The black acts as a shadow, and so the gold doesn't disappear into the pretty paper. See:

 Now it's your turn! Come play with us at So Artful and link us up to your creations!

Thanks for stopping by! 

Tuesday, December 27, 2011

SOS Challenge 32: Ribbon or Bugaboo

It's time for this week's Shopping Our Stash challenge: Rrrrrrrrrrrribbon!  Okay, really it's Tie it up ... ribbons, ric rak or twine; or a Bugaboo image. But you know me and rrrrrrrrrrrrrrrrrrribbon, am I right? :) 

Here's my card for this week:

 Not what you expected, eh? Well this card serves two purposes. First and foremost uses three - THREE - different ribbons:

The top strip is paper ribbon (Webster's Pages), the greenish-blueish lace (also Webster's Pages) and the vanilla seam binding (SU).

The second purpose of this card is my controlled test I mentioned the other day - to make a FAT card. I don't think I got it fat enough, but it should be fine:

I put Scotch brand mounting tape between each of the layers, made a multi-layer flower with curled-up edges and attached it to the card front with a Dimensional. I actually had a HUMONGOUS 3D flower out, but it completely covered the whole card front. Maybe I'll stick in the plastic box inside the bubble envelope, too, because I can.  My purpose here is to show a pal that the insides of the plastic box inside the bubble envelope will not be crushed in transit. Yeah, I'll tuck that baby inside the box with the card.

Also, please notice I used some reeeeeeally old stuff from a long-ago-retired SU Pretties Kit - the stick pin and the pearl in the center of the flower. And that flower was made using parts left over on my craft table, so I declare this a WIN!

Now go into your stash, dig out some ribbon or ric rak or twine - OR use a Bugaboo image, make a card, then come link it to our Shopping Our Stash post so we can see what you've made!

Thanks for stopping by!

Sunday, December 25, 2011

A $10 Booty Card

Heh heh ... got your attention, did I? This card is another one of those "what was I thinking?!" efforts, that you don't know is so bad until you get started, and then you're so stubborn you can't stop, and it takes you 3 hours to make one card and you swear you'll never make another one, and it took you 3 hours so it must be a $10 card. Yeah, one of those. Here it is, then I'll explain:

First of all: all scra ... er, remnants, and yes, I am very proud. The image and sentiment are my last two uninked Hambo stamps from my HYCCT gift certificate. I tried really, really hard to not use any pink, but I got this image because it was a pig, and pigs are pink, so ... I had to. But I chose a background paper that was mostly green, and used as little pink (gah) as possible.

The floofy oval die is one of my new and now used MFT dies from a release or so ago, and the white oval is a Nestie that perfectly fit both around the pig and inside the pink layer to cover up a lot of the (gah) pink. WIN!

Here's the sentiment up close and personal:

 (hee hee) Love it.  Okay, now for the whine-fest.

So I had this idea to use a piece of the 1/8 yard of Tulle I bought a while ago as the pig's tutu. I thought I'd gather it and tie a piece of baker's twine around it. I know how to sew, and all you do is run a needle over and under, over and over again, through the fabric and then you can gather it along that thread.

Well, thread is not baker's twine, or should I say baker's twine is not thread. Oh, it wove all right, since I used a big-eyed needle. However, the attaching part became a challenge. I poked holes on either side of where her waist would be, and it took me a while until I came up with a wrap that worked to both hold the Tulle in place AND let me tie the bow. I still had to go back and put a glue dot under the bow to hold it in place.

AND, because of this hair-brained scheme to use the Tulle, I had to use a marker to ink the pig, since her arm would have been in the way of the tutu, so I had to not ink that part of the main image, then had to stamp the arm separately. The very last thing I did after finally getting the tutu to stay in place was to cut out her arm and stick it onto the image at an angle other than would have been stamped.

See:

I'm pretty sure, now, that anyone who read this far wonders why (or how) I ever manage to make a card, much less more than one of them. It's not always pretty, people. Stamping can be HARD, especially if you are me, which right now I'm fairly certain you're glad you are not.

So that's my second card today, and I'm pretty wiped out from the exertion.

Tomorrow morning I get a massaaaaage, then I hope to stamp again. No Tulle will be involved, I can promise you that much.

Thanks for stopping by!

Scrappy Sunday

Day two of my three-day weekend, and I've finally made a card I'm not embarrassed to post. Yesterday was not a good crafty day in my world. Today, however, I broke out some new rubbah and made this:

The critter is from Hambo, and the sentiment is from my bag of unused and unloved stamps and is made by Stampendous. The white and grey card stock is from the remnant bin, and the green card base was on my desk, and now it's not. The ribbon is from my box of Every Color Neutral Ribbon But The One I Need, and I think it's a perfect match! :) I attached it with my Tim Holtz Tiny Attacher that Lisa enabled me to purchase.

I hope everyone's having a fabulous weekend! Now if you'll excuse me, I'm going back to The Captain's Quarters for some more play time.

Thanks for stopping by!

Thursday, December 22, 2011

It's (GAH) Pink!

I did it. I can't believe I did, but I did. I made a Valentine's Day card already, and it's (gah) PINK! ACK! I KNOW! In all fairness, it started out with a lot of black and red, but I flipped the paper over to tape it and saw the mostly pink side, and even though it was pink, I decided it was the better choice for this card.

Here she is:

The pig and sentiment are two of the Hambo images I chose with my $50 gift certificate winnings from October's HYCCT challenge over on Splitcoast. I think he is a cutie. :) I really did have all sorts of red and black layers die-cut, and they are currently all over my desk, unused and unloved. I shall have to remedy that by finding another purpose for them. But THIS card needed to be pink.

Now if you'll exqueeze me, I need to go play some more. Thanks for stopping by!

Wednesday, December 21, 2011

WOYWW & Moxie Fab!

I decided to combine two challenges today - this week's Moxie Fab World: Tuesday Trigger: Stripe-tastic and WOYWW (What's On Your Workdesk Wednesday). To save all the Moxie Fab peeps from having to look at my desk, I'll do the challenge first, then move on to The Reveal for WOYWW.

Okay, here's the trigger:


Isn't that amazing?! And here's my card:

 I chose the stripes, which I declared to be Concord Crush, River Rock, Baja Breeze and White. I also chose the Peter Pan collar with circles on it and used my MFT Dizzy Border die for that element.

That handsome taffeta ribbon hides the results of an unfortunate un-sticking incident that I really don't want to discuss right now, but I WASN'T starting over! Hmph. Oh, and the sentiment is from Paper Smooches.

Okay, time for the desk reveal for WOYWW:

Yeah, I know it's Thursday over in the UK already, but it's still Wednesday here! There is a lot of, er, stuff here, mostly projects in progress.  Front & center are the pieces of card stock that became my Tuesday Trigger card above. To the left are some parts that are in the process of becoming a (gasp) Valentine's Day card. Everything else is pretty much still here from the last time I took a photo. See that bandanna? Yep, still there.

In other news, the Analyst in me has planned a controlled test. One of my peeps wants to open an Etsy store, but she's afraid her cards are too floofy and fat to mail without being destroyed. BAH, I say, BAH! So I said I'd make a floofy card (HAHAHAHAHAHAHA, yes, I know, pretty funny, eh?) and mail it to her so she can see that she's worried about nothing. So stay tuned for that. I might have to take out some of my Webster's Pages floof for that effort. I'll be sure to warn you before I post it.

I'm off to finish that Valentine's card. I can't believe I made one ...

Thanks for stopping by!


Tuesday, December 20, 2011

Another Scrappy Card

Last night I played with remnants some more and made this:

Maybe not my best work, but I had fun with it, and that's what's important, right? :)  I broke out my as-yet-unused Memory Box Seville Buckle die, cut two of them, and put them on top of each other - offset. I only put glue in the center, so most of the die-cut shape sticks up off the card front:

The yellow and poppy layers were from my remnant box, and the poppy piece was already punched - all I did was layer the two pieces. :)

Hopefully I'll get over this color combination soon, but maybe not. I'll rummage deeper into The Heaplet next time. :)

Thanks for stopping by!

SOS Challenge #31 - Soft as a Snowflake

This week's challenge at Shopping Our Stash is Soft as a Snowflake. This time we ask you to dig out the Flower Soft, felt, snowflake stamps, papers, bubble stickers, puffy embellishments, flocking, fun flock, fabric flowers ... as long as it has something "soft" on it and/or an element of snow (snowmen, snowflakes, snowy scenes) - it works! OR use a Day for Daisies image! I think that's a TON of options!

Here's what I did:

I flocked him!!! (OMG, you have no idea how I've wanted to say that!) Okay, seriously, this is a 100% stash card. I had an extra (failed/mis-cut) MFT snow man stamped on a piece of white, and I figured out I could cut him out with that oval die and even though the bottom of the image was a hack, I could over that up, no problem.

I colored him with Copics, then got to work flocking him. (hee hee, no, I won't stop). Having learned my lesson about white flock being a magnet for the non-white flock, I did the blue scarf first, THEN did the white. Poifect! Lookie:


The Basic Grey papers were all still out, stuck into the front of the 6x6 pad, so I used them. Done.

Next, mostly because this cra ... er, stuff was still out on my desk, and also because that awesome piece of paper came for freeeeee with my Silhouette glitter pens, I used it with the red felt snow flake to make this:

Oh, look, that handsome folded and sewed ribbon is crooked. Sigh. There is a pool of Crystal Effects under that snow flake to hold it in place. The Merry Christmas is from a Taylored Expressions Poinsettia stamp set.

Here's a shot of that paper so you can see there really is red in it, and also so you can actually see the sentiment:

Niiice, eh?  I love that piece of paper. Again - ALL STASH, PEOPLE!

Okay, now it's your turn! Go find something in your stash that passes for "soft" and USE IT to make a card. Then go over to Shopping Our Stash and link us up so we can see what you've made!

Thanks for stopping by!

Sunday, December 18, 2011

Something A Little Different

Earlier today I was cleaning up my craft desk (Bwahahahaha! Okay, that won't happen.) Um, I was putting away the Christmas stamps and cut-outs and stickers and stuff and I ran across some of this really pretty SU paper (Domestic Goddess, of all things) and felt compelled to act on a suggestion from a friend. The suggestion was to make Post-It Note™ holders.

Well, knowing how short I am on space, I hesitated. Also, a fellow crafter is THE Post-It Note Holder Lady at all the local shows, so that wouldn't be fair. (It's amazing I ever sleep at night, isn't it?)  HOWEVER, it is a fabulous way to use up remnants, and heaven knows I have those laying around, so I tried one. Here she is:

 All of this was cut from pieces laying on my desk, except the base which was cut from a piece of very heavy card stock - maybe 120 lb. The doily is from Martha, but I also have that die from MFT, so I could make more if I run out.   I also made the button, because I could.

Here's a side view:

 This was ridiculously easy to make, so maybe I'll clean up my desk some more and make more of them. I need to get Post-Its to put in them, but I'll wait until after the holidays. OMG, you'd need to be CA-RAZY to go out there now. I don't shop after Thanksgiving, and I sure don't shop the week before Christmas!

You'll probably see some more of these float by as I continue straightening up The Captain's Quarters. Next up: Valentine's Day. Can you believe it?!?!?! Stamping is HARD, people, HARD! We are always a holiday or two ahead of the rest of the world. It can be quite confusing.

In other news, I've put away the remaining unsold holiday cards as part of the Holiday Purge. I suppose I could maybe, I dunno, write a few of them and send them, but that would be so out of character for me. Hmmm, maybe that's enough reason to do it! NO ONE will suspect anything!  heh heh

Okay, then. Thanks for stopping by!

Saturday, December 17, 2011

Hambo Challenge and CAS (not)

I tried the Hambo Hoedown challenge again, this time remembering it involved CORNERS. I still failed, unless consistently-rounded corners counts as "dressing up", which I'm pretty sure it does not.

I also used a sketch that has been stuck in my head since I first saw it, and tried to make it work.

Here's the sketch from Card Positioning Systems:

When I first saw it, I thought "stop light!" Then my challenge was how to incorporate that into a card. THEN I thought I needed to use a Hambo image. Then this happened:

I totally blew the CAS aspect of the challenge, but it NEEDED CLOUDS! I originally had just the stop light, cow and grass and it was booooooring. I was going to use my LawnFawn Harold's Letters set to stamp "cow crossing" but then I decided the sMOOches sentiment from Paper Smooches was better.

Oh, look, the stop light is crooked. ;/

And the Hambo challenge was to dress up the corners. I don't think a corner rounder really counts there, but I'm going to enter it anyway, if only to let them know I'm not dead.

Other details: Cloud die - A Muse Studio; Grass die - MFT (I think); image - Hambo farm cow; sentiment - Paper Smooches; buttons - hand-made by moi; card stock - ALL SCRAPS!; Copic markers and silver glitter gel pen for coloring.

That's it! I'm off to find something for dinner, then I'll hopefully stamp some more.

Thanks for stopping by!