Saturday, June 30, 2012

A Mojo Challenge

Last week I read about a new challenge called The Great Mojo Comeback, and since my mojo has been MIA for waaaay too long, I'm in! This week's challenge is to use a fabby layout by the super-talented Shari Carroll as a sketch for our cards:

I actually started out making something completely different, but it morphed in the direction of this sketch, and I'm glad it did!  Here's my card, then I'll explain:

It all started with a full card front of cream embossed with my Embossabilites So Trendy folder. Then I spied this sketch and changed gears. I opted to use a Spellbinders die from the Nestabilities Label Fourteen set to cut the embossed card stock. It flattened out the embossing a little, but I'm okay with that.

I broke out my old and dusty pack of Basic Grey Stella Ruby papers to make the vertical strips. At the end, I went all crazy and popped the top strip up on dimensionals.

I must have played with letters to fit on the die-cut piece FOR-EVAH. I finally die-cut the 'i' and 'u' (dies from MFT) from a piece of Stella Ruby paper, and the Heart (Nesties) from a different piece of Stella Ruby paper. Yeah, at this rate it's definitely SABLE. (look it up in the left side bar)

I wanted to use buttons for the yellow elements on Shari's sketch, but most of my buttons are shiny or not quite the right color, so, as is my nature, I made my own buttons from the Stella Ruby papers. Perfect match! I actually punched the bottom layers out of Kraft and just the top layers out of the red. I'm trying to ensure the SABLE factor, here. :)

I dismembered some brads and glued them (legless) into the holes of the buttons with some Glossy Accents.

I really like how this one turned out. It's muted. It's not too froo-froo. I think a guy could even send or receive this one. :)

Thanks for stopping by!

Just Playing (Part First)

In case you haven't heard, a line of serious storms ripped through much of the right half of our country last night, pretty much from Chicago, IL, to the Atlantic Ocean. Most of the damage was from high winds, and close to a million people in the MD/VA/DC area were without power at one point. I got lucky and only lost power for about an hour during the storm that I listened to and watched from the safety of my bed. I'm grateful for the power today since it's another record-setting HOT. Ugh.

They called this storm a derecho, and here's a great article about the science behind what blew through here.

But weather is not why you're here, I'm sure. :) I have power, but I did lose my DSL for much of the day, so I had a period of disconnectedness that I took advantage of, and I played in the craft room.

My first card started with this piece of remnant:

and I decided I needed to use it for this sketch challenge from Deconstructed Sketches:


Working with only what was already out on my desk, this is what I ended up with:

I'm not in love with this card. Too many greens, I think, and all wrong together. However, on a brighter note, I did use four more stamps from my HA My Happy set, so there's that. :) And I used that piece of paper from my desk, so it's gone now, too. AND, now I can put away that stamp set, since I've used it. (bonus)

I'll share more of my play-time cards later, maybe. :)

Thanks for stopping by!

Thursday, June 28, 2012

A New Day

Yes, kids, it's a new day. Or tomorrow will be, AND tomorrow is FRIIIIIDAY! I am not dead, though it has been four days since my last photo was taken, so I'm only nearly dead. I blame a draining work week and missing mojo.

But in a recent fit of retail therapy, I ordered one or more things from Simon Says Stamp, and since my order arrived, I forced myself off the couch and into The Captain's Quarters. I just made this:

I used my old-but-not-yet-opened Hero Arts My Happy stamp set and my new Simon Says Stamp Hexagon Border die. Oh, and the washi tape is also new. Hey, I had to justify the shipping, right?  (tee hee, I typed that just ify, like it's kinda IFFY logic. pffth.)

Here is a close-up of da boid:

I inked the wood-grain circle stamp in Memento London Fog and stamped it off on some scrap paper before stamping it on the card stock. I'd planned to stamp da boid over it, so the background needed to be lighter. I colored him with my B02 Copic marker. I did not color the fleurs ... longest. week. ever.

In other news, I feel compelled to re-do all my blog categories and labels. I do. I may not get to it, but I still feel like it. Or I may start one day with all new categories. Or maybe I'll go to bed.

Thanks for stopping by!

Tuesday, June 26, 2012

SOS #57 - Red, White & Blue or Stars & Stripes

It's time for another challenge over at the Shopping Our Stash blog. This week we ask you to use Red, White & Blue on your card; or Stars & Stripes; or surprise us and mix 'em up. Red, White & Blue and Stars & Stripes don't have to be only for patriotic holidays, you know, so put on your thinking caps!

Here's the card I made for this challenge:

I don't know about that raffia, but I like the rest of the card. I followed this sketch from My Favorite Things (aka: MFT):

AND I opened and used a ton of my MFT stash. I was determined to NOT make an Independence Day card -- I wanted to show that RW&B can be so much more versatile than that!

What, wait ... this can't possibly be all she has to say, right? Okay, let's have a show & tell. :D I documented how I did the button and raffia, so I thought I'd share that here.

First I put the button where I wanted it:

 and I punched through the holes with my paper piercer. Then I pushed the paper piercer through the holes to embiggen them.

This next part was the most difficult -- feeding the twine through the holes:

I ended up threading it through a big-eyed needle and pulling it through that way. Once that was done, I v-e-r-y patiently fed it through the holes of the button. Then I tucked in the bunch of raffia and pulled the twine tight so the button held the raffia in place, and I tied the knot. Done:

Okay, now it's YOUR turn. Go into your stash and find some Red, White & Blue stuff, or stars, or stripes, or a combination of any of the above. Then make a card and link us up over at Shopping Our Stash so we can see what you've made!

Thanks for stopping by!

Recipe:
Stamps: MFT Big Greetings
Paper: Authentique Celebration collection, SU Naturals White
Ink: Memento Black
Other: MFT Die-namics Mix & Match Banner, MFT Die-namics Notched Tags stamp & die set, Divine Twine by Whisker Graphics, misc white button, misc raffia

Sunday, June 24, 2012

Sunbursts

I got a clue! :)

People ask me where I get my ideas, and I tell them I spend a lot of time reading blogs and tutorials. A LOT. For example, my bloggy pal, Lauren, posted a card for a challenge I used to follow, then for some reason it fell off my radar. Which challenge? It's called Inspired By Challenges, and you get a different inspiration each week. This week's challenge is:


Sunburst. I have never successfully made one of these, so I decided to give it a whirl today. I have several templates for cutting sunbursts so they're even, but Lauren did hers without one, so I thought I'd be bold and try the free-wheelin' option myself. Here is one of the three (THREE) cards I cranked out today:

I used my now-open pack of Cosmo Cricket Early Bird papers. The trick was to get the strips of paper ray-like, and since I was flying without a net, this is what I did:

First, I cut a bunch of strips about 1.5" wide:

Then I cut them each on the diagonal:

I did this for all the papers. For the yellow strips, though, I had other plans, so I cut them again:


Then I got to work. I covered pieces of card stock with adhesive (I used my ATG, making sure to hit the edges), then placed my first ray sorta in the middle. The rest I just lined up next to it and it made its own pattern. For the first one above, I didn't use any yellow, but for the next two I did, because I wanted to mimic the yellow in the inspiration piece.

Here's one:

 You can see I separated each colored strip with a piece of yellow, and it really brightens it up! You can also see that the top layer on this card doesn't reach all the way to the right edge. That's because ... have you ever cut your own bangs? You know, take a little off on this side, then a little on this side, then ... yeah, again I did this. I finally got it pretty even, then stuck it to the yellow layer crooked. I cried UNCLE and cut the dang yellow edge off and decided this one would butt up against the left side of the card. I totally meant to do that. *ahem*

For this next one, I had a moment, and 4" turned into 3.5", so it was too small to start with. I realized this after I'd stuck on the rays:

To be different, I lined this one up with the right edge. Since I was in "winging it" mode, I also hand-cut the circles for the centers of each sunburst. Okay, they are not actually circles; they are rounded-edge shapes.

I've been staring at these most of the day, trying to figure out what to do to finish them. Did they need something more inside the circles? Did they need bling? What? I finally decided they didn't get anything else, and I settled on plain old sentiments and made them into banners. I called them Done.

And now that the weekend is just about over, I have another idea, but it will have to wait until tomorrow evening.

On that note, I bid you adieu. I hope you had a good weekend, have a great week, and thanks for stopping by!

I've Got (almost) Nuthin'

This weekend has been a bust in the craft room. I've printed out sketches and color challenges and all sorts of things to occupy my time, and everything I've touched has become more pretty trash. The last straw was this card by Jennifer McGuire, and the accompanying video in which she shows us how she pulled off her trick with the die-cut flower, and it's not smoke & mirrors, people. I totally intended to CASE the idea. I failed. But I was so frustrated by my failures this weekend that I forced myself to finish 
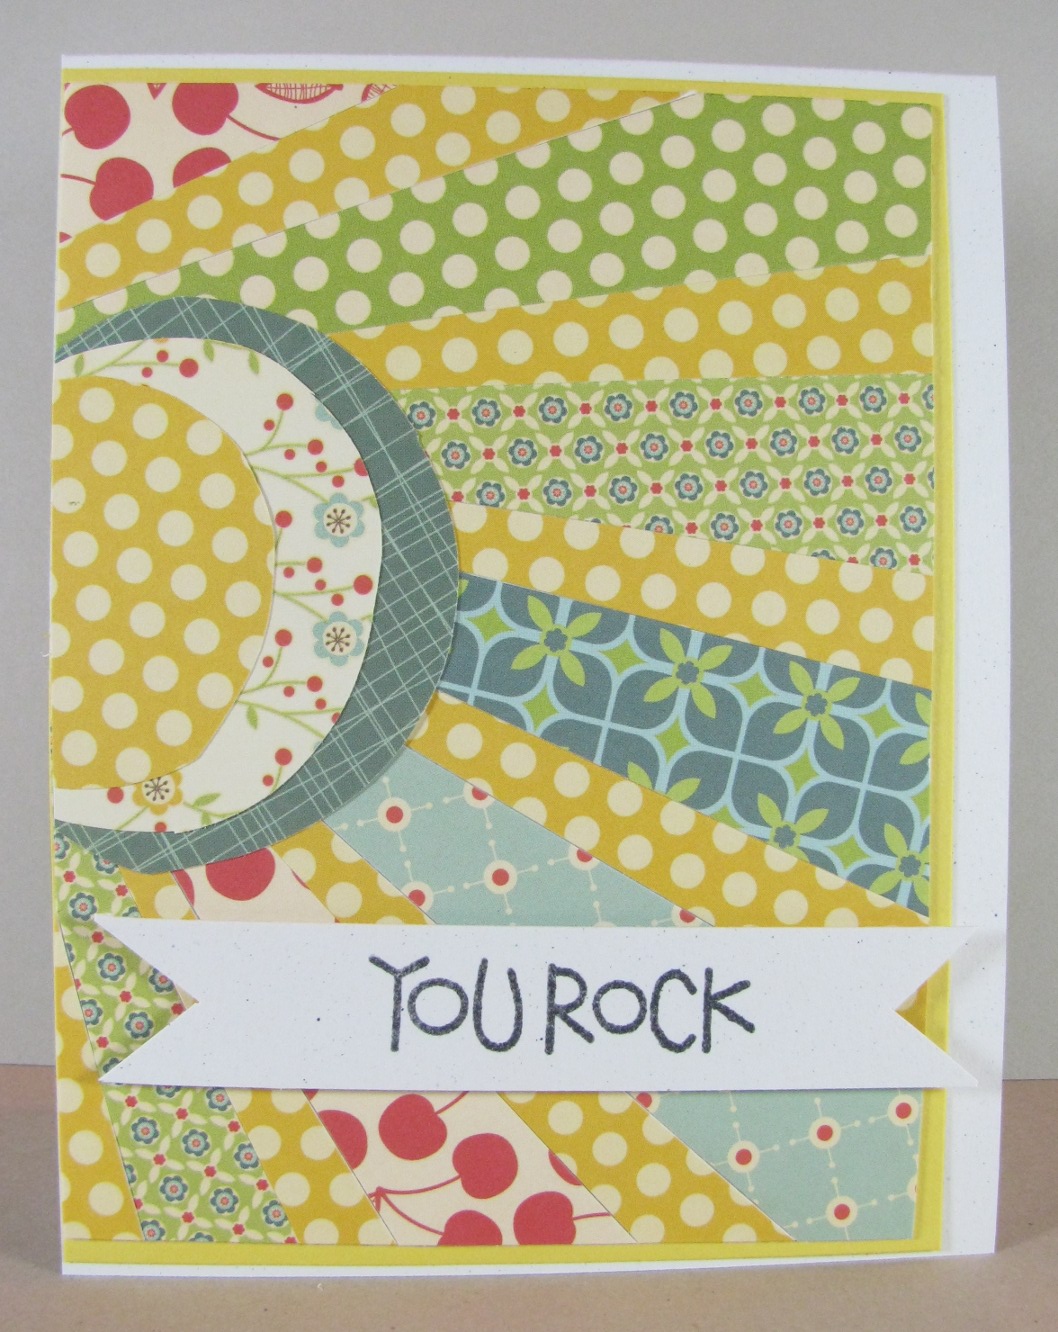
just one card. JUST ONE! Here it is, then I'll explain:

Here's how it's supposed to work: Jennifer die-cut the shape, flipped it over, applied a dot of glue to the back of each of the inside parts-is-parts, flipped it back over, pressed it to the card front, waited for it to dry, then removed the outer part of the die-cut shape. This left all the innard pieces that she then went back to color.

This is all to keep you from having to color all the separate tiny pieces, then place them back into the die-cut. In theory.

My turn. I die-cut the shape, but there seems to be a delicate balance between making a clean cut and getting the inside bits to stay put. They were popping out as I took the thing out of the die (which is what you would normally want), so by the time I got it to my desk, it was all apart. And I tried several times. Oh, I tried. I finally decided it would be WAY easier in my world to just do the fussy gluing, and that's what you see here. It still wasn't easy, as you can tell by the pokey-marks from my paper piercer I used to poke out the shapes:

My method: First, I die-cut the shape (Memory Box) in both white and artichoke. Truth be told, I cut many, many white ones. Two survived. Most of the bigger pieces around the outer edge, and the smaller pieces from between them, fell out on their own, so I stopped fighting it. I stuck the skeletal white die-cut to the River Rock piece, just gluing the center and the few white pieces that stayed in place; the outer edges are not glued.

I then punched out all the artichoke bits from the outer edge of their die-cut and glued them into the white die-cut shape. I applied a dot of glue in each missing white section, then I took the other white die-cut and placed it over this one, and used my paper piercer to poke them out of the top die-cut and into the bottom one. Thus, the pokey spots on most of them.

CRAFTING IS HARD, PEOPLE, HARD!

In case you wondered why these colors, I was trying to follow the current Dynamic Duos challenge:

Fortunately, they also allow neutrals, so I used black in addition to the white. I needed contrast, and the die-cut is really a ribbon slide, so I needed to cover the center, and a black button was it.

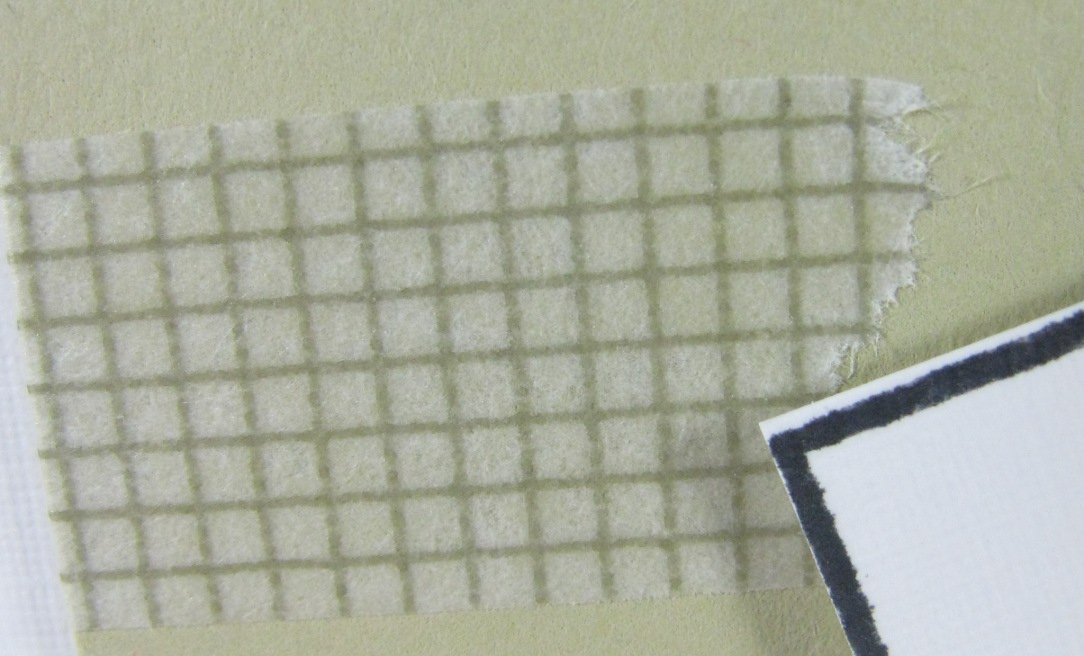
The ONE THING on this card that I actually like is this washi tape:

It's Khaki or Olive or something, and I loved the pattern, so I got it in several colors. I am weak. I think it goes really well here, and it breaks up the bottom part of the card.

The tag was an afterthought. I was going to stamp the sentiment in black between the pieces of washi tape ... booooring ... so I went with the tag.

Yes, I have had a baaaad weekend in the craft room. Except for my SOS card that you won't see until Tuesday, I have finished NOTHING ELSE. Well, I made a to-die-for enchilada casserole, but I'll talk about that next time.

Thanks for still being here, and thanks for stopping by!

Saturday, June 23, 2012

Birthday Sketch

My eldest has a birthday today (*waves* - pffth, like he reads this blog), and I'm telling you: cards for men are one of the most challenging things in my world. Well, next to domesticity, that is, but this is a crafting blog, so it's way up there.

I took the June SFYTT:

and made this:

I'm quite proud of the stash content on this card. :) Both the chevron and the ... other patterned paper are from The Heaplet, and I declared them "coordinating", or at least both in the "kinda tan" family. Color, it needed color. I went with blue, and added a piece of almost-never-used SU denim ribbon. After I scrapped (HA! No pun intended) the idea of stars and instead hollered "BUTTONS", I grabbed two dark blue, then opted for orange for some pop. Yes, that's a small orange button nested inside the large blue one. I added the orange layer, rounded the top left corners, and a card was born.

I think it's different, not boring, and shouldn't embarrass him if anyone else sees it. I'd call that a success. :)

In other news, I'm coming down off a 4-evening book club marathon with The Bloggess, and I'm seriously behind with my crafting. I played a bit today and made a ton of pretty trash. I hope to gain some ground on Sunday and do a few challenges, so hopefully I'll have something more to share.

Thanks for stopping by!

Thursday, June 21, 2012

I'm not sure about this one ...

Yeah, I'm not so sure about this card. My intent was to follow a sketch and use ONLY remnants and UFOs. I succeeded in that, but I'm not so sure this works. Here's the sketch from Card Positioning Systems:

which I eventually turned on its ear:


 and here's what I ended up making:

It all started with that piece of SU specialty paper - the green and brown are opposite sides of the same paper, and I may have hoarded it. The chevrons are left over from this card, and I declared them close enough to use. The white die-cut fell out of the UFO container when I retrieved the chevrons, so it got used, too. It's held on with a few attachers (aka: tiny staples) from my TH Tiny Attacher. The white & tan-ish chevron paper behind the brown was on top of the Heaplet, so why not.

At this point I still hadn't turned it - it still looked like this (minus the sentiment - just put your hand over it):


It needed contrast, thus the yellow button. Once I flipped it 90 degrees tonight, I had a place for a sentiment, and based on the week I've had at The Day Job, this one was perfect. (It's from one of the new Paper Smooches sets.)

In other news, I've been participating in Jenny Lawson's (aka: The Bloggess) book club live meetings. Well, the first night we were in a chat room at GoodReads, and we crashed GoodReads. Then someone set up a chat somewhere and we all went blind from the spinning comments. Last night we used TwitCam, and it took about 47 minutes for us to crash that one. The only thing I don't like about it is it auto-tweets your comments and I pi$$ed off a few followers, even with the early warning.

What have I learned? I've learned I need to make booze slushies, and there's something called cake vodka. We've met Victor and all the cats. She answered a lot of our questions, and we also got to see some of her taxidermied critters. Tonight I hope we actually talk about the book. My favorite line is in chapter ~19, where she's lost, calls home for help and her husband asks her, "How long do you need to be missing before I can start dating again." HAHAHA! *ahem*

So that's why I've been MIA in the stamp room, but I promise to get back in there after tomorrow. I think we'll need to discuss the whole book now in one hour. It's gonna be tough.

Thanks for stopping by!

PS: How many of you actually put your hand over the sentiment? :D

Tuesday, June 19, 2012

SOS Challenge 56 - Stickers

It's time for another Shopping Our Stash challenge! This week we ask you to use stickers. You can use any type of stickers from your stash: alpha, trims, puffy, clear, etc. Anything that has adhesive will work!

To prepare for this challenge, I went into my sticker stash box and pulled out a bunch that looked promising:

I never intended to make more than one card, but ... I couldn't decide, so I made five cards -- yes: 5. You may want to get a cuppa and settle in. This will take a while.

First, I used this package of vehicle stickers:

 ... to make this card:

Inspiration: People ask for the darndest things. One year while sitting at my table at the farmer's market, someone stopped by and asked if I had a card for someone who just got their driver's license. Um, no, I do mostly general-type cards, and that's pretty specific, but she got me to thinking. I went to the Dept of Transportation web site (or maybe it was a sign site) and got pictures of various street signs, printed them, and made a few cards. I eventually sold one or two of them, but I never made any more.

This is also something you learn when vending. You need to say, "No, sorry, I don't have that." So anyway, that's where the idea for that card came from. I'll let you know if it ever sells. :) (car stamp by Rosie's Roadshow)

Next, I used these fish stickers:

 ... to make this:

All I did was stick them to a piece of pretty Japanese paper from The Heaplet. Even the purple card stock layer is from the remnant box. Here's a close-up of some of the fish:

Next up, I used this pack of 7 Gypsies canvas tags (yes, unopened):

 ... to make this:

Again, the patterned paper was from The Heaplet. I win.

Then there was this bag of baby stickers:

 All sorts of stuff. I ended up making this:

This is a small card that could be included with a gift for a new baby. I used two stickers and punched a heart out of a gingham scrap.

Next up:

 I didn't make a card with these, but I seem to have them in every color, in multiples. These were popular back in the vellum tag days, long before Nestabilities and die-cut machines were in every craft room. I may have to break into these one day. I might even have dies that match it.

Next (and last one), I used these:

... to make this:

I honestly don't remember purchasing these stickers, but they got here somehow. These are so not something I'd buy or use, but I did it for the team.

I never even got to my wall of Thickers, which are also stickers and totally qualify for this challenge.

Alrighty, then, now it's YOUR turn. Go into your stash and pull out some stickers. You KNOW you have some. Got Thickers? A sticker alphabet? A sheet of stickers from a Basic Grey package or kit? Any Class A Peel sheets? Any Christmas poinsettia stickers? Any self-sticking lace trim? Break it out, stick it onto a card, then come back to Shopping Our Stash and link us up so we can see what you've made!

Thanks for stopping by!

Monday, June 18, 2012

Meow

Last night I played with the (checking real quick ...) current Card Patterns Sketch Challenge:

 I took a scrap of Basic Grey Max & Whiskers paper to use for the grey part in the sketch. Then I took another piece from the pack for the white part of the sketch. I did the scallop and the ... WASHI TAPE, then got stuck.

Then tonight I flipped the sketch like this:

and my card was born:

In a rare moment this past weekend, I cleaned widened the paths in my craft room, and along the way I found a pack of Basic Grey felties that went with the Max & Whiskers papers. So once I reoriented the card, I added the kitteh (here he is up close and personal):

 (squee -- so cute!) Love the whiskers! And maybe you didn't notice the mouse down below:

So cute. But it needed a sentiment and I was out of room, and out of ideas. I finally ended up with my trusty Dymo labeler and a scrap of the brown to anchor it. Yeah, it's not part of the sketch, but ...

In other news, if you haven't read "Let's Pretend This Never Happened" by Jenny Lawson (aka: The Bloggess), you must get it. It's so irreverent. I mention this now because tomorrow (Tuesday ) night is her first online book club session over at GoodReads, and I think it will be a hoot! Just think: a chapter-by-chapter discussion of an irreverent book with the author! If you want a peek into her book, she reads the introduction and first chapter on her blog post about the book club. Okay, I'm done now.

Thanks for stopping by!

Sunday, June 17, 2012

FINALLY

Yes, I FINALLY finished these cards. Yi yi yi. Stamping is HARD, people! This weekend I'd planned to CASE one of my Tweeps, Stephanie, who posted these fabby cards over on A Blog Named Hero. The idea was to use the same stamp different ways, and she used one of my new favorite background stamps: Lattice. It was going swimmingly until I got to the second card, and it took me ALL DAY to finish that one. /end-whine

Here's the first one I made:

 I started with a piece of textured white card stock and heat-embossed the Lattice stamp in white. I was going to color the shapes with Copics in a rainbow, but then I decided I didn't have the patience to stay in the lines. I know, I didn't have to stay inside the lines, but my brain had already moved on to option #2. I decided to water color with my Gelatos.

I scribbled the lightest color Gelato onto an acrylic block, spritzed it with some water, and painted it onto the bottom of the embossed card stock. I scribbled the next darker color onto the block (I didn't bother cleaning it since I was going light to dark), spritzed it, mixed the colors a little (living on the edge, here) and painted the next part of the card stock, overlapping the previous color a little. I repeated this until I had done the darkest color. I didn't even bother going all the way to the edge of the embossed piece, which is how I got that "worn" look around the edges.

I decided the Ranger Distress Ripe Persimmon was the perfect color to edge the white, then I declared SU Calypso Coral to be close enough for the mat.

One thing I wanted to point out -- this is not dirt:

No, I got a bug up my behind that I needed to color a few of the openings with Smooch Moonlight pearlized ink/paint. Bad decision, but I was NOT starting over.

Second card:

I used four 1" strips of paper from my Cosmo Cricket Clementine 6x6 pad. <3 I stuck them onto a 4x5.25" piece of card stock, then stamped the Lattice background stamp and heat-embossed it with white EP. (Stephanie said she put hers together like a puzzle -- she is much younger than I am. My head would have exploded.) I declared Calypso Coral to also be a match for these papers, so I matted it and ran a piece of ribbon across it. Then my world fell apart.

I tried most of Saturday night and most of the day Sunday to get the right sentiment in there, but it just. wasn't. happening. What you see here is the 3rd white die-cut piece, since I schmeared nope-not-dry-yet ink over the first two. The Love You was die-cut on my Silhouette using the Bender font. I'm not loving it, and it may not be the final-final version, but for now I am done done done.

So aside from my miserable experience with the sentiment, this background stamped over pretty paper remnants is DA BOMB. I always forget I can stamp on patterned paper!

Okay, I'm going back in for some more stamping. Thanks for stopping by!