I uploaded the pics in size "small" so I do not fill up Blogger, and it lets me have a running commentary down the right-hand side. So get a cuppa joe, or a vat of your beverage of choice, and settle in for a long read.
First I must explain what prompted this stamping frenzy. A year or so ago, one of my co-workers introduced me to The Paper Source. Let me just say that if you have a weakness for paper, even the 12x12 size, do not, I repeat: DO NOT, go to The Paper Source. If you want a mere 12x12, they have that upstairs. But to get upstairs, you have to walk through walls and walls and displays and more displays covered with parent sheets. Beautiful, lovely parent sheets, just asking to be brought home...
Just what is a Parent Sheet? Definition: The larger size sheets of paper used by commerical printers are called parent sheets. These large sheets of paper are typically printed to fold into smaller sizes such as for booklets or brochures. Or, parent sheets are printed then cut into smaller sizes. Standard parent sheet sizes are 17x22, 19x25, 23x35, and 25x38 (North American sheet sizes) or A2, A1, and A0 (ISO sheet sizes).
I went to The Paper Source. I saw paper. I bought paper. If you think it is tough to use a whole 12x12 piece, imagine how much fun it is to use a whole Parent Sheet. And I have many. Many many. So tonight The Plan was to hack up some parent sheets and make some CRS cards (I am sold out, again.)
After you read a few of these steps, you will see that the majority of the work is in the preparation. Kinda like cooking and that whole mis en place thing. So here we go.
 1. Cut up the card stock for the bases. I'd opted for Naturals Ivory. I cut a lot, and scored them with my Scor-Pal.
.
.
.
. (these dots keep me from going postal with photo alignment)
.
.
.
.
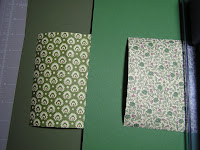
 2. Cut up the parent sheets. Here I have three different sheets all cut up into 4 x 5 1/4. Tonight we'll be using the top two. The bottom one will be used another night, but while I was hacking ... well, you know.
Notice the nice, almost permanent curl to the papers. Can you tell they have been rolled up for a long time?

.
.
.
.
.
.
.
.
.
.
.
.
.
.
.
.
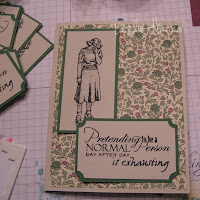
(It says, "Pretending to be a normal person day after day is exhausting.")
.
.
.
.
.
.
.
.
.
.
.
.
.
.
.
.
.
.
.
.
12. Stick the ladies down to one of the pieces of green card stock being used for the mats. Notice they are different sizes. Because I am incapable of cutting two pieces of card stock exactly the same size, this is a perfect method for me for matting. Maybe not for you, but it certainly works well for me.
Oh, and notice I punched the corners of the sentiments with the Ticket Corner punch before I stuck them onto the green mat. 
.
.
.
.
.
.
.
.
16a. Throw away all those green crumbs. See how small my work are is getting? Yeesh.
.
.
.
.
.
.
.
.


.
.
.
.
.
.
.
.

.
.

 27. Here is my first attempt to lay out the lady with the larger sentiment. I pretty much knew the pieces would overlap, so it was just a matter of getting the dimensionals in the right spots.
.
.
.
.
 28. Tying the ribbon and all that other fun stuff was done the same as above. Here is the first finished card of this flavor. I made four more.
.
.
.
.
.
.

29. Then I made this one, then four more.
.
.
.
.
.
.
.
 30. Here we have it: Twenty finished cards. Phew!
.
.
.
.
.
.
.
Normally I do not make this many cards in one sitting. Normally I am not faced with a cut-up parent sheet. Or two. Heck, it's bad enough dealing with a 12x12. I will never again whine about using a whole piece of 12x12. Well, maybe not.
So that's it. That's what I do when I should be eating or cleaning or, like now, sleeping. Oh, and I have a bunch of scraps from those parent sheets. Anyone want them? ;-)


I have tons of scraps...some very tiny. I'm saving them up in a box and one day...some day...I'm going to make paper. I can imagine how pretty it will be with all the various color flecks in it.
ReplyDeleteyou know i want some scraps! LOL
ReplyDeletealso, thanks for the explanation, its good to see how the pros do it ;)
ReplyDeleteWow.... what an exploration into your world ! :)
ReplyDeleteScraps are always good... I never knew about parent sheets! Well...not of the paper variety !
We work very similarly when mass producing. I choose to think we are great minds thinking alike. I think your lady stamp knows the truth about us, though :)
ReplyDeleteMy parent sheets (I have two tubs in the closet) have been rolled up and barely glanced at for the past 5 years...