Sunday, July 4, 2010

Market Update

Yesterday was a glorious day for a farmers market. This is a view up Main Street, right across the street from our pavilion:


If it stays like this the rest of the summer, none of us would complain.

Our little market has grown considerably:

It was so nice out, the market was hopping! It's always so much fun when it's busy and there are lots of people. And dogs. We'll get to them in a sec; I'd like to bring you produce first, because it wouldn't be a farmers market without produce, right?

Here's my usual maters shot, but this week part of it is in shade because Farmer Mike stood up some of his bins:

He says he does this for me, to make a 'wall' so people don't try to crawl over me to get to the veggies. (Yes, they have tried.) He also said it was to keep the squash from getting frisky with me like it did last week. Mmm-hmm. I think he really does it for better presentation of his produce. See:

Squash doesn't smell as nice as basil, but those bins do make a nice backdrop for me. Speaking of basil:

He had it set up on the other side of his tent yesterday. Across from these:
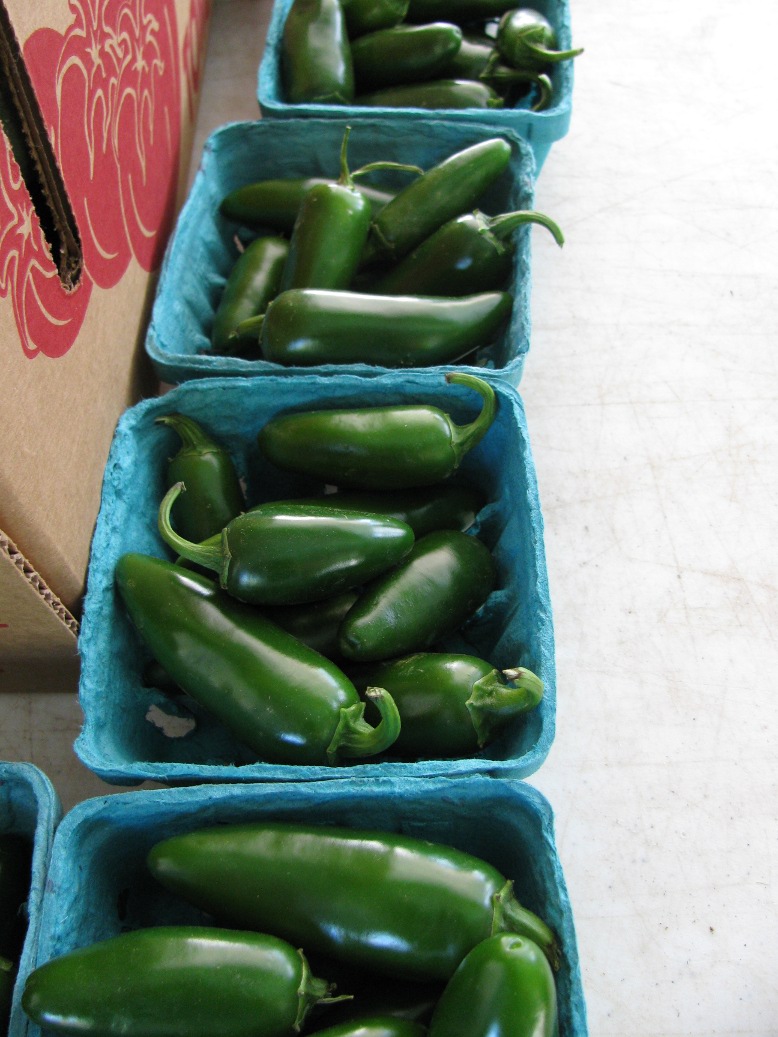
... which I call "fire in a box". I think these could kill small animals.

Farmer Mike also had melons:

... and they were quite popular, because this is all that was left by the end of the market:

No, I didn't get one, and I'm sure I'll hear about it next week, too.

Farmer Katie (see, I not only asked her name, but I remembered it!) had another FAB set-up with her berries:

I got some more of her apricots. SO good!

She also had cut flowers:

We'll see more of these in a bit.

Farmer Margie had plums this week:

... and more peaches:

... and some Birds Egg beans:

Last week I thought she'd called these Cranberry Beans. They're known by lots of different names. At this age, they are best opened and the inner beans used as, well, beans. Wanna see what the actual beans look like? So did I, so here you go:

Moving on, I stopped by the floral tent to drop off my vase. This is what this week's bouquets looked like:

... and this is the arrangement they put together for me:

The beading people had a very patriotic necklace:

So pretty!

Okay, ready for some doggies? I've been taking a lot of heat lately because I haven't had a doggie parade every week. Well, it's tough to get them all, and I'm really starting to scare people. Okay, maybe not scare them, but they definitely think I'm a few cards short of a full deck.

Fortunately, most people LOVE to have their dog's photo taken, so once they see I'm not actually dangerous, they are more than willing to pose with their dogs.

Check out this top-knot:

She said it's usually done in a French braid. Seriously. And here's her sister:

... with her own mini top-knot. FYI, I had to edit that photo to cut out people who probably didn't want to be featured on my blog. I'm just trying to do the right thing.

Then, crazy lady that I am, I darted across the street to get a shot of this guy:

Why, hello there! A Pit Bull puppy. SO cute!

And on the opposite scale size-wise, here is an Akita:


Only 18 months old. And a gentle beast, too.

Here is a hot pup:

... and a service-dog whippet:

Her itty bitty back pack was askew. The badge says, "Ask to pet me. I'm friendly." She was off-duty. Her service is to retirement communities as a visiting pet. Such a sweet animal.

Tweety stopped by, too:

You always hear him before you see him. ;)

This guy was seeking shade:

... and after a brief doggie encounter:

... he finally found it:

That's it for the dogs. Towards the end of the market, I was called over to take a photo of The Perfect Flower:

That pink one, bottom center. Here's a close-up:

Sigh ... I miss our Dahlia Guy. Then I went totally wacko and took a really close shot:

With a better camera, and a steadier hand, this could have been a great photo, but at least you get the idea. Just look at all those teeny tiny petal wanna-bes!

Since I was there, and the other flowers were feeling neglected, I took this close-up of another one:

Now, aren't you glad I'm done for the day? Oh, yeah.

My plans for today were thwarted last night by not having hoarded the right card stocks. I need a pack of SU Naturals White to make some cards for a charity (I agreed to it last year), so even though I've die-cut 25 pigs already today, I have no card stock for the actual cards. This is serious. I have put out an APB to some of The Ladies. My fingers are crossed.

Speaking of The Ladies, my classes are next weekend and I still only have 1.5 cards designed. This is not good. Note to self: don't make one that need Naturals White card stock.

And speaking of next weekend, I signed up for a Shoe Box Swap on Saturday, and if I haven't even done my class cards yet, how did I think I'd have time to do 20 kits for a SBS? WHAT WAS I THINKING?! Apparently, I wasn't. So if anyone wants to take my spot, let me know. It's in Ft Mead, MD.

Now I need to go do SOMETHING and try to be a contributing member of society. I might even get crafty and have something to show you tomorrow.

Happy Independence Day to my US readers!!! Happy Sunday to everyone else.

Thanks for stopping by

Saturday, July 3, 2010

Geisha, Geisha, Geisha

I'll bet you came here to see pics from today's farmers market, but I'll be disappointing you there. Oh, I took plenty. In fact, I started to scare some people. I think it's official: I am the scary lady with the camera. But I have a bazillion pictures of Geisha kids, so I started wading through them, and got tired before I was done. So the good news is you will not be inundated with all 16 Geisha cards, even though that's how many I made. The bad news is I didn't get to the market pics, so I'll post those tomorrow.

I thought I'd start in the middle. You've seen the thread-pulling exercise, the stack of finished layers, and one finished card. Never one to leave well enough alone, I had to tweak things as I went along. First up, we had a decision of "which blue looks better?" You see, when I stamped the little kimonos, I picked card stock colors that I thought went with the fabrics. But in reality, that was like picking a paint color for a whole room based on a 1" square paint sample. Those exercises can sometimes end very badly.

For the blue, I had selected Brilliant Blue, but when I put the Brilliant Blue as a background under the fabric, I didn't like it. I next tried Pacific Point, which, in my mind, was darned close to Brilliant Blue. But 12 photos later, I finally managed to capture the subtle difference:

The one on the left is Pacific Point. Side-by-each, you can see it's a little bit lighter - not such a deep color. This, my friends, made all the difference. Lookie:

I love those Class-A-Peel word stickers. I think they are just perfect with these images.

Then I had A Moment, where I thought I should layer a few of the images with what remained of my Brushed Gold card stock. I measured, I cut, I trimmed, I trimmed some more, and I ended up with this:

Eh? Not so much. I scrapped the idea.

One of my biggest challenges with these cards, aside from the fact that I ended up with parts for 16 of them (what was I thinking?!?!), was how to stick the fabric to the card stock. No standard two-sided tape or ATG tape would work, so I went for the red sticky tape. Oh, it sticks all right, but not to the fabric. At least not as long as I was picking at the ends of it to try to separate the backing. Once I got the backing off, it stuck to the fabric just fine.

But I must tell you: four strips of that red tape on the back of each fabric rectangle, times 16, was making me consider taking up heavy drinking. How outrageously frustrating! After about 5 or 6 cards, I went to Twitter and sent out a plea to all my crafty peeps, asking for suggestions. One was to use Crystal Effects (Diamond Glaze), but that would be wet, and I wasn't interested. Next: Xyron (a sticker-making machine, for you non-crafty types.) I ran a piece of fabric through the Xryon and it did not stick to the fabric. Drat. Next I thought about the do-it-yourself laminating sheets, but then I realized it's only sticky on one side. Doh!

Then it hit me: I have sheets of sticky paper (sticky sheets - like the red tape only in a 12x12 sheet). YES! I'd bought a bunch of them when they first became available from SU, and finally I got to use them! I cut a rectangle of the stuff to fit inside the center of the fabric rectangle and started to peel off the backing. It came off after the first try! YES! Success! I did a happy dance.

So I finished assembling the remaining cards and then went back and added the gold edging and the white collars on each one. Finally, I added my Class-A-Peel sentiments. DONE! I had 16 cards all finished. It only took me about 24 hours (minus time to sleep, but a full day all the same), after which I screamed something like, "I'm selling these for TEN DOLLARS EACH! OMG!" But I didn't, though these cards might be enough to push me over the edge and do tiered pricing. Seriously.

Since I worked so freakin' hard on these, you now get to see a few of them. You've already seen the blue one, so we'll start with a green one:

Does she seem a bit tipsy to you? :/

A red one:

ETA: Okay, this one got a gold layer. There was a brief discussion at my table today between two ladies pondering my Geisha gals. They liked the gold layer on the red one, but as one of them pointed out, she didn't "miss" it on the others. I hope that makes sense to you, because it does to me, and beyond that, I am unable to explain it.

A coral-orangey one:

For this coral-orangey one, I started with the orange kimono, but decided the orange was too dark to use as the background, so I used Cameo Coral. Oh, and speaking of Cameo Coral, it retired like three days ago, and I stashed all the retired card stock in the bottom part of the cabinet. Bad idea. I spent part of the day on my knees, bent over, digging for the color I wanted. Time to rethink that card stock storage system again. (Ow, my back!)

Moving on, here is one of the blue-green ones:

This is PTI's Ocean Breeze, and I LOVE IT. I love it so much, I am almost out of it. Must.order.more, but I'll wait until after this month's release, just in case there's something else I NEED.

Perhaps you noticed that sparkly gold ribbon I used on each and every one of these. That is from a spool of retired SU ribbon (it also came in silver). Even though I put it on 16 cards, and I cut it too long so I wasted some on the backs, I still have some left. I tried.

So after this little tirade, you'd think I'd be done with mass-production, right? Oh, no no no no. I got confirmation 2 weeks ago for an order for cards for a charity - the result of a discussion begun last summer. Yep. Originally she wanted 10, but now it's 25.

So after this order, no more mass-production for me. Nuh-uh. I quit. I think it's the "no instant gratification" thing. When I make one, two or three of a design, it's fun. It goes fast. I get it out of my system. I move on. I like that plan, and I'll stick to it the best I can. Promise. I think.

Tomorrow I plan to finish the 25 pig cards (yes, I said "pig"), then get a little domestic, then do some serious STAMPING. I hope. And I'll get the market pics up tomorrow, too.

Enjoy this long weekend! Happy Independence Day to all my USA readers, and thanks for stopping by!

Friday, July 2, 2010

I Am Irrational

Day 2 of my 5-day weekend, and I am still being amazingly semi-productive. Today I emptied the three unpacked SU shipment boxes cluttering my Living Room floor, put everything away, and broke down the boxes. CRAZY, I KNOW!

It's another glorious day weather-wise, so all the doors and windows are open again, and it's quite breezy inside, too. Finally! We had July in May, so now we get May in July. Whatever ... as long as we get it!

As I opened a window in the Captain's Quarters, I spied a pretty piece of patterned paper in my stack, so I stopped everything and used it to make this card:


I think the green or red might have been a better choice for the die-cut shape, but those shades looked too Christmas-y to me, so I went with the blue.

Then I took one of the Geisha girls I've been working on ... oh, yeah, I haven't told you about these little girls yet, have I? I'm sorry this is so long, but it gives you a good feel for how quickly I lose my grip and the situation spins dizzy-ing-ly out of control. This happens on a regular basis... no surprise there.

This all started when someone asked me to make three images of these little ladies with different colors of kimono, but not pink. Actually, she asked me months ago for these images, and being so pathetically behind, I am just now getting to them. So anyway, I started stamping and fell into my usual thought process of, "Hmmm, if I'm making three, I might as well make six. Or eight. Whoa, I've stamped five of this image but only four of the other one. One more of this one ... no, wait, that's now six and four. Oh, wrong image ... let's stamp another one. Doh! Mis-stamp, try again. Oh, now I need four of this third image. No, wait, I need five. No, six. Oh, let's stamp an extra one, what the heck." And so it goes, and I end up with a bazillion images to color and make into something.

What? Just throw away a few? What? Lalalalala ... I ... can't ... hear... you....

Backgrounds. I needed backgrounds. I went into the closet and pulled out my stack of Fat Quarters. A few years ago, I was in Fat Quarters mode, and no, I don't quilt. I inexplicably started going to fabric stores, though, and I bought just about every Fat Quarter I saw that had a gold thread running through the design. I even ironed them and I store them flat on a shelf. They are covered by a stack of mailing bubble envelopes, but I know they live there.

So I pulled out a few non-pink fabrics and cut off strips to use as backgrounds. I figured out how many background pieces I could get out of each strip, then went in search of colored card stock to coordinate with each fabric.

Based on the number of fabric rectangles, I stamped the kimono section of the images onto the colored card stock. You may notice there are too many numbers in this story. You see, the number of fabric rectangles I could get out of the strips of fabric had absolutely no bearing on the number of images I'd stamped. So as I started trimming the kimonos, I realized I had more girls than kimonos, and it didn't match the number of fabric pieces. So I stamped some more girls. Then I had to stamp a few more kimonos. Then I had to die-cut the girls.

I eventually ended up with the correct number, but it was a way larger number than three, which is all I ever really needed to make in the first place. Welcome to my world.

I decided to cut ovals out of some SU Brushed Gold card stock I have, and I layered everything together, then I colored the girls' faces with my E000 Copic. I know - Geisha girls wear a white paste-y make-up, but these are little girls dressing up like Geisha, so I gave them a healthy glow. Because I can.

Now the fabric. I showed you last night how I pulled the threads to "square" the edges. I made more than three, remember, so this took me FOR-EV-ER. Did I stop? Nope. Did I come up with a better plan? Nope. I did them ... all of them. I ended up with this stack I showed you last night:

Today my friend selected the three she wants, and I'm making cards out of the rest of them. This is what I ended up with:

Yeah, I know a gold layer would look better behind the fabric, but I ran out of Brushed Gold card stock, and even though I placed two orders yesterday, neither one included more Brushed Gold card stock. Go figure.

A second reason I went with this design is because I have several packages of Class-A-Peel stick-on words. I love these things! I used to use them all the time until I started collecting sentiment stamps. I thought the gold ones would look FABBY on these cards.

Also, if you look real close, you can see where I went over her hair pins and the front edge of her kimono with a gold gel pen. I also went back and did her collar with a white gel pen.

So now if you'll excuse me, I have about 15 more of these to assemble. I hope to get them done in time for tomorrow's farmers market. I hope tomorrow we have another day of this weather! OMG, would THAT be amazing!

Thanks for stopping by!

Thursday, July 1, 2010

Organization Day!

Good evening, all! Today has been GLORIOUS! And not just the weather, although it probably set some records today for LACK of heat and humidity. I have all the doors and windows open, and it is breezy through and through!

Today is day 1 of my 5-day weekend. I have much planned, but as we all know, I'll be lucky if I get half of it done. So I am quite proud of my accomplishments so far today. In case you don't know, today is the first day of the new Stampin' Up! catalog year. As such, I had on my list:

1. Re-organize card stock
2. Re-organize inks
3. Re-organize markers
4. Place 1st catalog order after 12 noon MT.

And I DID THEM ALL! Woo-hoo! For the non-stampers among you, this may be a little scary to see, but I thought I'd show you the re-orgs.

First up, we have card stock. Because I'm a Demo who gives classes, and because I also make cards to sell, it's just easier for me to always have all the SU colors on hand. Please remember what I am about to show you is ONLY SU card stock, ink, etc. All my contraband card stock lives in other cabinets.

Here we go:

Waaaay on top are my White, Vanilla, Kraft, and Naturals White and Ivory. I keep them there because I use them all the time, and this way I don't have to open any doors. Also on top are the current In Colors (I'd already relocated the old ones when I took this pic.)

Top shelf with doors holds all the current colors. I keep them together by color group (green, blue, etc.) and not by SU color family. My brain is happier that way. The rest of the neutrals - Black, Sahara Sand, Basic Gray - are on the right, and some overflow extras are stacked on top of the greens and blues.

The second shelf holds all the retired In Colors, by year. To the left of the In Colors are a bazillion packs of DSP. We'll see those again momentarily.

I took my handy-dandy Farewell Colors list and purged all the colors that are retired. Here they are, with the hoarded extras added in to the mix:

I then took all my pre-ordered card stock and put them in the boxes on that first shelf - in with the greens and blues, etc. I also took all the returning In Color card stock from their boxes on the second shelf and moved them up to the Current Colors shelf.

I still had that pesky pile of retired card stock to address. So I had to re-org the bottom shelf, too. It holds (held) mostly extra packs of now-retired card stock, plus all my specialty card stock like Brushed Gold, Shimmer White, Glossy, Vellums, etc. I had to remove some 12x12 storage cases to make room for everything, and after much futzing, I ended up with this configuration:

I now have a section of Neutrals back-up stock in the center of the second shelf. On the bottom left of the lower shelf I have all the now-retired card stock standing up, with their dividers. In front of the card stock is a stack of all those specialty papers, held up by a book-end thingie. It actually works pretty well. I will get some more dividers and label all of them eventually.

Remember those 12x12 boxes of DSP I had to remove? Well, I have this cabinet on the other side that holds some 12x12 overflow and a box of stuff I can't bear to purge:

The box had to go, and it was replaced by the two 12x12 storage boxes of DSP:

Oh, look! I have room for more! Not. That space will end up holding some more 12x12 storage boxes so I can make room for all the new DSP I'll be ordering out of this catalog.

So here we have this poor, poor box of goodies that is now homeless:

I could go through it all and use it. Or I could go through another cabinet and purge that stuff and find this box a new home. That is more likely to happen. I love everything in this box, I just don't use it.

Moving on to the inks. I have two Color Caddies. One with the extender section and one without. Here's the Before of the two caddies:

The smaller one holds all my retired In Color inks plus the 6 or so Craft (pigment) full-sized ink pads. The one on the right holds all the standard colors (except Basic Black, Basic Brown and Sahara Sand) plus the current In Colors. I have them by color (greens, blues, etc.) because when I'm looking for a green ink, I want to see them all together. Color families are no help to me when I am looking for "green". (I am a Bad Demo, I know, but this is just how my brain works.)

Today we had a major shake-up in the Color Caddy world. I took the smaller one APART and cleaned it, since some of the Craft inks had leaked over the years, and it was a mess. By the way, if you get ink on your white carpet, dab it with a dry paper towel to pick up all the black, then blot it with another paper towel wet with Hydrogen Peroxide. Keep dabbing until all (or most ) of the ink is gone. Ahem.

After the re-org, here is what I ended up with: Smaller caddy holds all the neutrals, including the 4 or 5 shrink-wrapped Basic Black ink pads I discovered in a drawer:

On the other sides are the retired In Colors that did not return this year. I moved the Craft inks, now cleaned and individually packaged in zip-top bags (grrr) to a drawer, where I made room for them by removing the aforementioned 4 or 5 shrink-wrapped Basic Black ink pads. (I need a keeper.)

The larger Caddy now holds all the rest of the SU ink I own:

This includes all 40 new standard colors plus all the now-retired colors that were already in there. I plan to put a red dot on the ends of the retired ones so I don't accidentally plan a card around a retired color for one of my classes. You just know that's something I'd do, right?

By some miracle, while looking for something else, I found my "lost" packages of 8 1/2 x 11 dividers and labeled them for all the new colors. See how organized I look:

It's almost scary. But I'm not done! Oh, no, I was on a roll, baby! I tackled the markers, too! Here is the re-org, just about finished:

Notice my cheat sheet of the new color groups? ;) I read somewhere that the markers are a perfect fit for the storage cases we sell (WAIT, that's not right ... the cases are the perfect size to hold our markers... yeah, that's better), so instead of organizing my non-SU unmounted stamps, I took the 4-pack of cases I had and used them for the 4 new color groups. Sweet!

Here's what's left of the old markers:

So sad. But look at my shiny new packaging for my new markers:

I bought the "all the new colors" markers pack, and it comes with an insert for the Many Marvelous Markers storage box, which I don't have. So I hacked it up and put the strips on each case:

This is how I operate, anyway.

Then, even though I was going to wait until later, I caved and placed my first humongous SU catalog order for the season. OMG, it was crazy. Then, after I stepped away from the steaming laptop, I realized I'd forgotten a few things, and no, I could not wait until later in the month. I could not! I would remember the incompleteness of my collections, and I would not sleep until I had the items ordered and on their way to chez moi. So I placed a second order. There, I admitted it. (Is there a 12-step program for this affliction?)

So what else did I do today? Well, I did all that organizing before noon, and except for the break to place my order(s), since then I've been stamping stuff and also futzing with fabric:

Yeah, that's a piece of fabric I plan to use behind some stamped images, and in order to get it square, you pull the threads out and let the fabric's weave do all the work. Well, that's fine if you do one or two, but since I don't know when to stop, I have quite a few more to do than two.

Here are some of the parts-is-parts, just to show you I've actually done something today besides organize ink and paper:


Oh, look, this little girl has a freckle right in the center of her forehead. Sigh ... I think I'll call this a sneak peek at my work-in-progress and go play with some more fabric now. I really hope to get these finished tomorrow.

Thanks for stopping by!