Saturday, November 27, 2010

Thanksgiving Marathon, Part Six (A Tutorial)

Because I still have no mojo, and because someone asked, and because I cannot find the video I watched to learn this myself, I shall now show you how I made my paper wreath.

Here is the finished one so you can see where we're headed:

First step: cut 8 pieces of 3" x 1.5" paper:

Working with one piece at a time, do the following:

Fold it in half:

... then fold it in half again:

(That other piece of paper is just for perspective. It was not meant to confuse you. Sorry if it did.)

Next, with the open edge at the top, fold down one corner like this:

... then do the other one:

You have folded one of the pieces:

(Ignore those scissors. You don't need no stinkin' scissors to make this.)

Do the other 7 pieces the same way:

This is a nice, monotonous task. Good for occupying your hands while watching TV or ... whatever.

Time to start the assembly process. Take two of your folded pieces:

Notice those open edges:

You will use these. Remember these. Now hold one of the folded pieces in one hand, then holding the second folded piece in the other hand, put the two pointed ends of piece 2 into the openings of piece 1 (the openings I showed you with those handsome arrows):

Don't you just hate it when someone does a tutorial and they do the "this is really easy" part and you don't get it? And it doesn't look easy? That's why I took another angle of this to see if it's any clearer:

See the pointy ends of piece 2 (on the right) sticking into the openings in the top of piece 1 (on the left)?

Once you get that part, you are home free. This is how the first two pieces look pushed together:

Don't worry about that "pushed together" comment. All will become clear once you start adding pieces. Just add the next piece's pointy ends into the open ends of the previous piece. (Keep it G, people.) Here is my third piece done:

Keep going until you have 6 of your 8 pieces nested. Then I like to put # 7 & 8 together separately:

Then put that onto the other 6. You can try it one at a time - whatever works for you. Here it is with 8 pieces - almost done!

The last step is to put the pointed end of piece 1 into the opening of piece 8:

Ta-da! Here is your finished wreath:

You might needs to move the pieces around a little to make it even.

Want to see what it looks like with 10 pieces? Here I've placed the 8-piece wreath on the grid paper so you can see the size of it. I have two more nested pieces waiting in the wings:

I just pulled the wreath apart at one section and added these two others to get ... a 10-piece wreath:

... and for giggles, I did one with 12:

So there you have it! Easy-peasy, right?

If you still have any questions, please let me know!

Now I think I'll go make some more Holiday cards (the ones I said I wouldn't make any more for this year) and see if I can salvage my last failed attempt and get rid of some UFOs. Wish me luck!

And thanks for stopping by!

Thanksgiving Marathon, Part Five (FIELD TRIP!)

As planned, I headed to Baltimore today to see PattiMonkey at the AVAM BAZAART show. This time I decided to not get lost* on my way there, so I looked it up on the map again and followed the directions EXPLICITLY. This time I did the opposite of getting lost: I drove past the place before I thought I should have! Hey, always an adventure with me!

Following are some pics of the outside of the museum, mostly of the funky art they have all around. Click on any of them to enlarge the photo.

The front of the museum:

Biker art:

Bus art:

Weather vane art:

Duck art:


HUGE nest on the side of the building:


That thing NEXT to the huge nest:

Shiny egg art:

And finally, the sign telling me I'd landed in the right place:

As soon as you enter, you are greeted with a warm welcome (to the museum) and a reminder that there is NO PHOTOGRAPHY ALLOWED INSIDE THE BUILDING! Crud, I'd forgotten. And being a good citizen, I didn't even take a pic of the cool sink in the Ladies' room! I want one like that in my house!

So no pics of the craft show offerings. Sorry. I did meet up with Patti and we had several hugs and a fun conversation. She is so CUTE!

If you are near Baltimore, you should plan to go to this show next year. It's the Fri & Sat after Thanksgiving. If you like funky stuff, or even if you don't, it's a lot of fun to see the different artists' creations.

One of the things I'd hoped would happen today was that all the craftiness would jump-start my mojo. On the way home I envisioned me cleaning off both tables and starting with a clean slate. I didn't happen. I had some lunch and got overwhelmed again. I think I'll go make some City Cards. Those don't take any planning - just coloring, which I am pretty sure I can handle. I hope to have something crafty to show you later today!

Thanks for stopping by!

*lost. I don't get lost. I have a great sense of direction and almost always (eventually) find my destination. I think of it as more of a side-trip if I don't take the direct route. That's my story, and I'm sticking to it.

Friday, November 26, 2010

Thanksgiving Marathon, Part Four(th)

For my next trick, I told The Ladies we'd make a version of this in December's Stamp Camp:

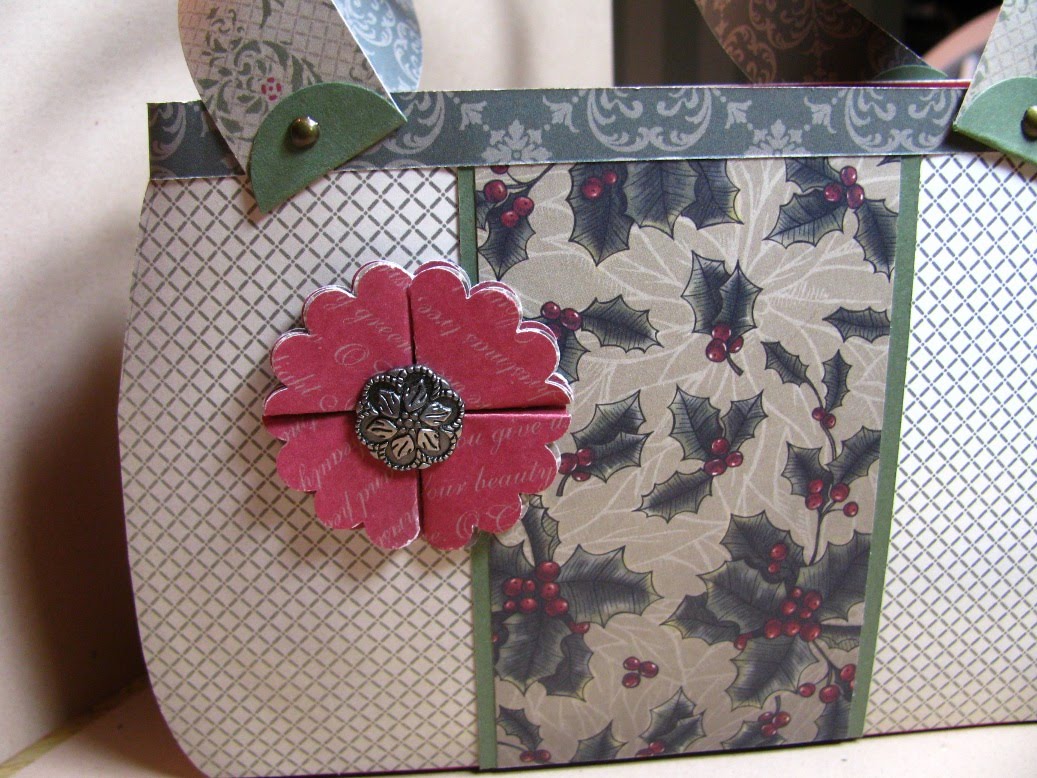
The "purse" will hold 4-6 cards & envelopes. It's made with SU card stock, but all the DSP and bling is Heidi Grace from many years ago. Totally illegal in an SU class. Last month one of my customers brought a purse she'd purchased at a craft show that was made with the SU Deck the Halls vintage-y papers, and it was beautiful! It reminded me of these. It used a base very similar to the one I'd made, but the "shape" was stuck onto the front and back to make it more purse-like. Everyone ooooh'd and aaaaah'd over it, and then looked at me with pleading eyes, and I said Yes, fine, okay. There was joy in Muddville.

For my Stamp Camps, I decided I wouldn't go for the whole "purse" look (no patience for that, plus The Ladies have to be able to make it in under 30 minutes) - I just wanted it to be "not square". This is what I came up with:

Before I got to this point, I tried many different things, a few of which I'll show you here. First, the bling-less version:

Boooooring. It needed something, but I wasn't sure what. I kicked around a few ideas with some of my Tweeps, and decided it needed a red flower. I tried this one:

It's 3 scallop circles, fan-folded and stuck together. It's totally crooked, and it was a little too much work. Believe it or not, I do think about my experience and what The Ladies will endure when I make up this stuff. Keeping in mind they would also need to make the purse, I decided this flower wasn't going to happen.

Next up was this one:

Not nearly as dimensional as the first one, but sooooo easy to make. SOLD!

Here's the whole purse again:

... and that beeeeautiful flower, up close and personal:

And because I cannot post anything without at least one out-of-focus photo, this is the side view that shows how the box is covered by the front and back shaped panels:

Yeah, my head is swimming from the out-of-focus, too.

I may go back and add some more stuff to it, like maybe a piece of lace tied to one of the handles. Maybe.

You may notice I still haven't made any Birthday or irreverent cards this weekend. Yeah, I'm running a little behind. I need to kick-start my mojo, or something. I'm attending the AVAM BAZAART show tomorrow, so maybe all that funky stuff will wake up some of my brain cells.

Thanks for stopping by!

ETA: HAHAHAHAHAHA! OMG, total FAIL! The whole reason I wanted to make this purse was because the sample my customer showed everyone had a pocket on the outside that would be perfect for a gift card. Do you see a pocket on this purse?! Nooooooo, you do not! Did I purchase the die for the sole purpose of making this purse with a pocket on the front?! Yes, I did. Ergo, FAIL, FAIL, FAIL! I shall try again tomorrow. Sigh.

Thanksgiving Marathon, Part Third

Everything I have touched today has failed me. Well, the laundry went okay. And I showered and got dressed without too much trouble. Okay, everything CARD-RELATED I've tried today has failed me. I've started no less than 5 projects, and nothing has worked since that last one I posted. I am having a seriously awful, no-good, very bad day.

Then I read this and stopped feeling sorry for myself. Trevor's favorite color is blue (I asked), so since I had everything blue out on the table, I grabbed this heart stamp from my so-what-if-its-retired-I-will-never-give-it-up stamp drawer and made a card:

I think 12-year-old boys might be just a bit more difficult to make cards for than men in general. Since he is having heart surgery, I decided it was okay to use a heart on the card. I tried to lighten it up with a fun sentiment from The Cat's Pajamas. And lookie:

I remembered to cut it long enough to fold it and pop it up like a banner! YAY, me!

So if you'd like to send a card to Trevor or his family, the information is here.

I'll be back later if anything else paper-related actually works for me today. :/ Thanks for stopping by!

Thanksgiving Marathon, Part Second

Yes, Part Second. Last night I woke up to the reality that I'd failed to get this baby rolling and posted Part First a little late.

I addition to needing a bazillion birthday and irreverent cards for my show next weekend, I also have my December Stamp Camps the weekend after that, so, you see, I really REALLY do need to get my rear in gear this weekend.

This morning I wanted to try this idea from Mary Fish for one of my Stamp Camp projects. I told The Ladies that we'd probably do packaging or last-minute things they could make with materials they already have. I also expedite the December order so if they feel the need to shop based on the Stamp Camp's projects, I am here to enable. It's what I do.

So here is my version of Mary Fish's project:


I liked them without the ribbon, but I like it with, too. I couldn't believe I hadn't even opened my Poppy ribbon yet! I KNOW! I just loooove the Poppy color, and what's not to love about this twill?

You can see a Hershey's Nugget fits perfectly inside one of these tiny boxes:

Wouldn't these be fun to put at place settings, or on co-workers' desks? So easy, too, except that one part of the punch that seems to stay stuck - right at the top where you can see it's not smooth. If anyone has a hint as to why this is, or what can be done to fix it, I'm listening.

I'm not sure who enables who(m) with these things. Do Demos figure out what products perfectly fit the candy on hand? Do candy-makers "inspire" punch- and die-makers to make the perfect tools for us? It's a conspiracy, no matter which way you slice it. All I know is I must have extra chocolate on hand for these projects, because some candy will disappear during the process. "Mistakes", you know. ;)

In other news, I got a clue about some of the UFOs on my table. I did this with those folded paper wreaths I made the other day:

I'm not sure if I'll sell these or just give them away. It could also be another project to use up my retired Christmas papers. Hmmm ....

I also realized all was not lost with the embossed snowflake cards. I can't stamp on the embossed surface, but I can stick something to it! So I salvaged my crookedly-stamped sentiments from other pieces of paper by punching them out, layering them with blue and making these:


I am still not in love with them, so I call it quits with the snowflakes already. I know when I'm beat(en).

I hope to actually make some birthday and irreverent cards today in between loads of laundry. Yes, my life is so very glamorous. I also plan to have a turkey + cranberry sandwich for lunch, washed down by a mini pumpkin pie. I love leftovers!

I'll be back later with more schtuff! Thanks for stopping by!

Thursday, November 25, 2010

Thanksgiving Marathon, Part First

Happy Thanksgiving to all my US readers! I hope you have survived the embarrassing overabundance of food and did not get too crazy. My Thanksgiving was subdued, as always, being a family of one. I can do whatever I want, and the past few years I've done a mini-Thanksgiving - boneless turkey breast, stuffing, green beans (no casserole), baked sweet potato, homemade cranberry sauce, and pumpkin pie. This year went pretty well, except my timing was off.

It all started last week when I thought to buy the fixins. I got a frozen boneless turkey breast along with all the other stuff, and when I got home, I put it in a bowl in the refrigerator. I was not thinking. So the frozen boneless turkey breast was thawed on Sunday, and had to be cooked on Sunday. Well, one less thing to do today, right? So that was out of the way.

I spent today cooking one dish at a time, then nibbling on it while I cooked the next one. Let's just say that by late afternoon, I was no longer hungry, and had consumed enough nibbled bits to constitute a meal had it all been consumed at the same time.

I also made some Crack & Cheese, and had a spoon of it (or two) before I decided it was time for my mini pumpkin pie for dessert. My meal was over before it was even a meal! And I have enough food left over to get me through the next week.

So what did I do the rest of the day? I stamped, of course! My planned Thanksgiving Weekend Marathon is off to a slow start, but it has started.

First thing I did was make more of my "Guilt cards":

You'll notice (or maybe you won't) that these were stamped on white instead of vanilla (my last batch was vanilla). Truth be told, these were the first ones I stamped before I realized they should have been done on vanilla. THIS, people, is how a UFO pile comes into being.

Seeing as how I needed to use these white pieces, I chose a piece of patterned paper with a white background instead of vanilla. I cut this piece into 6 pieces plus a scrap left over, and made three of that Guilt card above, then three of the "Don't judge me" cards below:

The layers are Artichoke, as is the seam binding ribbon. That stuff is so thin and ties so nicely! (Note to self: hoard before the Holiday mini ends in December...)

Six cards - not a bad start. Then, as I scanned through my "OMG, YOU MUST CASE THIS CARD" file, I saw this one and decided that even though my mission* was to replenish my birthday and irreverent card sections, I could make some more holiday cards along the way.

Being a rebel, and also not owning the stamp set she used, I made this version instead:

Yeah, it's out of focus, but you get the idea. I had trouble with the white space. I always have trouble with white space. I fear white space.

So first I tried this:

I die-cut a piece of Pacific Point DSP (close enough to this Brilliant Blue I wanted to use up), and I hated intensely disliked it. So I glittered it, and I still hated intensely disliked it.

Moving on.

I tried a scalloped order:

Better, but not great.

Then I had a hair-brained idea to emboss the background! Yeah - I AM SO SMART:

Doofus - how can I stamp the sentiment on an embossed background? Pththt.

For giggles, I tried to scallop punch the top edge:

Needless to say, I put all of these aside and moved on to another project that I also failed to accomplish. I'll show you that one tomorrow.

Oh, and I had to take the wine out of the fridge to make room for the vat of Crack & Cheese, so it will be a happy night here at the Crooked Pad. Oh, the suffering.

Thanks for stopping by!

*mission. Back at my first job working for the Buick Division of General Motors, some younger-than-me whippersnappers came around to our cubes with clipboards. When we quizzed them on what they wanted and when were they going to stop bothering us, one of them said "It is our mission to inventory all the computer equipment." When we picked ourselves up off the floor and wiped the tears of hysteria from our eyes, we let them pass. I guess the phrase has stuck in my brain since then.