Showing posts with label neon. Show all posts

Friday, December 6, 2013

Neon Feathers

I'm still working through some of my recent acquisitions, forcing myself to use them so I can put them away. This round I chose my WPlus9 Fanciful Feathers stamps and dies. Here's the resulting card, then I'll explain:


It took me three days to make this. THREE DAYS. Stamping is HARD, people! Er, I mean difficult.

My card started with an idea I had to use the teeny tiny feathers from the set to make a border. That actually worked. Then I die-cut a bazillion of the feathers, then stamped and stamped until I got three of them mostly lined up. I gathered the three feathers in a cluster and moved them around for about 48 hours.

I struggled with a sentiment until I decided to use this one from the Simon Says Stamp For the Record set. Then the feather placement worked for me. I used black & white twine to offset the black ink I used for the sentiment. The pointy tail-ends of the feathers weren't long enough to cooperate with the bow, so I glued that sucker twine down, both back and front, with Glossy Accents. It's not going anywhere.

After I got the feathers situated, I decided the row of tiny stamped feathers looked disembodied, so I cut a narrow strip off of a wide piece of washi tape and added it under the row of tiny feathers. I think it helps to anchor them.

Last, I added some Neat & Tangled neon sequins, and a strip of card stock I colored with Hero Arts neon yellow ink.

In the end I think it's pretty busy, but not too bad.

Oh, two tips. One, washi tape is easy to cut, since you can just stick it to your paper trimmer like this:


Second, I have a problem with my sequins flying all over my table, then I find them all through the house, so I picked up this tiny scoop at The Container Store (I have no affiliation with them, I just love the place). I pour the sequins from the tiny bag into the scoop:


use what I want, then pour them back into the bag. I love this thing!

In other news, we are in the midst of our first real snowfall here in the Miami Valley. I love snow. It's like a damper, making it so peaceful and quiet outside. I'm also kinda happy a neighborhood kid stopped by and offered to shovel and salt my walk, driveway and sidewalk. I offered him hot chocolate, but he said he was okay. It's still snowing, so if he comes back I'll ask him again. :)

Thanks for stopping by!

Products used: Neat & Tangled neon sequins (the variety pack is currently sold out,but the individual colors are available), misc washi tape, black & white Whisker Graphics Divine Twine, and the following:


Tuesday, October 23, 2012

Neon Lines

One of the things we learned in the Kick Start Online Card Class was how to CASE a card but not. Instead of printing off the card, or bookmarking it for later, take a moment and think about what it is about the card that attracts you. Is it the color combination? A mix of patterns? A blend of techniques? Then take notes. I started to keep a little notebook with me, and when I see something I like about a card, I write that down. Then, when I need inspiration, I go to my notes and I have options. I can either take one of the ideas and use it to kick-start my mojo, or even combine a number of ideas all onto one card.

The beauty with this approach is you take a little extra time to think about the composition of the original card, and it keeps you from ever copying someone else's card, which is, well, wrong.

One of the things I had written down ... I saw a card where someone had taken a long thin striped stamp and made a plaid. The whole card front wasn't covered - just a few impressions, and where they crossed, the stripes made a plaid. So my idea was to take a patterned stamp and try the same thing. I did, and it came out kindof cool.

I used the notebook paper stamp from this Lawn Fawn Schoolhouse Backdrops set:

 (yeah, it's out of focus) and made this:

 I stamped it once in each direction in three different neon colors. I was pretty careful and they're almost straight, even:

I think I stamped the pink one first (so I could see it), then the orange. By the time I got to the yellow, I was muttering "below the pink and above the orange". Ha.

I looked at this for a few days before I figured out what to do about the sentiment. I ended up using some navy blue cloth letters from Prima.

So there you have it - I've actually used something I learned in class, and it's not even a CASE of a whole card; just an idea. I'll be using this again, because it totally works. :)

Thanks for stopping by!

PS: I colored my pearls with Copic markers, but not the neon Copics. I've found they dry dull and I like my pearls shiny. These were left over from another project, so I don't remember which markers I used. :(


Saturday, August 11, 2012

New Challenge On The Block

There's a new challenge on the block: The Cameo Spotlight. Today they posted their first challenge: Summer, and we're supposed to use our Silhouette Cameo or SD to create a card.


 Well, I'm not big into Summer as a theme, but since the challenge is officially open to interpretation, I went with sunny colors and made this:


Yes, again with the neon. Hey, they're still out. ;/  This tree is one of the first custom designs I made when I got my Silhouette Cameo. Now that I've had a lot more training, I'd probably have an easier time creating this, but it's done, and it still works. :)

One note about the yellow rectangle behind the sentiment: I was going to make it a full layer under the banner, but the measuring and cutting was making my head hurt. I really only wanted it for contrast, so why not just ... give it some contrast? I am so lazy.

Okay, I'm going back in for more! Thanks for stopping by!

Friday, August 10, 2012

Even More Neon

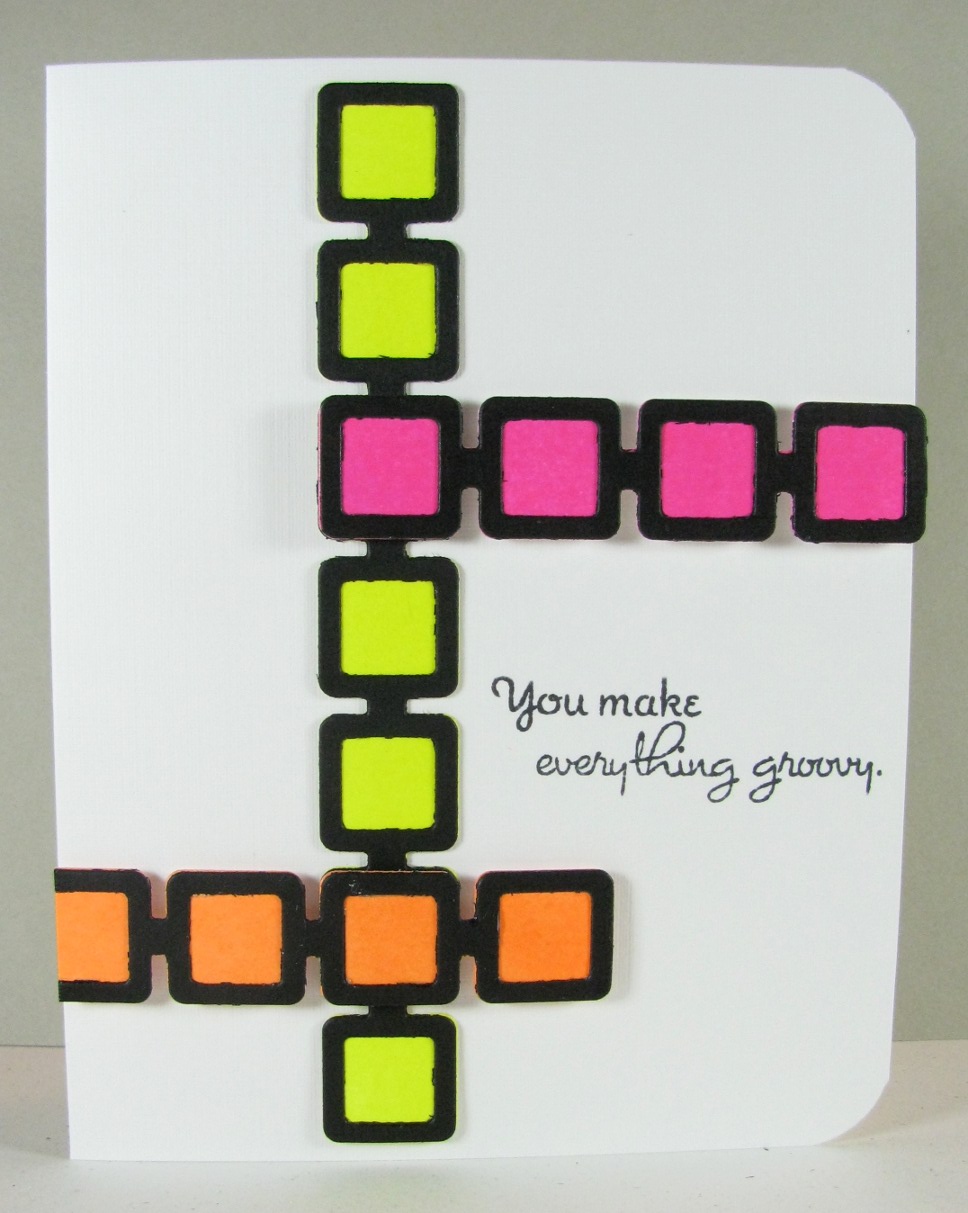
I had to go back in for one more. I HAD to. Here's another neon card, but this time it's on white and I used both of the MFT dies:

I used the solid square die to cut the neon-inked card stock, and cut the black outline squares to layer on top of them. (That's really yellow, not lime green. I need a new photographer.) It reminds me of the 60s and the neon trend that was long before the current neon trend. The good stuff always comes back.

This color scheme also qualifies for the current Play Date Cafe challenge:


Okay, NOW I'm done. It's THE WEEKEND, so I'll be back with more challenge cards.

Thanks for stopping by!

PS: sentiment from the Verve Feeling Groovy set

A Neon Rainbow

When I think of anything neon, the 1967 song Neon Rainbow by the Box Tops pops into my mind, and if you listen to this, maybe it will be nice background music for my card:


Ah, neon, and yes, I caved and bought the Hero Arts neon inks. Many, many cards in the Blogosphere have attempted to woo me, and none really did until I saw this card made in  this video, and I was doomed. So of course, I needed to CASE her card, but still make it my own. I did the same thing she did with the black background and the direct-to-paper with the three inks, but I die-cut my pieces with my new MFT Retro Squares die (love), and I left off the bling.

I liked the idea of using the insides of the die-cut squares at the bottom of the card to cut all that black, and also to make it look (hopefully) like they are falling, which kinda goes with my Hang In There sentiment from the Paper Smooches Hang Ups set.

I have some of the inked paper left over, so you'll probably see some more of the neon later this weekend. Just a warning. :)

Okay, sing along now:

 ♪ ♫ ♫ ♪  ♪ ♫ ♫ ♪  ♪ ♫ ♫ ♪
The city lights, the pretty lights,
They can warm the coldest nights.
All the people going places,
Smiling with electric faces.
What they find the glow erases,
And what they loose the glow replaces, and life is love
In a neon rainbo-o-o-ow, a neon rainbo-oo--ow.
 ♪ ♫ ♫ ♪  ♪ ♫ ♫ ♪  ♪ ♫ ♫ ♪

You're welcome for the ear worm, and thanks for stopping by!