
 | ||
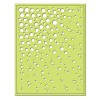
| Oh, look, top left corner rounder #FAIL |
This is the Spellbinder's Cascading Dots die. Well, part of it. It comes with this center part which cuts the holes, but it doesn't cut around the outside edge (ask me how I know). There's a separate frame die part that does that. After I finally watched a video, I understood, but I was still challenged.
You see, the outer die is A2 size, and for me to get it to work, I needed to cut my card stock bigger than A2, so I was wasting a lot of card stock. After too many tries, I finally decided to cut the card stock smaller than A2 so it nested inside the inner piece. I also got it to work by manually trimming down the piece after I removed the circles die.
Speaking of which, you really do need to use a piece of wax paper between the die and your card stock to get the card stock to easily release from the die. I still had to poke all the holes out of the die in order to use it again. If I find I use this often enough, I'll invest in the Spellbinder's roller thingy that you just roll over the die and it pops all those pesky holes out for you.
/whine
So, once I had a white panel that I liked, I was stumped with how to use it. I'd planned to put it over a piece of shiny card stock, and I still might. I think I set that one aside while I wrestled with the die and Mr Big Shot. The card above uses a piece of paper from my UFO pile. That piece of card stock was colored with Distress inks (Evergreen Bough, Peacock Feathers, and maybe Seedless Preserves). I then applied translucent embossing paste over it using a Hero Art stencil, so there's a shiny stenciled pattern over all the color. It's been in my UFO pile for a while.
You can see some of the shiny background here:

This card has no stamping, and for that I feel guilty. For the shiny under-layer version I may go finish now, I might use a banner with a stamped sentiment. We'll see.
Thanks for stopping by!
Stuff I used: SU Basic Black card stock, UFO panel, and the following:


I saw a video the other day by Karen Burniston who uses cheap dryer sheets to get a really easy release from intricate dies. Check it out and, if she is correct, you will never have to poke holes again. I love yesterday's star wreath.
ReplyDeleteWow, that's beautiful. I am not a fan of Spellbinders dies anymore, but this one might tempt me. I tried the dryer sheet technique mentioned in the post above and it does work. One word of warning - use a piece of printer paper on either side of the dryer sheets to prevent the sticky stuff in the dryer sheets from getting on your clear plates.
ReplyDeleteLOVE this card!
ReplyDeleteI used to have that rule that I couldn't put new things away until I had at least tried them out. I ran out of desk room and decided that was a dumb rule. I'm not sure I understand that die. It is two pieces? One cuts the circles and one cuts the border edge? Why is the border edge needed? I think I'm misunderstanding. I like how this came out. I have that Spellbinder rolly thing but never remember to get it out. I'm so used to poking the bits out by hand.
ReplyDelete