In my world, it's all about baby steps. I've lived here just over a year, now, and I find I only unpack a box when I'm looking for something. Well, yesterday I was looking for my S-hooks because I wanted to finally hang up some of my IKEA Bygel storage (photos in a sec), and they were nowhere to be found.
I started in the craft room annex, also known as the third bedroom. I unpacked three large moving boxes of "stuff", some of which is now trash, some will make it to the craft room closet, some will be given away (I think I have every color curling ribbon ever made), and some landed here:
It's time to play What's On Your Workdesk Wednesday!
Yep, this is my desk right now. It holds things I've found in various boxes and bags, and also some new things like the pretty flowers and ribbon on the right that were a gift, and a stamp I haven't used yet (that miraculously didn't get covered up). All that stuff is either from a box I unpacked in the annex, or from a bag I cleared out from the corner behind my desk (pic in a sec), or from kits I received last year that I have no idea what to do with since I don't scrapbook. They all eventually need homes, but for now they are here. I can't make another card until I address this ... stuff.
In all fairness, I have a huge empty space in the annex that used to hold the three packing boxes. I also have this:
I finally hung up two of my IKEA Bygel rails (you can find them in the kitchen section). See my Copics on the right? My refills used to sit on top of the cubbies, but I got a few more and ran out of space, so I grabbed the basket you see on the top rail, put all the refills in the center, and put in some button storage boxes to hold them in place. This freed up the top of my cubbies for a tin bucket of miscellaneous bling, and my box of Gelatos.
Here's the top basket up close and personal:
The bottom basket holds all my bling:
In a rare moment, I bought this container because it was pretty, without a thought to what I'd use it for. I had three small baskets of bling, one each for rhinestones, pearls, and enamel dots. Now they all live happily together in here.
This is also the basket for which I needed the S-hooks. Sadly, after I'd emptied the three huge moving boxes, I still hadn't found the hooks.
Then I moved on to the craft room to look for the hooks. One of the things on my list of self-assigned tasks was clearing out the s-crap that was piled up in boxes and bags that filled the space behind where I stand at my desk, and continued all the way to the open closet doors, and behind the doors. I could barely move in there, and I couldn't get to the closet for all the s-crap piled in the way. Some of the stuff now on my desk was in that heap, and now that space looks like this:
I see floor! And the doors actually close! Wheeee! Standing next to the cabinet are a few SU grid pads I re-discovered, a few stamping pads, and my large MS score board. Also my cache of wet wipes and a few book ends that will make their way to the bookcases in the annex. Once I relocate that black bag (it holds a bunch of Hero Arts card bases), all the standing stuff will live under the cabinet and it will look much neater. I probably won't be able to handle it.
Bobra couldn't figure out what happened to his exploring area. He does not like closed doors. See:
He opened that.
One other thing I did in the craft room was bring in my two wooden CD storage boxes, that now live here:
You can see the closet on the left and my standing desk on the right. Now that the closet doors close, I had room for the wooden boxes on top of my cabinet. I used these boxes in my old place to hold my black inks, my most-used acrylic blocks, etc. I see no reason why they can't be used that way again.
On top of the boxes is an altered letter E. I also have an M and an H (MEH), and these will eventually be hung on one of the walls as ART! I have several other pieces of "other people's" art that will also make it to the walls one day.
Oh, about those S-hooks? The next thing on my list to organize is a stack of boxes under my wooden library card catalog. I looked into one of them and found the S-hooks. I hung up my green basket and called it a day.
Up next: the desk.
Baby steps, people, baby steps.
Showing posts with label Organization. Show all posts
Wednesday, December 17, 2014
Friday, July 11, 2014
The Card Stock Re-org
[If you're looking for my Jingle Belles post, please scroll down, or click here.]
I don't know if you've watched Jennifer McGuire's recent organization video of how she stores her paper and card stock, but it made me get off my rear and organize my own. I have a vast collection of A Muse patterned card stock, Hero Arts Layering Papers, and SU card stock. I sold a ton of my SU card stock before I moved, but I still have a LOT of it.
I have IKEA cabinets in my craft room, and I'm constantly changing how things are organized. Here is what I've been working with the past few days:
I have three sets of this 2-tier cabinet stack, and this one has been holding disorganized non-SU colored card stock for some time. When I was a Demonstrator for SU, I had all my colored card stock at eye level, in a 3-tier stack of cabinets, with current colors on top and the retired colors on the second level. They were all organized by color - reds, yellows, greens, etc. I felt it was time to cross the beams and mingle them all, so I got to work.
First, I took all my Hero Arts Layering Papers and put them in piles by color. Along the way I re-discovered a bunch of packages I'd forgotten I had, so I bought more. Sigh. I then took out my labeler and put all the papers into their own sleeves like Jennifer did.
I also took all my Hero Arts patterned/designer papers and put them into sleeves - one for each color: greens, reds, etc. In the end I had quite tidy piles of Hero Arts card stock!
Since I'm not in the biz like Jennifer is, and it's not so important that I know whose paper I'm using, I took all my non-Hero and non-AMuse card stocks and put them together in sleeves of blue, red, green, etc.
Now it was time to cross the beams, and this is what I ended up with:
Please ignore the loose papers at the top ... I seriously ran out of room to wedge even one more sheet in there. But isn't it pretty? Yeah, I know the yellows and oranges are backwards, but that's how they were before, and I didn't bother to switch them. Yet. All the SU card stock is on its side with dividers between colors. I mixed up all my retired, non-retired and In Colors, and I lived to tell about it. In between the SU boxes, I stood up the sleeves with my Hero Arts, A Muse, Bazzill and all other miscellaneous card stocks.
Do you see my vast collection of purples over there on the right? Mmm-hmmm. And no, I do not have a lot of (gah) pink. Most of the vertically stored card stock is white core, so it just looks pink. That's my story and I'm sticking to it.
Here's the lower shelf of that cabinet:
It houses all my neutrals. The magazine holders contain specialty papers, On the far left are velvet papers (which you'll see in action in another post), and Japanese papers. Yummy stuff. The middle magazine holder contains my specialty white card stock: wood grain, glossy, canvas, etc. The box on the far right has wood sheets and some metal sheets I forgot I had.
The small horizontal boxes hold my Clearbags Linen card bases, and there are some packages of watercolor and letterpress papers on top of them.
I did a huge purge of my SU 12x12 Designer papers, and only kept a few packs. I also kept my 12x12 Cosmo Cricket, Co'ordinations, and Graphic 45. Where I used to have a 2-tiered cabinet full, on both levels, of 12x12 card stock, this is all I have left:
Less than 1/4 of a cabinet, which means between this week and last September I've purged 3/4 of it. YAY! Oh, please note the stack of purple 12x12 card stock. I remember when I bought this ... in a fit of WHY DO I NEVER HAVE THE RIGHT COLOR PURPLE. So I might just have the right color purple after all.
The partial packs of SU papers I kept were cut down and put into this box:
That's it! That's all I have left. I might be a little stoked about it, too.
I had a moving box of neutral SU card stock on the floor that is now gone and integrated into the new storage system. The cabinet that used to hold my SU colored card stock now houses some other specialty papers that didn't fit in the system above: acetate, pre-embossed card stock, and washi sheets. I'm sure I'll come up with a system for storing them, too. Bottom line is I have a ton more space now. Wheeee!
Also, I have BIG plans to use some of this stuff now that I remember I have it. To prove it to you I've made a few cards with some card stock I couldn't bear to give away. I'll be back shortly with a show-and-tell of those.
Thanks for stopping by!
I don't know if you've watched Jennifer McGuire's recent organization video of how she stores her paper and card stock, but it made me get off my rear and organize my own. I have a vast collection of A Muse patterned card stock, Hero Arts Layering Papers, and SU card stock. I sold a ton of my SU card stock before I moved, but I still have a LOT of it.
I have IKEA cabinets in my craft room, and I'm constantly changing how things are organized. Here is what I've been working with the past few days:
| Note the cat bed on the top right. Also, the crap on the floor is a product of my re-org, and where-the-hell-do-I-put-this-oh-right-here-for-now. |
I have three sets of this 2-tier cabinet stack, and this one has been holding disorganized non-SU colored card stock for some time. When I was a Demonstrator for SU, I had all my colored card stock at eye level, in a 3-tier stack of cabinets, with current colors on top and the retired colors on the second level. They were all organized by color - reds, yellows, greens, etc. I felt it was time to cross the beams and mingle them all, so I got to work.
First, I took all my Hero Arts Layering Papers and put them in piles by color. Along the way I re-discovered a bunch of packages I'd forgotten I had, so I bought more. Sigh. I then took out my labeler and put all the papers into their own sleeves like Jennifer did.
I also took all my Hero Arts patterned/designer papers and put them into sleeves - one for each color: greens, reds, etc. In the end I had quite tidy piles of Hero Arts card stock!
Since I'm not in the biz like Jennifer is, and it's not so important that I know whose paper I'm using, I took all my non-Hero and non-AMuse card stocks and put them together in sleeves of blue, red, green, etc.
Now it was time to cross the beams, and this is what I ended up with:
Please ignore the loose papers at the top ... I seriously ran out of room to wedge even one more sheet in there. But isn't it pretty? Yeah, I know the yellows and oranges are backwards, but that's how they were before, and I didn't bother to switch them. Yet. All the SU card stock is on its side with dividers between colors. I mixed up all my retired, non-retired and In Colors, and I lived to tell about it. In between the SU boxes, I stood up the sleeves with my Hero Arts, A Muse, Bazzill and all other miscellaneous card stocks.
Do you see my vast collection of purples over there on the right? Mmm-hmmm. And no, I do not have a lot of (gah) pink. Most of the vertically stored card stock is white core, so it just looks pink. That's my story and I'm sticking to it.
Here's the lower shelf of that cabinet:
It houses all my neutrals. The magazine holders contain specialty papers, On the far left are velvet papers (which you'll see in action in another post), and Japanese papers. Yummy stuff. The middle magazine holder contains my specialty white card stock: wood grain, glossy, canvas, etc. The box on the far right has wood sheets and some metal sheets I forgot I had.
The small horizontal boxes hold my Clearbags Linen card bases, and there are some packages of watercolor and letterpress papers on top of them.
I did a huge purge of my SU 12x12 Designer papers, and only kept a few packs. I also kept my 12x12 Cosmo Cricket, Co'ordinations, and Graphic 45. Where I used to have a 2-tiered cabinet full, on both levels, of 12x12 card stock, this is all I have left:
Less than 1/4 of a cabinet, which means between this week and last September I've purged 3/4 of it. YAY! Oh, please note the stack of purple 12x12 card stock. I remember when I bought this ... in a fit of WHY DO I NEVER HAVE THE RIGHT COLOR PURPLE. So I might just have the right color purple after all.
The partial packs of SU papers I kept were cut down and put into this box:
That's it! That's all I have left. I might be a little stoked about it, too.
I had a moving box of neutral SU card stock on the floor that is now gone and integrated into the new storage system. The cabinet that used to hold my SU colored card stock now houses some other specialty papers that didn't fit in the system above: acetate, pre-embossed card stock, and washi sheets. I'm sure I'll come up with a system for storing them, too. Bottom line is I have a ton more space now. Wheeee!
Also, I have BIG plans to use some of this stuff now that I remember I have it. To prove it to you I've made a few cards with some card stock I couldn't bear to give away. I'll be back shortly with a show-and-tell of those.
Thanks for stopping by!
Sunday, March 3, 2013
Stamp and Die Organization
I've been making quite a mess in the craft room, but have produced nothing blogable. I did finally remember to take some pics in the daylight of my latest storage attempts, so I thought I'd share those with you.
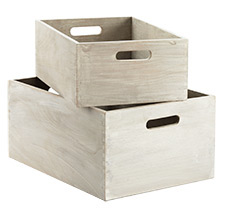
A while ago I spent some time at The Container Store looking at storage containers, and I ended up with the smaller of the two here to store my dies:
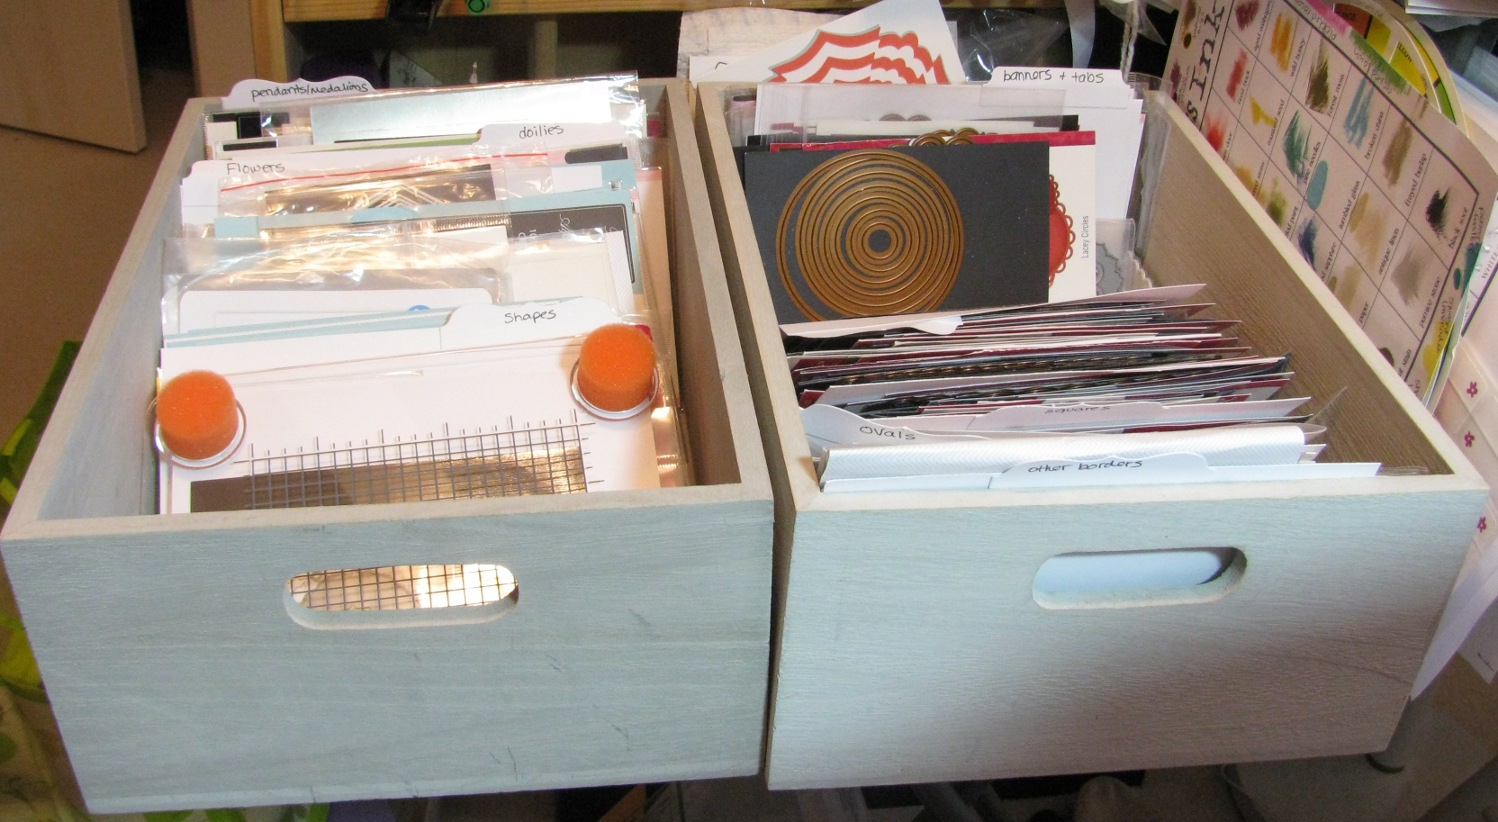
The Small box is 9-1/2" x 13-1/4" x 5" h, which is perfect for me since I store my dies on 4x6" magnet sheets, or in the original packaging if it's not too thick. Here's a photo:
Why yes, I do have two of them now. It was full to where I couldn't flip through them and I needed to expand. Sigh. You can see the Circles section is open to what I was using at the time. I have hand-made dividers you may be able to see if you click on the photo to embiggen it.
You can also see the box is wide enough to hold my Compact Fiskars stamp press, since I have nowhere else to put it.
When I shopped for that second box for my dies, I also picked up four of the Extra-small boxes seen here:
These are 11-1/4" x 7-1/2" x 5-3/4" h, and are perfect (for the moment) for holding my background stamps and most of my clear stamps. Here's two of them in action:
On the left are what I call my "theme" stamps:
Lots of wiggle room, which is nice, but not so much it's sloppy.
On the right are my background stamps:
The box is wide enough to hold my Impression Obsession Cover-A-Card stamps, so it's perfect.
The third box holds my sentiments:
The only thing that doesn't fit in here are my Dyan Reaveley sets, and I'm okay with sliding them in sideways.
I have a fourth box that I may use for my embossing folders. I currently have them in binders, and I think I'd use them more if I had them out. We'll see.
Okay, I'm going back to try stamping again. Wish me luck! And thanks for stopping by!
* I am not affiliated with The Container Store in any way. I just like these boxes.
A while ago I spent some time at The Container Store looking at storage containers, and I ended up with the smaller of the two here to store my dies:
The Small box is 9-1/2" x 13-1/4" x 5" h, which is perfect for me since I store my dies on 4x6" magnet sheets, or in the original packaging if it's not too thick. Here's a photo:
Why yes, I do have two of them now. It was full to where I couldn't flip through them and I needed to expand. Sigh. You can see the Circles section is open to what I was using at the time. I have hand-made dividers you may be able to see if you click on the photo to embiggen it.
You can also see the box is wide enough to hold my Compact Fiskars stamp press, since I have nowhere else to put it.
When I shopped for that second box for my dies, I also picked up four of the Extra-small boxes seen here:
These are 11-1/4" x 7-1/2" x 5-3/4" h, and are perfect (for the moment) for holding my background stamps and most of my clear stamps. Here's two of them in action:
On the left are what I call my "theme" stamps:
Lots of wiggle room, which is nice, but not so much it's sloppy.
On the right are my background stamps:
The box is wide enough to hold my Impression Obsession Cover-A-Card stamps, so it's perfect.
The third box holds my sentiments:
The only thing that doesn't fit in here are my Dyan Reaveley sets, and I'm okay with sliding them in sideways.
I have a fourth box that I may use for my embossing folders. I currently have them in binders, and I think I'd use them more if I had them out. We'll see.
Okay, I'm going back to try stamping again. Wish me luck! And thanks for stopping by!
* I am not affiliated with The Container Store in any way. I just like these boxes.
Sunday, January 6, 2013
Crafty Packaging Mini-Rant
As I opened and spilled yet another package of crafty goodness, I thought I'd take a moment to extend a plea to the packagers of said products to please consider a more viable alternative.
I just acquired a few packages of wooden embellishments. I don't mean to call out any one company, because several of them do this; these photos are only to serve as one example.
This is a package of wooden stars:
LOTS of pieces in here. But the problem is what to do with them once you've opened the package. In my experience, taping or stapling the original package to keep the remaining bits from leaking out is a mess waiting to happen.
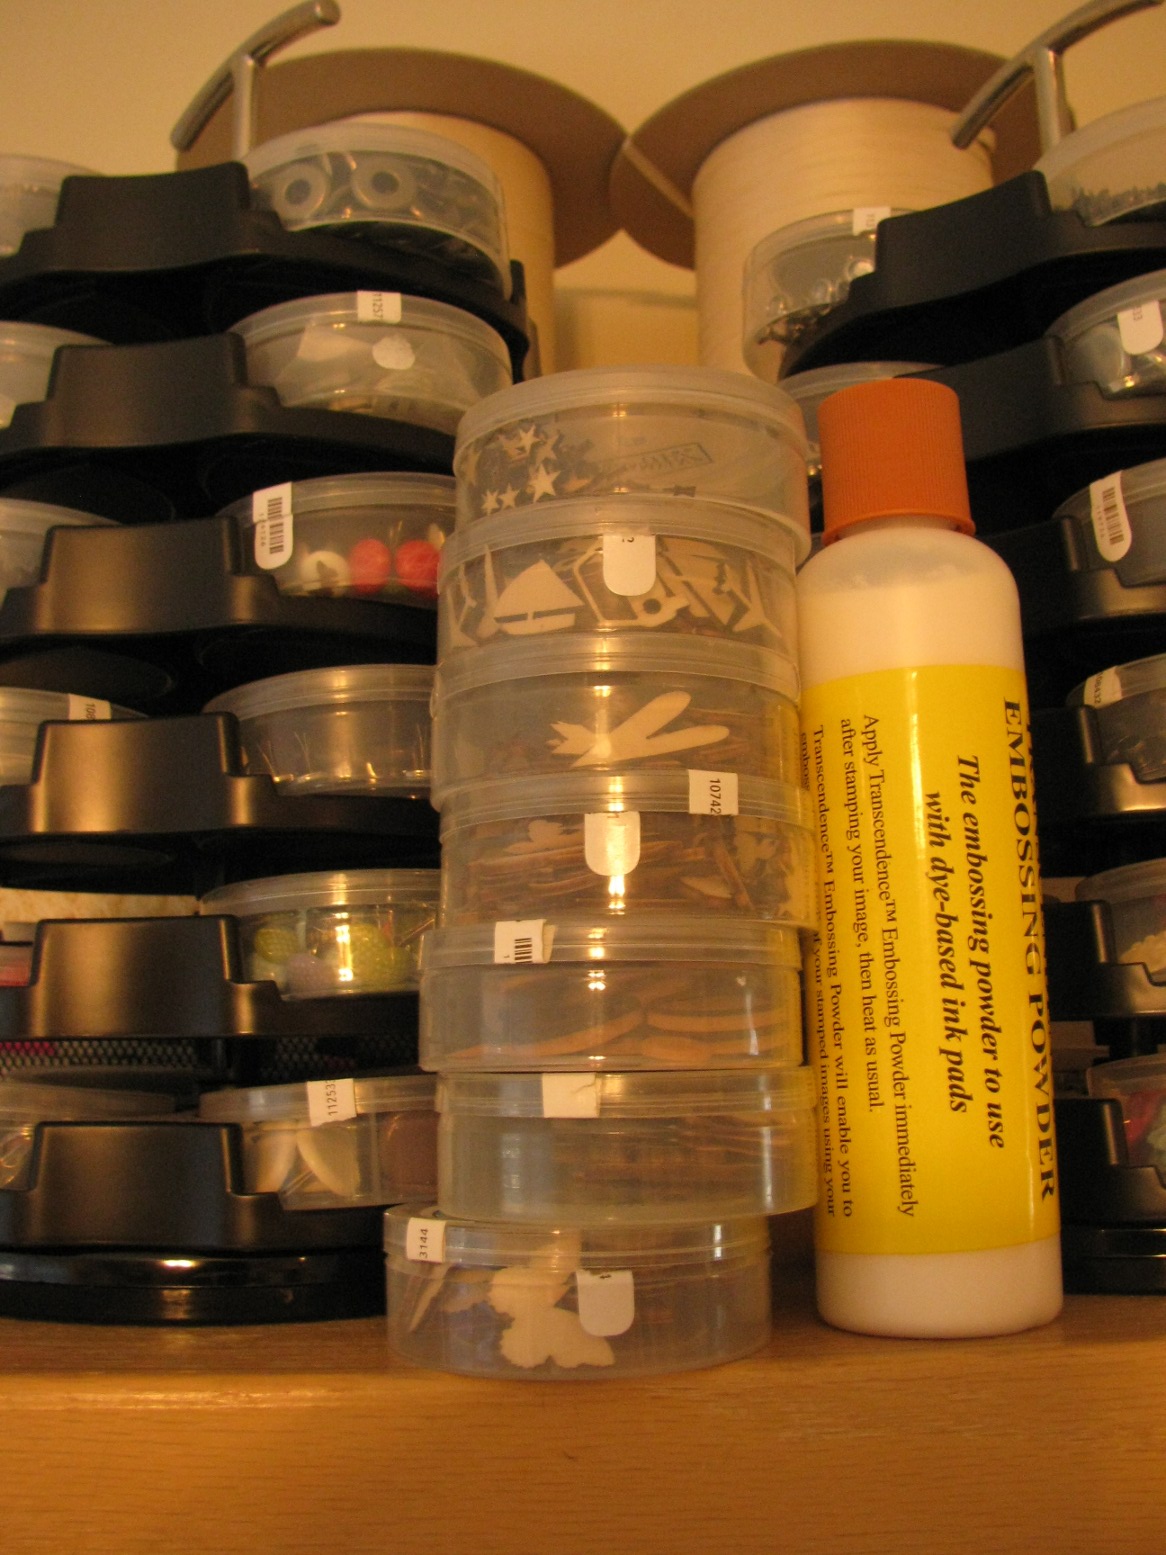
I now immediately open the packages and dump the contents into one of my collection of empty SU embellishment containers:
See? All nicely contained. And since I have more than one *ahem*, I have stacked them here:
During one of my re-org efforts I emptied a full storage caddy, so I'm down to two now. If I ever empty out enough slots, I'll be able to put these in one of the caddies. I like having them where I can see them. None of that stuff got used much when it was in a drawer.
Now, back to the original packaging ... How about at least a re-sealable package? Some embellishments come in packaging that has a cover on the plastic part so it can be re-closed (if that's a word). Or maybe include a small zip-top bag? Or heck, make it a plastic container to start with and put the cardboard inside the package. I know it's plastic, but I have to use other containers once I open yours anyway, so sell me yours.
Meanwhile I'll keep using my SU containers.
So what do you guys do with packaging like this? Inquiring minds want to know.
Thanks for stopping by!
I just acquired a few packages of wooden embellishments. I don't mean to call out any one company, because several of them do this; these photos are only to serve as one example.
This is a package of wooden stars:
LOTS of pieces in here. But the problem is what to do with them once you've opened the package. In my experience, taping or stapling the original package to keep the remaining bits from leaking out is a mess waiting to happen.
I now immediately open the packages and dump the contents into one of my collection of empty SU embellishment containers:
See? All nicely contained. And since I have more than one *ahem*, I have stacked them here:
During one of my re-org efforts I emptied a full storage caddy, so I'm down to two now. If I ever empty out enough slots, I'll be able to put these in one of the caddies. I like having them where I can see them. None of that stuff got used much when it was in a drawer.
Now, back to the original packaging ... How about at least a re-sealable package? Some embellishments come in packaging that has a cover on the plastic part so it can be re-closed (if that's a word). Or maybe include a small zip-top bag? Or heck, make it a plastic container to start with and put the cardboard inside the package. I know it's plastic, but I have to use other containers once I open yours anyway, so sell me yours.
Meanwhile I'll keep using my SU containers.
So what do you guys do with packaging like this? Inquiring minds want to know.
Thanks for stopping by!
Sunday, November 11, 2012
Washi, Washi, Washi (Revisited)
Back in August I shared how I used an IKEA pot lid holder to organize my growing collection of washi tapes. I also said I thought I had enough washi and would buy no more. I might have lied. I keep buying to fill in the missing colors. You know, when you go looking for just the right blue, and none of yours are right? Yeah, those missing colors.
So I'd been collecting the new tapes in a bag down in The Abyss, that area of floor space at my feet where everything eventually lands. I can't see going across town to IKEA to buy one $5 item, so I just never go. I even tried to order it online, but it was $20 to ship. Pffth. So the bag at my feet was filling up.
Until this weekend, that is! You see, one of my local tweeps, Kara, tweeted me that she and her DH were headed to IKEA, and did I want her to pick me up another washi rack? YES YES! We did the clandestine parking lot hand-off again, and I rushed home to re-organize the washi. Now it looks like this:
Sorry about the bad lighting. The only decent light in The Captain's Quarters is right over my desk.
Here is the blue/green section now:
I think I may have a problem.
To attempt to justify this collection, I decided to make a card using some of the tape. I used the new OWH sketch:
and I made this:
I used a few more stamps from my CAS-ual Fridays Big Thanks stamp set. The gray chevron is part of a sheet of washi tape, and because of that, the strip of blue is stapled to the card to hold it in place. I decided the white-on-white was boring, so I used some more of the tape to make a border around the front of the card. I actually applied the adhesive for the top panel inside the washi rectangle on the card front so I knew it would stick. The washi is yummy, but not good with adhesives.
Right after I added the gray piece of washi, I decided to accentuate it by scoring a line above and below it, which you can sorta see here:
It looks way better in real life.
Now I may try this sketch with paper, like a normal person would do. ;/
Thanks for stopping by!
Products used and not listed below: Misc white card stock (it's an un-marked package, so who knows), CAS-ual Fridays Big Thanks stamp set, Queen & Co silver pearls, misc washi tape.

So I'd been collecting the new tapes in a bag down in The Abyss, that area of floor space at my feet where everything eventually lands. I can't see going across town to IKEA to buy one $5 item, so I just never go. I even tried to order it online, but it was $20 to ship. Pffth. So the bag at my feet was filling up.
Until this weekend, that is! You see, one of my local tweeps, Kara, tweeted me that she and her DH were headed to IKEA, and did I want her to pick me up another washi rack? YES YES! We did the clandestine parking lot hand-off again, and I rushed home to re-organize the washi. Now it looks like this:
Sorry about the bad lighting. The only decent light in The Captain's Quarters is right over my desk.
Here is the blue/green section now:
I think I may have a problem.
To attempt to justify this collection, I decided to make a card using some of the tape. I used the new OWH sketch:
and I made this:
I used a few more stamps from my CAS-ual Fridays Big Thanks stamp set. The gray chevron is part of a sheet of washi tape, and because of that, the strip of blue is stapled to the card to hold it in place. I decided the white-on-white was boring, so I used some more of the tape to make a border around the front of the card. I actually applied the adhesive for the top panel inside the washi rectangle on the card front so I knew it would stick. The washi is yummy, but not good with adhesives.
Right after I added the gray piece of washi, I decided to accentuate it by scoring a line above and below it, which you can sorta see here:
It looks way better in real life.
Now I may try this sketch with paper, like a normal person would do. ;/
Thanks for stopping by!
Products used and not listed below: Misc white card stock (it's an un-marked package, so who knows), CAS-ual Fridays Big Thanks stamp set, Queen & Co silver pearls, misc washi tape.
Sunday, September 23, 2012
Just Call Me A Scrap Wrangler
Last night my VSN high kept me up waaaay past my bed time, and while chatting with a few tweeps, I ended up watching the OWH Scrap Wrangler video. The admittedly fake Western accent bothers some people, but if you get past it (it's kinda cute, I think), she has some great ideas for managing our s-crap.
She goes way beyond what I'm willing to do, since I make cards for more than OWH, so a lot of her pre-cut ideas won't work for me 100%. However, she's right in that you don't need anything bigger than a 1/4 size of background papers. And you don't need to keep anything that's not a rectangle.
Note: She has a Donate Pile and a Recycle Pile. I only had the Recycle Pile, but that's me.
Since I was totally stamped out from yesterday, I devoted today to wrangling my scraps. I took some really bad Before and After pictures, but I think you'll get the idea.
Here is my Before box of solid scraps:
That's a large box from The Container Store. It has paper in there from the beginning of time, I think. I know I discovered colors SU hasn't carried in 5+ years or more.
Here's the top view, so you can see what I deal with when I say, "Hmm, I wonder if I have a scrap this color ..." :
Mmmm-hmmm. You can see why I usually give up and cut into another piece of card stock.
Just because I can, here's the back of the box:
It wasn't until I started to unload it that I found what I was looking for last week, and the week before ...
I took out my paper trimmer, set up a huge recycle bag, and got to work. I started at the back of the big scrap box, pulling out green card stock. I cut it into 1/4 sheets and piled them up by color. Anything smaller got recycled. I have so much of the stuff, that if I need a piece for layering, I'll cut into another 1/4 sheet - I'm okay with that.
Then I moved on to the next color, until I was done. I'm telling you, I found colors I can no longer identify.
Sandy (from OWH) said we should toss anything that's a color we're pretty sure we'll never use.Well, since I have so much Basic Grey paper, I thought I'd keep the older colors (and the pinks and the purples), just in case I need a layer. Hey, it's already paid for, right?
I actually tackled the colors separately from the neutrals, including whites and creams, and I stored them separately. I know how I operate, and white is the first thing I look for, and then it's black or brown to layer it.
Here is the After of the scraps. First, the empty box:
It's now a table to hold the other stuff. :D Yes, I am very proud.
Here's the Whites and Neutrals:
Since I like to use the same white for the sentiment that I use for the base, it's important to me to keep them sorted. I have SU Whisper White and Very Vanilla up front, followed by Naturals White, a huge pile of Naturals Cream I forgot I had, a pile of PTI white (that I'm using now for bases, so I need the scraps for sentiments), and in the back I have "specialty" papers, which right now are pieces of Bazzill and the textured linen card bases from clearbags.com that I 'm using.
And here's what's left of the colored card stock:
That box is half as tall as the original. Yes, I'm very proud of this, too. I may stack up a few more storage boxes to raise that up to the same height as the other ones so I don't hurt myself looking for a card stock layer.
Next, I tackled The Heaplet. Here's The Heaplet Before:
I cut everything into 4.25x5.5 pieces, but I did save a few smaller pieces, especially with the double-sided papers. I ended up with 4 tidy piles:
Back right are the 4.25x5.5 pieces. Back left we have 6x6. Front right are smaller pieces I NEEDED to keep, and front left are what I call "specialty" papers like wood, wood grain, star sheets, and one or two pre-printed digital images.
So, will it stay like this? I hope so! My new MO going back into stamping mode will be (1) trim it and put it away, or (2) recycle it. That's my plan, anyway. Wish me luck!
Okay, I think I need some food, then I may do the last two VSN challenges I didn't get to yesterday. I'll be sure to share my creations with you as the week goes on. One or two of them have potential for OWH cards, even. :)
Thanks for stopping by!
She goes way beyond what I'm willing to do, since I make cards for more than OWH, so a lot of her pre-cut ideas won't work for me 100%. However, she's right in that you don't need anything bigger than a 1/4 size of background papers. And you don't need to keep anything that's not a rectangle.
Note: She has a Donate Pile and a Recycle Pile. I only had the Recycle Pile, but that's me.
Since I was totally stamped out from yesterday, I devoted today to wrangling my scraps. I took some really bad Before and After pictures, but I think you'll get the idea.
Here is my Before box of solid scraps:
That's a large box from The Container Store. It has paper in there from the beginning of time, I think. I know I discovered colors SU hasn't carried in 5+ years or more.
Here's the top view, so you can see what I deal with when I say, "Hmm, I wonder if I have a scrap this color ..." :
Mmmm-hmmm. You can see why I usually give up and cut into another piece of card stock.
Just because I can, here's the back of the box:
It wasn't until I started to unload it that I found what I was looking for last week, and the week before ...
I took out my paper trimmer, set up a huge recycle bag, and got to work. I started at the back of the big scrap box, pulling out green card stock. I cut it into 1/4 sheets and piled them up by color. Anything smaller got recycled. I have so much of the stuff, that if I need a piece for layering, I'll cut into another 1/4 sheet - I'm okay with that.
Then I moved on to the next color, until I was done. I'm telling you, I found colors I can no longer identify.
Sandy (from OWH) said we should toss anything that's a color we're pretty sure we'll never use.Well, since I have so much Basic Grey paper, I thought I'd keep the older colors (and the pinks and the purples), just in case I need a layer. Hey, it's already paid for, right?
I actually tackled the colors separately from the neutrals, including whites and creams, and I stored them separately. I know how I operate, and white is the first thing I look for, and then it's black or brown to layer it.
Here is the After of the scraps. First, the empty box:
It's now a table to hold the other stuff. :D Yes, I am very proud.
Here's the Whites and Neutrals:
Those are cardboard storage boxes from IKEA that proved too flimsy to hold my dies. And maybe too small, too. ;/ They are perfect for these scraps, though.
Since I like to use the same white for the sentiment that I use for the base, it's important to me to keep them sorted. I have SU Whisper White and Very Vanilla up front, followed by Naturals White, a huge pile of Naturals Cream I forgot I had, a pile of PTI white (that I'm using now for bases, so I need the scraps for sentiments), and in the back I have "specialty" papers, which right now are pieces of Bazzill and the textured linen card bases from clearbags.com that I 'm using.
And here's what's left of the colored card stock:
That box is half as tall as the original. Yes, I'm very proud of this, too. I may stack up a few more storage boxes to raise that up to the same height as the other ones so I don't hurt myself looking for a card stock layer.
Next, I tackled The Heaplet. Here's The Heaplet Before:
I cut everything into 4.25x5.5 pieces, but I did save a few smaller pieces, especially with the double-sided papers. I ended up with 4 tidy piles:
Back right are the 4.25x5.5 pieces. Back left we have 6x6. Front right are smaller pieces I NEEDED to keep, and front left are what I call "specialty" papers like wood, wood grain, star sheets, and one or two pre-printed digital images.
So, will it stay like this? I hope so! My new MO going back into stamping mode will be (1) trim it and put it away, or (2) recycle it. That's my plan, anyway. Wish me luck!
Okay, I think I need some food, then I may do the last two VSN challenges I didn't get to yesterday. I'll be sure to share my creations with you as the week goes on. One or two of them have potential for OWH cards, even. :)
Thanks for stopping by!
Saturday, August 25, 2012
Washi, Washi, Washi
You have to read that title a la "Marsha, Marsha, Marsha" from The Brady Bunch, because that's how I say it in my brain.
So my pal Lisa is here, and we are eating and crafting and not sleeping enough, and eating some more, then yesterday we went to IKEA. I'm always fascinated by the storage options, and when we were in the kitchen section, we spied an expandable pot lid organizer --Rationell Variera -- that I decided would be perfect to organize my washi tape collection.
Here's what it looks like in its mostly-intended-for position:
And here's what it looks like in its "other options" position:
I have a small space in my craft room on the wall between two closets, and I decided that's where I'd hang these (I got two). Here's what my new washi tape storage system looks like:
Yeah. Ahem.
Here's the blues and greens:
Yeah.
It's a great organizing system, and I really like it.
Also, I'm not going to buy any more washi tape for a very, very long time.
So my pal Lisa is here, and we are eating and crafting and not sleeping enough, and eating some more, then yesterday we went to IKEA. I'm always fascinated by the storage options, and when we were in the kitchen section, we spied an expandable pot lid organizer --Rationell Variera -- that I decided would be perfect to organize my washi tape collection.
Here's what it looks like in its mostly-intended-for position:
And here's what it looks like in its "other options" position:
I have a small space in my craft room on the wall between two closets, and I decided that's where I'd hang these (I got two). Here's what my new washi tape storage system looks like:
Yeah. Ahem.
Here's the blues and greens:
Yeah.
It's a great organizing system, and I really like it.
Also, I'm not going to buy any more washi tape for a very, very long time.
Subscribe to:
Posts (Atom)