Wednesday, June 29, 2011

WOTT (6/28/2011) and WOYWW (6/29/2011)

It's been a few weeks since I've shared the mess that is my stamp table, so why not:

Yes, it's pretty bad. This was taken Tuesday evening as I worked on a card that has since been finished and is on its way to its recipient. I'll post more detail about the card on Friday, including a few pics about those buttons.

Also (still) out on the table are:
- baker's twine from my patriotic cards from the other night
- a star punch from the same episode
- the Congrats stamp from my money holder mock-up
- a bunch of other s-crap I don't want to talk about

There, I've taken another one for the team. You're welcome. I'm posting ALL OVER THE WORLD at both WOTT and WOYWW, because I can. :)

And thanks for stopping by!

Hambo Hoedown #22 - Doghouse Blues

It's Hambo Hoedown time! You know how I keep telling you that if you play, Hambo will send you a free digital image for the next week? Well, I've been waiting, and waiting, and waiting for my free digital image, but it's Wednesday, and it never came. Wanna know why? Because I never emailed my card image to them. It's in the rules! You have to email them your card image to get the freebie. GAH! I guess that's to make up for the fact that I actually read the challenge instructions last week, so I needed to forget something. Sigh.

So I didn't get the free doghouse image. And this week's challenge (see? I did read it!) was to incorporate dog tag, dog bone, or metal charm. Well, that kinda means I needed to use a Hambo dog image. Fortunately, I had Drooly from a previous challenge. Yay, me! I made this:

Continuing with my "use it up" mode lately, I used some papers from the DCWV Pets Pack (it's 12x12, and I will never, ever, use it all), including that strip of embossed DOG BONES! The sentiment is from A Muse. For extra credit I added a metal bone clip I've had in my stash for years - at least 2 or 3, or whenever Recollections closed. {moment of silence}

Here's a close-up of the DOG BONES that I remembered to include:

Yes, I am very proud. Also, please notice his drool is colored with a glitter pen, the better to stick to you:

His tag was colored with a silver glitter pen. Love those things. Oh, and that sukky coloring on Drooly's fur? I totally meant to do that. It makes him look like he has a mix of colors in his fur. No, really!

So remember, if you play the Hambo Hoedown (and you should), remember to not only follow the challenge, but also email your card to them so you get the free digital image the next week. Don't be like me.

Thanks for stopping by!

Tuesday, June 28, 2011

Jingle Belles Rock #26 - Tagging Along

The Jingle Belles ROCK! They DO! This week's challenge is to make any Christmas card we want to, then make something else inspired by the card. This week the Belles are also teaming up with Order of the Opus Gluei and there be PRIZES!

First, you'll notice it's Tuesday night and I'm just now posting this (deadline is Wed before I get home from work), because I have to leave at the crack of cranky to get to work early tomorrow morning, so tonight was IT, kids. I'd put it off as long as I could.

You see, without rules and instructions and guidelines and sketches and ... I am a lost soul. I have no direction. Well, truth be told, even when I have instructions I can't get a clue, so imagine my suffering this past week. It's been intense.

Tonight I went in search of a sketch to get me started, and I selected one, then forgot about it and selected this one:

This is CPS Card Sketches # 224, and here is what I made:

(Sorry about the glare. Things are getting worse, I know.) I chose to pick through the remaining papers in my Basic Grey jovial pack. At this point, my least-favorite papers remained, so I had to deeply ponder my approach. I decided to use a dark piece of paper, since I would never, ever do that out of the gate.

Then I went in search of an element to use where the sketch has a circle, and I chose my MFT die set (the name escapes me at the moment, and I'm too tired to look it up). I selected three other left-over papers and used them for the die-cut layers. The snowflake is also an MFT die.

Sentiments. Do you know I have very few sentiments that fit in that top layer die? The one I ended up with is from A Muse.

Here's a detail shot (because I could) of all the layers:

Now for the rest of the challenge. When I cut layers out of 6x6 paper, I'm left with a strip of paper 6" by 1 to 2". ... Think about that for a sec ... ... ding ding ding! TAGS! I just folded them in half and called them tags! Lookie:

The handsome strips of paper on the front of each tag were pulled from the other remnants in the pack. I just added a few pearls, punched a hole, tied a string - DONE!

Soooo, have you made your card yet this week? Come on over and play!

Thanks for stopping by!

SOS Challenge #6 - Scrap Attack

Welcome to challenge week #6 at Shopping Our Stash! This week we ask you to use all (or mostly) scraps to make your card or project. If you don't have any scraps --- um, what is WRONG with you!!?!?!? --- then you can recycle or up-cycle something instead. Heck, do both and go for the gold! HA!

According to the "official" rules set out by our fearless leader Carla, you can use new card stock for the card base, but use scraps: paper, ribbons, the odd single embellishment, etc. for the rest of the parts-is-parts, OR recycle something: re-do a former card, use something that was intended for a different purpose, like ribbon from a package, coffee cup sleeve, corrugated paper, button from a shirt, etc.

I think you get the idea.

Me, I live in a room filled with s-crap, er, remnants. One in particular has been mocking me for weeks - WEEKS, I TELL YOU - as it peeked out from beneath the Heaplet. It inspired me to make this:

Yes, my dear readers, (almost) all of that came from scraps. See:

These are parts of pieces of Basic Grey kioshi paper. I keep the cut-into pieces in the front of the 6x6 pads so I always know what is what. It's the only way I survive my collection of BG 6x6 pads. It's embarrassing.

This is the piece (are the pieces) that started me down this path:

And yes, the scalloped edge was already done on that other piece. I was living right.

Let's look at that card front again:

- All of the kioshi papers were partial pieces. No new 6x6 papers were sacrificed for this card.
- The SU images (from the Happiest Birthday Wishes hostess set from the 2011-2012 catalog) were stamped in Rich Razzleberry and Old Olive onto a scrap of Whisper White.
- The card base was new, the piece of Razzleberry ribbon was cut from a mostly intact roll, the layer of Razzleberry card stock was from a virgin piece, and the doily is from a pack of MS doilies I have had on my desk for a while, just waiting for the right moment to use one.
- I actually made up the layout, all by myself, too! :)

I've made a decent dent in those paper pieces. Now go forth into your scrap piles and make a card, then link it up to the SOS Challenge #6 post so we can see what you've made!

Thanks for stopping by!

Monday, June 27, 2011

Less Is Better

My nephew just joined the Marines. Yep, he's in basic training right now, and needs some love, so I decided to make him a card, just to let him know I'm thinking about him. Something patriotic. You know, red, white & blue. Sounds easy, right? Not if you're me.

I tried several failed attempts to make a flag on my own, and it didn't go well:

Then someone reminded me I have the Land of the Free stamp from the SU mini catalog. I've tried to ink that up in the past using red and blue markers, and I've not been all that successful. Then someone sent me this video, so I gave that a try. This is my version:

I made mine A2 instead of square, and I also added some baker's twine. Love that stuff. I don't know how I've lived without it up 'til now.

This was a ton of work, and in the end I decided it was too much. Just too much. Then I remembered this card I saw on the Paper Smooches blog and I made this:

I colored the stars with glitter pens, then I stopped. Maybe my mind is just more twisted than most, but do those stars look like the Rockettes? You know: long, leggy dancers? With skimpy tops? I may be long over-due for a vacation.

We learn a lot about ourselves when we craft. I found out this evening I have not one piece of textured navy blue card stock in my stash. I know that because I spent 30 minutes looking for a piece and couldn't find any. I have all the other color families of textured card stock, but the one with navy blue? Noooooooooooo.

And not one of my vast collection of Core'dinations card stock packs contains anything remotely close to navy. In desperation, I took out a couple of pound-of-paper packs I've had for ages (years, even) and this one single piece of dark blue is the closest I could get. Sigh.

I used my Stamp-A-Ma-Jig to get those stars mostly lined up, then I realized they were too far to the right. Well, the first three attempts I had them centered, but I managed to destroy those, one at a time. This was going to be my last attempt, and thank goodness they were only off-center and not schmeared. Important note: Assemble your card, then color the glittery goodness. OMG, what a mess.

I added a piece of my ever-present baker's twine and a button made from a remnant of the trimmed piece of dark blue textured card stock. Then I called it "done". I like it a lot better than the first one I made.

I can see this is going to be an on-going challenge for me, especially if my nephew makes the Marines a career. I'll be sure to share any other patriotic things I devise.

Thanks for stopping by!

Something New

I got this bug up my patootie that I need to offer money holders. This all came about when I sold a card to a guy who held up a dollar bill to see if it would fit without folding, and it won't. Maybe in a 5x7 card, but not in a A2. Boo. So, yeah, the wheels started turning.

Last night I made this:

I started with a piece of real paper money and played. I made several templates out of printer paper until I got it right. Once I figured out the dimensions*, I grabbed a piece of miscellaneous textured card stock and sliced and diced to make that handsome blue thing above.

Here's the inside:

The notch was punched with the Wide Oval punch before I stuck it down. It's as wide as it is to allow for a strip of red-line tape on either side of the pocket to hold it closed. I've seen versions with a loose pocket and the corners cut down, but what if it's a check instead of cash? Nah, I like it closed.

Next time I may play with it a little and make the pocket a little less tall. Or not, we'll see.

Those two shiny things are the two halves of a BG magnet closure from a pack I had to first find, then break into. I don't know why it's required that we have amazing upper-body strength to break into craft supplies. Seriously, people, lighten up.

Today I looked for envelopes to fit this beast. Not. This is apparently a non-standard size. I CRY FOUL! Fortunately, I found this tutorial on the Interwebz on how to make any size envelope in 3 minutes. Uh-huh. It's always more difficult than it looks, right? But hey, it was worth a try.

So tonight when I got home, even before I emptied my pockets and changed into my jammies, I went into the Captain's Quarters, grabbed a miscellaneous piece of 12x12 paper, and set to work. Within the advertised 3 minutes (not counting the search for the paper) I had made this**:

Okay, 5 minutes if you count adding the tape. This is what it looks like on the inside:

Please ignore the little cut in the flap. I slipped. ;/ I put a piece of Scor-Tape on the flap so sealing this baby will be easy.

I think this has promise! And not only will I use up my miscellaneous textured card stock, I'll also use up some miscellaneous 12x12 paper for the envelopes. Go, me! I think maybe I'll make some from wedding-ish papers, too. :)

That's it! I need to go make some more of these and also work on my Jingle Belles card for the week.

Thanks for stopping by!

* Measurements for the folder:
7" x 8 1/2" (isn't that convenient?!)
score along the long edge at 3" and 6", leaving a 2 1/2" flap

** Measurements for the envelope:
First, according to the USPS First Class rules, I knew this had to be a minimum of 3 1/2 " tall, so that's what drove that detail.
My envelope came out at 7 1/2" x 3/3/4"

Sunday, June 26, 2011

Stamping 411: Saturday Sketch 209

I've been a lurker over on Stamping 411 for quite some time, but the challenges either get buried in my "I'll get to it eventually" pile, or I get inspired by it but I don't use SU-only stuff, so I can't play. Today might be the first time I've played AND made it SU-only. Here is the sketch:

I thought it would be a great design to use more of my Just Eat Cake papers, so I tried the sketch and made this:

Yeah, another one done literally to the sketch. I ended up modifying the sizes of the paper pieces a little because, as we all know by now, I am incapable of cutting two pieces to exactly the right size much less three pieces.

I've been cutting out that stamped image (from one of the soon-to-be released Hostess sets: Happiest Birthday Wishes) with a circle, but I just realized (!) it is designed to fit into the scallop punch (of course it is). I ended up cutting the black circle for under that scallop shape with my Circle Cutter that I keep stored under my cabinets. :)

That's it for this challenge. I'm off to stamp some more.

Thanks for stopping by!

Sketchy Sunday {TG023}

I'm actually doing Tiff's Sketchy Sunday on a Sunday, and the right Sunday, too! I think. At worst I'm a week behind. Oh, yeah, I'm a week behind. Oh, well.

Here's her sketch:

and here's my card:

I broke open my new pack of Cosmo Cricket Social Club for the papers. The Thank You is from Hero Arts, the tiny tags are punched with the SU Jewelry Tag punch, and the center one was stamped using the Tiny Tags set.

A slight aside on sentiment stamps: I have been collecting stamps (I mean, come on, we are collectors, right?) for about 9 years now, and I have neat little collections of Thank You and Happy Birthday and Thinking of You stamps, all organized in clam shell boxes, and I. never. use. them. I went in search of the right Thank You for that card, and I must have touched dozens of "not the right one". What is wrong with me/us that we have so. many. stamps. and none of them are right for what we are making?!

I decided then and there I need to be rid of all these neglected stamps to make room for some of the collection still all over my stamp room floor. Stay tuned. I'll need to photograph them all, and that sounds like work, so it may be a while.

Okay, I'm back to the card. I actually used a new-ish Hero Arts stamp for the Thank You. See? I don't need all those other ones. :)

Let's look at some detail, because I'm all about sharing my DOH moments to help you avoid the same pitfalls.

First, let's talk about that sentiment:

It's straight, right? It's die-cut, too. That's because the one I stamped directly onto the paper was not straight. :( No big surprise there. So I stamped it again onto a scrap, die-cut it, and aligned it with the existing paper, and realized I'd die-cut it off-center, too. Well, technically it is centered within the die-cut piece, but it's not centered on the base strip of paper. (Have I lost you? I've lost myself.)

Embellish! I needed to embellish! It only took me about 15 minutes to find a punch almost the right size to punch out three of the circles from a scrap of the dotted paper to fill in the space. I hope it looks like I meant to do that.

Here is the tag element:

I decided the card was boring and needed a pop of color, so instead of just attaching the tag to the card front, I made that little stacked circle thing out of a few other papers from the pack, then I tied the linen thread around the brad.

I think that's enough picking at this card. I'm going to hit Publish and then go stamp some more.

Thanks for stopping by!

Market Update (6/25/2011)

'Twas a glorious day at the market yesterday:

The day's high was in the low 80s, but the humidity was unseasonably low, so people were out in force. I think today I'll present the photos in the order they were taken (pretty much), to give you a flavor for the randomness of the day.

We'll get started with the stars of the show - fruits and veggies (sorry, Bunny, but yes, there are dogs today, just hold on):

The veggie spread at Farmer Mike's:


Tomatoes:


and green tomatoes:

Grape tomatoes:


Cukes:


... and Zukes:

Bell peppers:

... and BASIL:


OMG, you can smell this stuff as you approach that end of the table. Mmmmm.

He also had beets (blech):


... and cabbage:


Kohlrabi:


and fennel (yes, it smells like licorice):


... and celery:


... and both blackberries and blueberries:


Oh, and lest I forget, he had okra:


and SOME people were happy about it. I don't get it. Oh, is my Yankee showing?

I turned the corner to Farmer Margie's and spied her fruit offerings:

which included blueberries and sweet cherries, and also sour cherries:

Over at Farmer Katie's, we had pretty PattyPan squash:

and this fruit spread:


Sitting across from it all morning I finally broke down and got both sweet and sour cherries, and some blueberries. The blueberries were disappeared in no time. SO good.

Over at the flower tent, we had Snapdragons:


... and daisies:


... and these, which I think are cornflowers:


and zinnias:


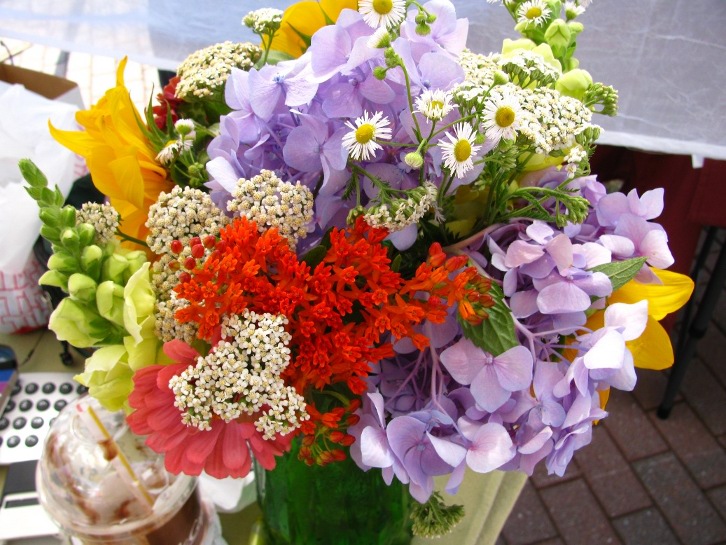
This is my arrangement:


The Rock Lady had a few new items, too. These are the ones that are in focus enough to share with you.

The pond:

Isn't that a great display? It's not wet - just looks like it is.

And some guinea pigs:

I overheard someone say these are the best kind. They don't eat much, and you don't need to clean their cages. :)

Okay, Bunny, are you ready? Time for some real-life critters!


This next one is a Schnoodle - Schnauzer + Poodle. SO cute:

This Westie was thirsty:

She said he lays down to drink at home, too. :)

Olivia:

Warren:

This guy is a Vizsla:

It's a Hungarian breed, also called the Velcro dog - I guess they stick to everything. She said he's like a Weimeraner, but not, and they only come in this color.

A pug for Carla:

And TWEETY!

I've always wanted to get a decent photo of his blue feathers, since they are gorgeous. This is the best I could do yesterday:

You can see some on his tail. He's such a pretty, er handsome bird.

This is a Poodle and Golden mix:

He would put down this toy when they stopped, and pick it back up again when they resumed walking. What a hoot!

Okay, one more:

That's it for photos. Sales were decent, so I can't complain much. I even sold one of these sets of cards I made just before I left for the market:


I love it when a plan comes together. :)

In other news, when I got home I had happy mail from Libby:

She did something totally crazy and actually MAILED some cards. I KNOW! Isn't this one perfect for me? She enabled me to purchase these stamps, I like them so much. :)

I hope to get caught up with some challenges today, so I hope to have something crafty to share later today.

Thanks for stopping by!