You may notice I have a new badge in my right side-bar. I've been STALKED! Every Friday EtsyStalker features a few etsy shops that catch her eye (their eyes) and they included ME ME ME this week!
Check it out here. EEEEEEK! They also featured my bloggy and Twitter pal UnderstandBlue.
I am sooooo excited! (Can you tell?) Personally, I suspect it's because she tweeted that she is in Phoenix and was looking for restaurant recommendations, and Blue happens to be in Phoenix for Leadership 2010, so I hooked them up. Twitter rocks!
I'll be back tonight with a plumbing extravaganza that you won't want to miss. Seriously.
Thanks for stopping by!

Friday, January 8, 2010


Wednesday, January 6, 2010
I Tried
I am still trying for Project # 4 of 4 for this weekend. I really want to use the beyond-cute Love Bandit set. Really, really really, I do! This is all I have managed to produce:

Eh? It's not my best work. I just noticed I need to move that curly label piece up a little bit, though I have about 5 pounds of tape on it to make it stick. Just not my night, I guess.
All the other projects this month are pink or red, and I wanted this one to be, well, not. I had originally used a green accent down the left side, but it looked like Christmas, so I scrapped it and went with red.
I think it is boring. What do you think?
And being a full-disclosure kind of gal, here is my current 6 square inches of available work space at my Captain's Table:
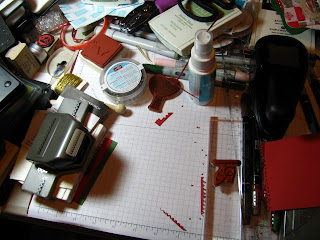
Yeah, it might be time to put away a few things. But just a few. I've also run out of acrylic blocks to use with all these un-mounted stamps, so that's another challenge. I think I'll have to post this card on The Door Gallery and use some more of my new stuff for Project #4. Or maybe I'll use OLD stuff. heh heh That'll shock 'em!
In other news, my plumber is coming over tomorrow, so I took the day off from the Day Job. He'll be working in both the Kitchen and bathroom, so that means I need to clean the Kitchen and bathroom to reduce the embarrassment level. He says he does not judge, but still ... I'll clean. That will also save me some time Sunday morning, which is my normal OH MY GOD THE LADIES ARE COMING OVER AND I NEED TO CLEAN THE BATHROOM AND KITCHEN list of tasks before my Stamp Camps. See? It all works out.
Also, my 1 and 2 laptop keys are sticking, which pi$$es me off to no end. I'll be prying those off in the next day or so to investigate the probable cause. I vote for cat hair. Do I hear a second? :-)
Thanks for stopping by!

Eh? It's not my best work. I just noticed I need to move that curly label piece up a little bit, though I have about 5 pounds of tape on it to make it stick. Just not my night, I guess.
All the other projects this month are pink or red, and I wanted this one to be, well, not. I had originally used a green accent down the left side, but it looked like Christmas, so I scrapped it and went with red.
I think it is boring. What do you think?
And being a full-disclosure kind of gal, here is my current 6 square inches of available work space at my Captain's Table:

Yeah, it might be time to put away a few things. But just a few. I've also run out of acrylic blocks to use with all these un-mounted stamps, so that's another challenge. I think I'll have to post this card on The Door Gallery and use some more of my new stuff for Project #4. Or maybe I'll use OLD stuff. heh heh That'll shock 'em!
In other news, my plumber is coming over tomorrow, so I took the day off from the Day Job. He'll be working in both the Kitchen and bathroom, so that means I need to clean the Kitchen and bathroom to reduce the embarrassment level. He says he does not judge, but still ... I'll clean. That will also save me some time Sunday morning, which is my normal OH MY GOD THE LADIES ARE COMING OVER AND I NEED TO CLEAN THE BATHROOM AND KITCHEN list of tasks before my Stamp Camps. See? It all works out.
Also, my 1 and 2 laptop keys are sticking, which pi$$es me off to no end. I'll be prying those off in the next day or so to investigate the probable cause. I vote for cat hair. Do I hear a second? :-)
Thanks for stopping by!
Tuesday, January 5, 2010
Something Completely Different
Did I mention I went shopping at my LSS this past weekend? Mmm-hmmm. One of the things that jumped into my basket was a stick-on template of a bustier that had pre-defined spots for stitching. It is clear, so I stuck it on a piece of pink paper from my (also new) Gossamer paper pack from Memory Box. Yeah, I know, that whole sticker thing makes no sense, so just have a look and I'll explain:

Preeeeeeethy, yes? I almost went blind doing the stitching*, even WITH my glasses. Now I remember why I gave up cross-stitch. Let's zoom in a little for the obligatory detail shot:
 Okay, that's not very close at all, is it? Let me try again:
 See all that gold stitching? Grrrr. Let's do some numbers:
 1. The detail that comes with the stick-on that you just leave there and admire, untouched.
2. The stitching holes. I left these alone, but it's what the stitched ones looked like before I, uh, stitched.
3 & 4. Swirly-shaped lines I stitched.
5. Little flower thingies I stitched. There are six of them.
I punched the holes down the middle, threaded a miscellaneous gold ribbon and tied it in a bow at the bottom.
It took me part of three evenings to make this thing. Tonight I came up with the plan for the card itself. The base is from Core'dinations - one of the black versions. This one has a pink core and inside. I ran the front through my Big Shot with a Cuttlebug embossing folder** and lightly sanded it to reveal more of the pink.
I thought the bustier on the black card looked unfinished, so I opted to layer it on an oval cut from another piece of card stock from the same Memory Box papers pack. Much better!
I also opted for no sentiment. Because I could. I'll let the buyer decide on the occasion. My only decision is how to categorize it: Any Occasion? Love? Irreverent? Inquiring minds want to know.
In other news, I hit up Mike's last night and picked up a few punches. Hey, it was next door to the pet food place where I was buying Her Highness more kibble, and it was just too convenient to not check out what was in stock, ya know? I'll be sure to make something, eventually, with them so I can share with you all their punchy goodness.
The rest of my SU goodies arrived yesterday, too, so I have much to do! Including making up project #4 for Sunday's Stamp Camps. There's LOTS of time ... it's not Saturday night yet. :-)
Thanks for stopping by!
* The sheet of stick-ons has another bustier and a TON of tiny flowers and leaves. It may be a cold day you-know-where before I tackle any of them.
** Did you ever wish the names of these CB embossing folders were actually printed ON the folders? I mean, c'mon, who keeps all the plastic carp or the cardboard insert that comes with those things? Not I! I know I could write the names on them with a Sharpie, but puleeze! L A Z Y ! *waves hand in air*
Sunday, January 3, 2010
The Red Box
Back in December, which was LAST YEAR, I attempted to make a box project based on this VERY cool project on Brenda's blog. I wanted The Ladies to see how much fun it was to make, and maybe use it for a holiday gift idea, but well, it just didn't happen.
Fast forward to this weekend, and while sitting at my Captain's Table pondering life's mysteries, and desperately trying to think up another project for my Stamp Camps, which are NEXT SUNDAY, I spied my failed green box, and got a clue. YES, we'll make a red box instead, and make it for Valentine's Day! Wow, I had a PLAN!
Here is the box:
 I figured if I'm going to make them construct the box, I'd make the decorating part easy for them. The hearts are actually a single stamp from the new "I {Heart} Hearts" set in the Occasions Mini, and I punched it out with the Three-heart punch. I supposes I could have added a white edge or a Versamarked pattern to the top, but I chose to leave it nekkid.
I was worried that wrapping the ribbon around the top before I stuck it to the top of the box would affect its stick-to-it-ness, but I used red sticky tape, and it's not going anywhere, lemme tell ya.
 THEN, to kick it up a notch, and to maybe cut down on the potential whining factor, I included some chocolate:
 I grabbed some Hershey's Minis at the store yesterday, and wrapped them with a strip of retired red patterned papers. In this Bad Demo moment, my goal is to illustrate that you can use ANY paper for this - it's just decoration. Plus, I did not buy the new Valentine's Day papers, so I really had no choice.
That's all I have to share today. I plan to go work on Project #4, and maybe make some more Valentine's Cards for my etsy shop.
Thanks for stopping by!
Saturday, January 2, 2010
Pieces of Love
I called this post Pieces of Love not to be profound or anything, but because the card was made from scraps of DSP, and it says 'Love'. Deep, I know.
After all the furniture moving yesterday, I planned to make (and DID make) a Valentine's Day card using some of my cool stash of Tessa Ann's buttons from The Button Shop (tessaann.etsy.com). Here's my card:
 I decided to let the button drive the card, and since it was kinda hot pink, I opted for Pink Passion, which is an SU color I very rarely touch... it's just a little too pink for me. But I did use it last night, and I think it looks fiiiine. Of course, I cut it with some black. :-) The papers are from the Night & Day Specialty pack (from the Holiday Mini); the sentiment is from PTI's Mega Mixed Messages; the fancy-schmancy shape behind the sentiment is a Nestie; and the skinny ribbon is from my stash. I thought about blinging it up a little, but then decided against it so the button can be the STAR.
I made two of these and they'll end up in my etsy store as soon as I get them bagged and tagged and posted.
I am going to the Post Office today (sure hope it's open), then I'm actually going to buy some food. That's just crazy talk, I know, but you see, I have these mushrooms that are just crying to be stuffed, and I wanted to make another batch of spinach-artichoke dip to stuff them, and I have no more canned artichokes. 'Tis certainly tough to do without the main ingredient, so shop, I must.
After I get all that errand stuff out of the way, I hope to make some more Valentine's Day cards, so I should have something crafty to share with you later.
Thanks for stopping by!
Friday, January 1, 2010
Furniture Movement Exercise - Part Second (and Last)
Well, I managed to cram all of this into two posts, so it will not be a long, drawn-out read after all. Lucky you.
Before we get back to the main program, let's look in on my helper:
 Uh-huh. Do you think she could be any more-tightly wound? Yes, that is her tail draped over her own head. (Please ignore the towels I just dumped on the chair - I'll fold them later.)
Okay, let's pick up where we left off - I needed to move stuff around in the Captain's Quarters to make room for the now-disassembled card catalog. First, I moved the dismembered set of drawers next to the 4' table I have in the center of the room:
 Well, would you look at that! It is the same height as the table! Lucky Duck Move #1. If I find a top for it, it can be a functional extension of my work space. YAY!
(For the morbidly-curious among you, that clutter on top of the drawers-with-no-top is a 3-ring binder with pictures of every card I have made this year. Yes, I have binders by year that contain pics of every card I have ever made*. On top of the binder are all the stickers with numbers for the cards I have not yet printed out for the binder. There's also extra stickers and some clear bags for my bag-em-and-tag-em efforts. And an emergency flashlight that I need to plug back in.)
*Why do I have binders of every card I have ever made? At one point I thought I'd need to go back and re-create a card, but that's not happening, so I may quit doing it. Maybe. Plus, I am running out of room for binders.
Moving that drawer section left an empty spot in its wake:
 I vacuumed it and everything! Then I moved the 2-section storage cabinets into the empty so it is now filled:
 Moving on, we get to The Test. Will that base section actually fit in the newly vacated space?
 YAAAAAAAAAAAAAAAAAAY! It does! Aaaaaaand, I can reach the wall outlet without becoming a contortionist! A pleasant, unexpected bonus!
Let's see how close we came:
 ... ooooh, literally an inch to spare. So I brought in section #1:
 ... just perfect. Then ... THEN ... I brought in section #2:
 Would you look at that! It is the same height as the other cabinets! This is what I call Lucky Duck Move #2. I had to stop for a second and think things through. If I stopped with only two sections, I could use the top for ... more storage! I would have a place for my now-homeless Color Caddy! I could reach it!!!!
So I tried it. Instead of section #3, I brought in the top:
 This was going very well. Very well, indeed. Lookie:
 Is this perfect, or what?!?!
Here is what that wall looks like now:
 Oh, look. My muse is showing there in the center, hanging from the light. And we are looking up her skirt. Look away, just look away!!!
Here is the wall in my Dining Room, mostly back to normal:
 And here I demonstrate that I actually put something INTO one of the drawers:
 Since I pre-ordered 2 of each new color of the yummy SU satin ribbon, I needed a place to put it, so this was perfect.
Oh, and that third section of the card catalog? Here it is:
 I had to move a dead lamp out of the way to put it here, but it is a perfect fit. I have not decided yet what I'll do with it - keep it or sell it. Since it is not in my way, I have all sorts of time to think about it. But now I need to dispose of that dead lamp. Sigh ... a woman's work is never done.
That's it for the Big Move. I am finished for now. I also realized my Stamp Camps are NEXT WEEKEND, and I am once again sorely unprepared. I'll need to gosteal CASE a few projects so I'll have something for The Ladies to do when they arrive. Hopefully I'll get to that this weekend so I'll have something crafty to show you.
Thanks for stopping by!
Before we get back to the main program, let's look in on my helper:
 Uh-huh. Do you think she could be any more-tightly wound? Yes, that is her tail draped over her own head. (Please ignore the towels I just dumped on the chair - I'll fold them later.)
Okay, let's pick up where we left off - I needed to move stuff around in the Captain's Quarters to make room for the now-disassembled card catalog. First, I moved the dismembered set of drawers next to the 4' table I have in the center of the room:
 Well, would you look at that! It is the same height as the table! Lucky Duck Move #1. If I find a top for it, it can be a functional extension of my work space. YAY!
(For the morbidly-curious among you, that clutter on top of the drawers-with-no-top is a 3-ring binder with pictures of every card I have made this year. Yes, I have binders by year that contain pics of every card I have ever made*. On top of the binder are all the stickers with numbers for the cards I have not yet printed out for the binder. There's also extra stickers and some clear bags for my bag-em-and-tag-em efforts. And an emergency flashlight that I need to plug back in.)
*Why do I have binders of every card I have ever made? At one point I thought I'd need to go back and re-create a card, but that's not happening, so I may quit doing it. Maybe. Plus, I am running out of room for binders.
Moving that drawer section left an empty spot in its wake:
 I vacuumed it and everything! Then I moved the 2-section storage cabinets into the empty so it is now filled:
 Moving on, we get to The Test. Will that base section actually fit in the newly vacated space?
 YAAAAAAAAAAAAAAAAAAY! It does! Aaaaaaand, I can reach the wall outlet without becoming a contortionist! A pleasant, unexpected bonus!
Let's see how close we came:
 ... ooooh, literally an inch to spare. So I brought in section #1:
 ... just perfect. Then ... THEN ... I brought in section #2:
 Would you look at that! It is the same height as the other cabinets! This is what I call Lucky Duck Move #2. I had to stop for a second and think things through. If I stopped with only two sections, I could use the top for ... more storage! I would have a place for my now-homeless Color Caddy! I could reach it!!!!
So I tried it. Instead of section #3, I brought in the top:
 This was going very well. Very well, indeed. Lookie:
 Is this perfect, or what?!?!
Here is what that wall looks like now:
 Oh, look. My muse is showing there in the center, hanging from the light. And we are looking up her skirt. Look away, just look away!!!
Here is the wall in my Dining Room, mostly back to normal:
 And here I demonstrate that I actually put something INTO one of the drawers:
 Since I pre-ordered 2 of each new color of the yummy SU satin ribbon, I needed a place to put it, so this was perfect.
Oh, and that third section of the card catalog? Here it is:
 I had to move a dead lamp out of the way to put it here, but it is a perfect fit. I have not decided yet what I'll do with it - keep it or sell it. Since it is not in my way, I have all sorts of time to think about it. But now I need to dispose of that dead lamp. Sigh ... a woman's work is never done.
That's it for the Big Move. I am finished for now. I also realized my Stamp Camps are NEXT WEEKEND, and I am once again sorely unprepared. I'll need to go
Thanks for stopping by!
Furniture Movement Exercise - Part First
Ya know how sometimes in order to do one thing you need to do something else first? Or in my case, about twelve things? Since no one can figure out why it takes me forever to do anything, I thought I'd record today's activities for posterity.
Goal: Move the library card cabinet into the Captain's Quarters.
Let's get started with a pictorial of the "before". Here is the library card catalog in spot #2:
 The bottom two sections of drawers are filled with my embarrassingly-large CD collection. The top section of drawers actually have index cards in them. The object of my attention today ... this whole piece of furniture must be moved into the CQ.
Now let's take a look at where we think it will fit. This is one of the walls of storage cabinets in the CQ:
 Please focus on the small one to the right:
 If that small section of storage were to find a new home. the space between the 3-level cabinet to its left and the edge of the door is:
 ... just over 36". And measuring to see how the depth of the card catalog will fit:
 ... see the 17" mark? That's how far it would stick out into the room/doorway. I wrinkled my nose over this when BR#2 was here, until she pointed out that the bags hanging on that door knob stuck out 20". She's right.
So where do we think this 2-section storage thing will live? Gotta find it a home, right? Well, there's this spot:
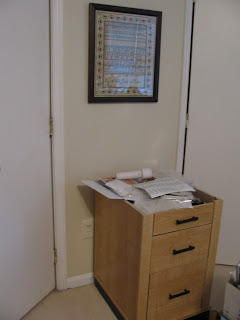 That ... thing is a part of my desk that used to support an L-shaped desk section that I took down because it took up too much room and was just a collection spot for STUFF. The drawer section has no top ... I keep meaning to get one, but, well, you know.
So if I moved that drawer unit somewhere, I could move the 2-section storage thing over here in its place and then try and fit the card catalog in the space vacated by the 2-section storage thing. Welcome to my world.
Let's measure the card catalog one more time, just to be sure:
 35". Mmm-hmmm. In theory, this should fit.
Okay, now for the "gotta do 12 other things before the one you want" part. In order to take the Card Catalog apart, it needed to be empty. To empty it out, I needed to remove the drawers, which contained all my CDs. I needed somewhere to put these CDs, so why not put them back where they originated: a cabinet in my front hall. But that cabinet was moved into the Dining room:

(For those of you wondering, I actually did take that packing material and fold it nicely and stack it up in the kitchen a few weeks ago. I have a ton of it. Anyone need packing material?)
... to create a spot for this green cabinet in the front hall:
 (You may recall that this green cabinet used to live where the card catalog lives now. Just think of it as musical chairs and you'll do fine.)
So I dragged (drug?) the green cabinet into the Dining Room, then set about moving the brown cabinet back to its original spot.
Unfortunately, that brown cabinet is not only a put-together-yourself cabinet that weighs about 15423 pounds without the CDs, it is old, and was partially limping before I tried to move it, and it broke totally when I moved it to this spot. Moving it back was going to be a Herculean task. And it was.
I had a hair-brained idea that if I took off the two doors, it would not only lighten the piece enough to move, but allow me to flip it over and re-attach the bottom support that ripped of when I moved it the first time. (Lesson #1: Don't ever attempt to move this stuff.) So I unscrewed the doors, one at a time, and the first one ripped off with screw #6 of 6. Did I mention these doors are heavy? The first one fell onto the carpet, which was okay with me. Most of the VHS tapes even stayed in place. Cool.
Then I got another hair-brained idea to support the second door so it would not fall off with the removal of screw #6 of 6. I am capable of learning from my mistakes. I am. No, really.
So I supported the open door on some cans of varnish I had conveniently stored next to the cans of Raid. They did not work, and that door crashed to the wooden floor, spewing its VHS, cassettes and CD contents all over my kitchen. Okay, at least both doors were off; time to re-build this baby.
The screws for the base that had ripped off had destroyed their holes, so they had nothing to grip. No way they were getting re-screwed, and drilling new holes today was not gonna happen, so my only option was to put the cabinet where I wanted it and carefully place the support where it would, well, support the cabinet. Oh, yeah, I know - this is scary stuff, but c'mon, I had 250+ CDs that needed to go SOMEWHERE, and I did not want to move them twice.
So I dusted the inside, outside and underneath of this thing, screwed the doors back on, and began to transfer the CDs out of the drawers of the Card Catalog and back into the cabinet.
FINALLY, I got to begin on the card catalog! One at a time I took a drawer out of here ...
 ... stacked it over here:
 ... grabbed the CDs out of it, and put them in here:
 DONE! All back the way it started a few weeks ago.
 I did move the cabinet a little to the left in the front hall so I can move a chair to the right of it in place of all the cans of varnish and paint and Raid. See? I do have a plan!
Then I took apart the card catalog itself.
Here is the base:

... and here are the heavy parts - the drawer sections:

Next up, I'll move stuff around in the CQ, then move the base into place to see if it fits. Let us all pray that it does, or I am in deep doo-doo.
I'll be back later with another installment. Are you tired yet? I know *I* am!
Thanks for stopping by!
Goal: Move the library card cabinet into the Captain's Quarters.
Let's get started with a pictorial of the "before". Here is the library card catalog in spot #2:
 The bottom two sections of drawers are filled with my embarrassingly-large CD collection. The top section of drawers actually have index cards in them. The object of my attention today ... this whole piece of furniture must be moved into the CQ.
Now let's take a look at where we think it will fit. This is one of the walls of storage cabinets in the CQ:
 Please focus on the small one to the right:
 If that small section of storage were to find a new home. the space between the 3-level cabinet to its left and the edge of the door is:
 ... just over 36". And measuring to see how the depth of the card catalog will fit:
 ... see the 17" mark? That's how far it would stick out into the room/doorway. I wrinkled my nose over this when BR#2 was here, until she pointed out that the bags hanging on that door knob stuck out 20". She's right.
So where do we think this 2-section storage thing will live? Gotta find it a home, right? Well, there's this spot:
 That ... thing is a part of my desk that used to support an L-shaped desk section that I took down because it took up too much room and was just a collection spot for STUFF. The drawer section has no top ... I keep meaning to get one, but, well, you know.
So if I moved that drawer unit somewhere, I could move the 2-section storage thing over here in its place and then try and fit the card catalog in the space vacated by the 2-section storage thing. Welcome to my world.
Let's measure the card catalog one more time, just to be sure:
 35". Mmm-hmmm. In theory, this should fit.
Okay, now for the "gotta do 12 other things before the one you want" part. In order to take the Card Catalog apart, it needed to be empty. To empty it out, I needed to remove the drawers, which contained all my CDs. I needed somewhere to put these CDs, so why not put them back where they originated: a cabinet in my front hall. But that cabinet was moved into the Dining room:

(For those of you wondering, I actually did take that packing material and fold it nicely and stack it up in the kitchen a few weeks ago. I have a ton of it. Anyone need packing material?)
... to create a spot for this green cabinet in the front hall:
 (You may recall that this green cabinet used to live where the card catalog lives now. Just think of it as musical chairs and you'll do fine.)
So I dragged (drug?) the green cabinet into the Dining Room, then set about moving the brown cabinet back to its original spot.
Unfortunately, that brown cabinet is not only a put-together-yourself cabinet that weighs about 15423 pounds without the CDs, it is old, and was partially limping before I tried to move it, and it broke totally when I moved it to this spot. Moving it back was going to be a Herculean task. And it was.
I had a hair-brained idea that if I took off the two doors, it would not only lighten the piece enough to move, but allow me to flip it over and re-attach the bottom support that ripped of when I moved it the first time. (Lesson #1: Don't ever attempt to move this stuff.) So I unscrewed the doors, one at a time, and the first one ripped off with screw #6 of 6. Did I mention these doors are heavy? The first one fell onto the carpet, which was okay with me. Most of the VHS tapes even stayed in place. Cool.
Then I got another hair-brained idea to support the second door so it would not fall off with the removal of screw #6 of 6. I am capable of learning from my mistakes. I am. No, really.
So I supported the open door on some cans of varnish I had conveniently stored next to the cans of Raid. They did not work, and that door crashed to the wooden floor, spewing its VHS, cassettes and CD contents all over my kitchen. Okay, at least both doors were off; time to re-build this baby.
The screws for the base that had ripped off had destroyed their holes, so they had nothing to grip. No way they were getting re-screwed, and drilling new holes today was not gonna happen, so my only option was to put the cabinet where I wanted it and carefully place the support where it would, well, support the cabinet. Oh, yeah, I know - this is scary stuff, but c'mon, I had 250+ CDs that needed to go SOMEWHERE, and I did not want to move them twice.
So I dusted the inside, outside and underneath of this thing, screwed the doors back on, and began to transfer the CDs out of the drawers of the Card Catalog and back into the cabinet.
FINALLY, I got to begin on the card catalog! One at a time I took a drawer out of here ...
 ... stacked it over here:
 ... grabbed the CDs out of it, and put them in here:
 DONE! All back the way it started a few weeks ago.
 I did move the cabinet a little to the left in the front hall so I can move a chair to the right of it in place of all the cans of varnish and paint and Raid. See? I do have a plan!
Then I took apart the card catalog itself.
Here is the base:

... and here are the heavy parts - the drawer sections:

Next up, I'll move stuff around in the CQ, then move the base into place to see if it fits. Let us all pray that it does, or I am in deep doo-doo.
I'll be back later with another installment. Are you tired yet? I know *I* am!
Thanks for stopping by!
Happy New Year!
For today's post, I am going to 99.9% copy Lauren's, because, well, because it moved me. Okay, her post did not move me, but the link she posted did.
She linked to Bruce Mau's Incomplete Manifesto for Growth, and she is right: it is definitely worth the 5-minute read.
His points remind me not only of actions I personally have tried to embrace, but they also remind me of other artsy people I know and very much describes how they seem to approach life and art.
So take a few minutes, go read the Bruce Mau piece, think about how how it applies to you and your approach to life and art, then HAVE A GREAT 2010!
Me? I'm gonna go move some furniture.
Thanks for stopping by!
Thursday, December 31, 2009
Spinach-Artichoke Dip
Because I have nothing crafty to share this evening, I thought I'd share my Spinach-Artichoke dip instead. Well, truth be told, it is Artichoke dip to which I add spinach. The spinach is totally optional, but it does make it look real purty. Like this, straight out of the oven last night:

This is stinkin' easy. You will need:
2 cans artichoke hearts (NOT the marinated stuff)
1 C Mayo
1 C Parmesan cheese
Frozen or canned spinach (1 or 2 boxes frozen OR half a bag of frozen OR two small cans OR ...whatever)
garlic powder to taste
paprika
Drain the artichoke hearts and either (1) dump them into a food processor and, um, process them, or (2) chop them up by hand. I have taken to doing (2) because I am tired of retrieving the food processor from the bowels of its storage cave, assembling it, whirling it for less than 10 seconds, then having to wash it and put it away. A rough chop is fine.
Dump the chopped artichoke parts into a large bowl
Now that you can see how much artichoke you have volume-wise, decide how much spinach you really want. This can be spinach dip with artichoke instead of the other way around, if you want. No problem!
If using frozen spinach, nuke it or cook until it is no longer frozen (you do not need to really cook it thru), and DRAIN THOROUGHLY. You need to get all that water out of there, or you will have soup instead of dip.
If using canned spinach, you still need to drain out all the liquid.
Dump the spinach into the bowl with the artichoke pieces.
Add mayo and Parmesan. Season with garlic powder to your liking. I never measure this stuff, but I have left it out because I forgot it. Don't do that.
Mix it all up until thoroughly blended, and dump it into a pretty, sprayed-to-keep-stuff-from-sticking baking dish. Level out the top, and sprinkle it with paprika. It's aaaaallll about presentation, people.
Bake at 350 F - the universal baking temp - until bubbly ... I think about 30-40 minutes. I always get lulled into a coma smelling it bake, and then I forget about it and overdo it a little. This is a VERY forgiving concoction.
Let it cool a little bit before you dig in. I just take a cracker and scoop up the goodness.
M-m-m-m-m!
If you have any left over, it refrigerates well. I just cover mine with plastic wrap so I can pop it into the microwave the next day and call it 'lunch'.
Once you make it the first time, you will make your own adjustments on subsequent preparations, and there WILL be subsequent preparations! The original original version had something else along with the mayo, but I forget, and this is just fine, so I don't care.
Go forth and make this some time, then let me know what you think of it, and if you change it up, please share with us what you did so WE can try it, too!
Happy 2010, and thanks for stopping by!
Wednesday, December 30, 2009
More Trees
Yes, I bring you more trees. At least this time I employed a different technique, and I tried to do it all SU. I FAILED, but that does not mean that I did not TRY.
These are inspired by yesterday's sunset. The sky was mostly a deep blue, but down at the horizon it was a lighter blue with pink and orange mixed in. Just lovely. Of course, I failed to capture the colors on my phone's camera while standing in the parking lot of the post office, but still, again, I tried.
So here is pass #1:
 I used the direct-to-paper technique with my SU ink pads. (I actually threw away the first 4 to 5 attempts ... such is my sacrifice for my art; so I guess this is really pass #6, but I digress. ) I started with Bashful Blue and schmeared it all around the top 3/4 or so of the card stock, leaving some un-inked spots on purpose to make it look more realistic. Then I swiped Pretty In Pink and a little Going Grey near the horizon. Then I went over the top part of the card stock with Brocade Blue - pretty much my go-to blue these days. I soaked it reeeeeal good, too. Even had to change the grid paper it was such a mess. Using a scrap of printer paper to make a distinct line near the bottom of the color, I went back over everything with the Bashful Blue.
I was going to stamp the tree in Basic Gray, but then I had a horrible thought: This stamp set retires effective January 4th, and my classes are not until the following weekend. You know what this means, right? It means I cannot use this stamp in my classes! ACK! All restrictions being off, I used Memento London Fog ink instead of SU Basic Gray. I am such a rebel.
I went over the stamped trees with my white gel pen, and then, in a fit of creativity, I poked in a few stars in the clear night sky.
I liiiike! And did you notice something strange? No ribbon. None. And I am okay with that. This time.
So today one of my Tweeple suggested moonlit trees resplendent with hearts as a cool Valentine's Day card. This gave me the idea for this evening's project:

I tried to replicate the sky from last night's card, and it's close. This time, though, I added a red heart brad from my stash to one of the tree branches. Just one heart - just a touch of color. How did I get it right in the middle of the card? Before I stuck the white layer to the Basic Gray layer, I poked a hole in the white piece with my paper piercing tool, drew the silver thread (with a glitter pen) down to the hole, then I stuck the brad in. The back of the brad is totally hidden between the white and grey layers. Poke-poke with the gel pen for the stars, and Done!
So what do you think? Besides the fact that I am in a shadowy-tree rut, what ELSE do you think?
In other news, I innocently planned to hit the grocery store on the way home this evening to get the ingredients for my Spinach-Artichoke dip that I said I'd bring to dinner tomorrow night, but the voice on the radio said the most feared words in these parts: Winter Storm Watch. This translates into an "oh my god i am out of bread, milk and toilet paper and i must rush to the store and buy some or we will all surly die" frenzy for the 500,000+ residents of my fair county. And they all go to whatever store *I* choose. I just wanted canned artichoke hearts and frozen spinach, but noooooooo, I had to battle the stoopid people for a parking space. I was nearly broadsided in the parking lot by someone who just had to get home before the roads became impassable. Seriously! THERE IS NOTHING FALLING FROM THE SKY, PEOPLE!
I must divulge that I was not at a real grocery store. No, I went to Target, thinking it might be better. What did I find? There was not.one.shopping.cart.in.the.entire.store. Not even the hand-carry ones. People were running in the aisles and their carts were filled with TP and diapers. The shelves were practically barren. I was scared.
The worst part? They had no frozen spinach. NONE! ACK! I thought for about 2 seconds that maybe I could go to the real grocery store for that, but then I decided it would be a suicidal decision, so I did something I have not done in about 32 years: I bought canned spinach. I DID! Please do not share this with any of my friends, because I might be banned from ever attending another dinner ever again. I will report back on if they detected my dirty little secret or not.
Okay, that's enough for this evening. I need to go bag and tag these tree cards and add them to my etsy store. If I don't get a chance to post tomorrow, Happy 2010, everyone!
Thanks for stopping by!
Subscribe to:
Posts (Atom)