So today I wrote a beautifully-formatted Word document, with instructions and links and pictures and lots of arrows (no 24 8 x 10 color glossy photos, though ... name that song!) ... and I just learned Blogger will not allow the upload of a Word document. They say it is for security reasons, so, oh well, okay, but geez, it is so pretty! So here is my attempt to post the How To by cutting and pasting whatever Blogger will let me cut and paste. If you have problems reading the blurry images with teeny tiny print that I have included here, let me know and I'll email you my Word document.
Let us commence.
First: follow the instructions in this most-excellent tutorial to get your blog into the coveted three columns: http://www.bloggerbuster.com/2007/07/create-three-column-blogger-template.html. (Thanks to June for the link!)
Once you finish with the instructions in the above link, you will have a three-column format with all your widgets still in their original right-hand column. I tried to drag-and-drop from the right column to the new left column, but Blogger was having none of that. So I resorted to hacking the HTML. Hey, it's what I do.
Make sure you do a back-up of your template before you start any hack, so you can go back. Check the default file name, too, cuz Blogger defaulted mine to the same as the original, so I saved the new one as that name with an added “-3col” to keep them different.
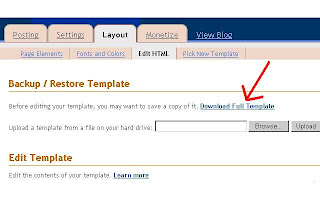
1. Back-up your current template. DO THIS:

2. Making the left-sidebar-wrapper ‘container’.
This is a crucial step! This is (I am convinced) the reason my initial drag-and-drop attempt failed.
In your HTML, look for this:

(That teeny print says left-sidebar-wrapper.)
This is the stuff that you just added for your left column in the above instruction link. My left-sidebar-wrapper got the default '/' at the end of the b:section tag, and we’ll need to change this to accommodate content.
Take out that trailing ‘/’ after the ‘yes’ and add the following b:section close tag:

Okay, now you have a container to hold your widgets. Let's start moving them!
3a. Moving your widgets via drag-and-drop.
You remember how up above I said Blogger would not let me drag-and-drop my widgets from one sidebar to the other? Well that's because of that pesky '/' that we just removed. Once that is done, you now have a container, and you can drag-and-drop your widgets (in the Layout view) from the right sidebar to the left. This is MUCH SAFER than an HTML hack, but if you loooove HTML, or maybe you just want a little adventure in your life, then read the next section. If you choose to drag-and-drop (the better choice, I think), make sure to go to the last section about previewing and backing up your template with your changes.
3b. Moving your widgets via an HTML hack.
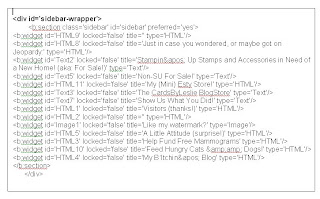
Look for the div id="sidebar-wrapper" section (mine looks like this post-widget-move, but all your widgets should be here initially):

Each of those b:widget lines represents one of your widgets.
Carefully highlight one or more of your sidebar-wrapper widgets, then cut from the current sidebar-wrapper and paste it between the b:section tags in your left-sidebar-wrapper:

You have now successfully moved the widgets!
4. Checking your work, and the back-up.
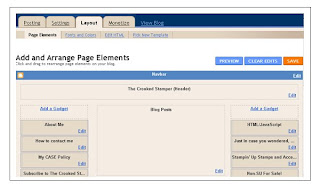
Go ahead and preview your blog to see how it looks, or look at the layout tab and you should see your widgets on the left. I am not kidding, it is really this easy.

Check out that new left-hand column! Schnazzy, huh?
When you are done re-arranging your widgets, make sure to save your template as a different name…back-up is a good thing.
When I had my background skin issue, having these backups let me just import the old template and go back to the way it was. Then, when I found the three-column skin, I simply imported my three-column template, and I was done. (Of course, I am also wishy-washy, so the ability to go back and forth like this helps me a lot.)
That's it - you are done!
So you see - there is no need to be afraid of a three-column Blogger template because you don't want to re-do all your widgets, because you get to keep them! Now go forth and move some widgets!!!

Now if only you had posted this two days ago you probably would have saved me lots of hassles and swear words!!!! Nevermind, it's done now and I changed out a bunch of the widgets anyways. But I shall be bookmarking this post in case I need to do it again.
ReplyDeleteI am pretty pleased with myself for learning how to insert html code for my background into the blogger code rather than adding a premade skin into a sidebar widget. It means it's easy for me to customise the background...now that I've worked out dimensions for 3 column bg :) loads much faster than skin too! Also learned how to make label list into dropdown box...very handy instead of big long list taking up lots of space. I'm rather impressed with how much I've learned about html code this weekend...I am an ancient historian after all...definitely not a computer programmer....pmsl :)
You are sooooo good!!!
ReplyDeleteNow, if you ever want to share a document on the intergoogle - I have a way for you to do that! So you don't have to redo it!
Would love to know how Kristie made a label list into a drop down box...
ReplyDelete