Showing posts with label Projects. Show all posts

Saturday, April 16, 2011

I Tried Something New

I left the house today. I did. It was pouring rain, so I went out. Actually, I went to see MaryBeth at a local craft show that I chose not to do, since it's not May yet, and I can't get my brain around doing a craft show before May. I just can't.

She does a lot of ribbon work, so I asked her how tough she thought it would be (for me, not her) to make something like this:
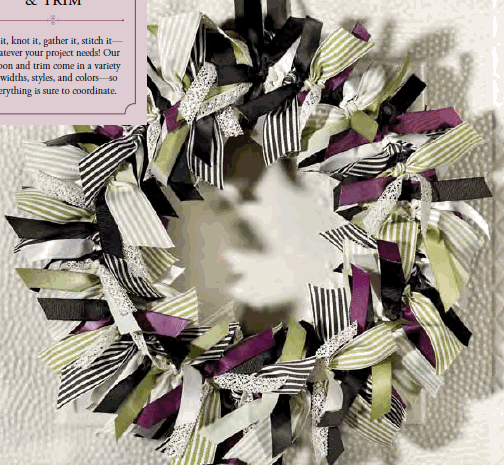
(from page 190 in the 2010-2011 Stampin' Up! Idea Book & Catalog) I have been in awe of this project since I first got my paws on the catalog. And ribbon? Hello! You've come to the right place. :) But how to begin?

First you need a circular something - like a ring. I stopped at every freaking store within 10 miles of here and found NOTHING. Zero. Zip. Here was my basic route:

You see, if I ever (EVER) leave the house to go somewhere that's not to work, I make darned sure to plan my day in a circle. So in that squiggle above, my house is the black X at the bottom. Moving to the right was the path I took today.

My first stop was the top right, to see MaryBeth and the craft show. Every. last. stinkin'. other. black. x. is a stop I made, IN VAIN, to find something, ANYTHING, that passed for a metal ring. I'm talking craft stores, dollar stores, hardware stores. NOTHING!

Oh, that tiny blue line? By the time I left the hardware store, I stopped in at Chipotle, which was only 20 paces from my car, to get a salad to go. Then I came home and ate it.

Dejected, I went searching for knowledge on the Interwebz. First, I found some metal rings online for not too much moolah, so I ordered a few to try them out. Then I found this video on YouTube to get a clue about how to make the actual wreath. She used a way different ring than I plan to use, but I was no longer completely clueless, so I started to play.

I started with my much-neglected circle cutter, and cut 3 circles from some scrap cardboard at about 3", and again at about 3.5" so I ended up with three cardboard rings that I then glued together for a practice ring. I pulled out some of my 1249563 miles of ribbon and went to work.

This is not as easy as it looks. I cut, I tied, and I tied some more. Then I trimmed and trimmed some more. Finally, it looked passable, and I made this:
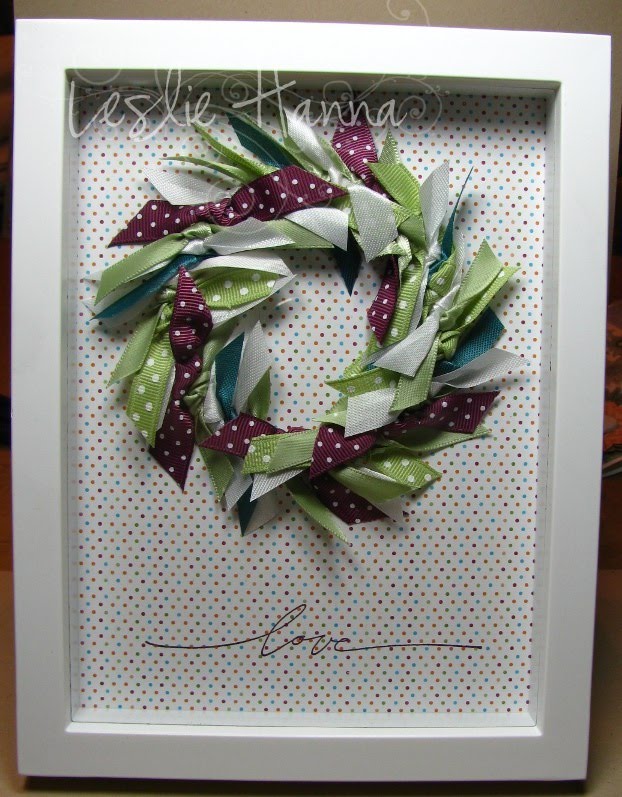
My first attempt. Not too bad. I have some other ideas up my sleeve, too, but this was one of them. What do you think?

Gotta keep trying new things, right? :)

Thanks for stopping by!

Tuesday, October 6, 2009

Still With The Tea Bag Holders!

I finally finished packaging my Tea Bag/Candy holders. I had no idea it would take me this long to do! This is probably the reason I stick to cards - packaging for those is easy!

I thought I'd show you the 23 holders I did, all packaged and ready for sale. The rest of the tissue paper I used on the first few toppers went missing (I know!), and I had to resort to using regular card stock from my stash for the others.

Here they all are in their packaged splendor:


Not bad, not bad. Looks pretty good, actually. Now all I need to figure out is where to put them on my display table.

The bagging part was not too tough. It was the labeling that almost killed me. Check it out:


I made the address labels and stuck them on the back of each topper. Then, because I've done enough shows to know these things, I needed a way to know which package had what inside of it without opening it. Even if I used the exact same thing in each one (which I did not), and even if I put it on the sign (which I usually do), people will still ask me what is inside. Trust me on this one.

So I scanned one of each item - the tea bag and two different chocolates. Then I copied the pics into a word document, re-sized them, copied, copied, copied, and printed them on regular printer paper. I cut them all out and put one in each package.

I lied again. I am almost done with these... I have a few more to go. I need more tea bags and more chocolate. I'll get those today and finish the packaging.

I will also stop by Staples and get a new stapler. Maybe a Swingline. Red. :-) I am sick of my staplers breaking. The one I used last night will staple just fine if I hold it over the trash can. It only fails when I try to staple the topper to the cellophane bag. Hmph. I will show that stapler who's boss. It will be retired today in favor of a real, functional stapler. Ptttht!

I will report back later on how today's projects go in The Other Room. Thanks for stopping by!

Monday, October 5, 2009

Tea Bag/Candy Holders

The other day, Lydia, over at Understand Blue, posted this very cool project. They can hold tea bags or candy. She made hers for Halloween, but I thought I'd try to make some with a Thanksgiving theme. And since I am doing two craft shows in November, I have a shot at maybe even selling one or two of them. Going with the Thanksgiving/Autumn theme, I thought I'd put some spiced tea in the little pockets. But I am getting ahead of myself! Let's start out by making the tea bag holders, shall we?

I am going to cop out and not show the first two steps: making the holder base and the tube of DSP for the inside. This post is all about the making of the stamped piece for the front of my holders. I used Creamy Caramel, Really Rust and Old Olive textured card stock for the holders, so I wanted to make something for the fronts that would work for all of them - I did not want to make any more decisions. I AM ON VACATION, HERE!

I wanted to use one of the leaf stamps from Autumn Splendor, but the thought of coloring and cutting 24 of them made me feel faint. So I went to Plan B:

I took a piece of Creamy Caramel card stock (a color I tend to ignore in favor of Kraft, but not today), then I brayered both Really Rust and Old Olive ink randomly over the card stock. It looked really messy, then I thought it looked 'distressed', which is what I was going for.

I cut the piece into 2 3/4" squares, which turned out to be PERFECT, not only for the front of the holder, but in paper usage efficiency.

This is ALL I had left from cutting 12 squares from one piece of card stock. YAY!

I then stamped the leaf image on each square with Memento Rich Cocoa ink. Each square is a little different color-wise, but they all go with all three colors. This is what they look like stuck to the front of the holder.

Here is a peek at the inside of one of the holders. I ran the ribbon through two slits I cut in the spine of the holder, and it wraps around the outside to tie it shut. The leaf piece above secures the ribbon on the front.

This is what it looks like tied.

Now about that ribbon. It is a 100-yard roll from my stash that I got during my Ribbon Outlet trip a loooong time ago. I will never use it all. I thought it was Cream or Vanilla, but by the time I got to card 20 of 23, I realized it might be pale yellow. Oh, well.

23? Yes, that is a weird number, but we had a few fatalities in the card stock preparation area today.

I actually started with this one Saturday night. I have had this piece of snowman paper for a few years, and I thought I could use it on the front of some Christmas-themed holders. It JUST fits!

This is the inside of one of the snowman ones I made - a piece of paper from The Stash.

I thought about adding a tea poem to the inside on the flaps, but I am not sure it is necessary. I also thought about adding a sentiment on the front, stuck on over the leaf, but I am not sure about that one, either. Still pondering. These are already close to the cost of a card from just the materials standpoint, so I need to be careful of adding too much and making them too expensive to sell. I thought that as they are, they could be used at a Thanksgiving table place setting as a little something extra. Maybe.

So this is how I spent my first full day of vacation, a Sunday. I made 23 of the leaf ones, contemplated going to the store to buy spiced teabags or maybe candy for them, then sat down on the couch and stayed there. What a slug. I think I 'get' this vacation thing. :-)

Monday I WILL go to the store and get a few things that resemble food to sustain me through the next week or so. I have much physical labor to endure. I think I'll begin with painting. Yeah, painting the rest of the wall(s) in The Other Room so I can get started organizing. I'll report back as the day progresses to see if *I* have made any progress. ;-)

Thanks for stopping by!

Sunday, January 4, 2009

2009 Calendar - Done!

At long last, I have finished my 2009 calendar! Actually, it came mostly finished, but pretty nekkid, so I wanted to dress it up a bit. I did January a while ago, but then I put the project aside, and well, I decided that since my little Stamping Group has disbanded so we did not make a 2009 calendar, and The Pioneer Woman did not produce a calendar this year, my wall at work would be pretty empty, so I had to do something drastic. Today I decided to finish the little bugger.

Here's the cover. I mostly followed SU's design as a guide, but I put it on pieces of the SU Chipboard Basics (small) instead so I had front and back covers I could bind.

January you've seen before. You'll see I covered up the lines on each page with a piece of DS paper, and covered the top edges of the paper with pieces of coordinating ribbon. This one is brown. I even stamped something on this page.

For February, with me still being contrary and refusing to bend to using the traditional holidays, I went with a "it is still cold and so I'll use a polar bear" theme. I popped him up with Dimensionals and made him lay across the month name. He's an image from Rosie's Roadshow. You'll see more Rosie's on some other pages, since, well, you know, they were still out on my table and pretty darned handy.

Here is where I began to raid the old stash of retired DS papers. And that's another Rosie's image. March = Spring, so a duck with a flower in her bonnet, well it just had to be done.

Please ignore the fact that I used dye ink, then went around it with a Copic marker so it all kinda ran.


For April, we have more retired DS paper, and another Rosie's duck. This one is being rained on ... April showers ... yeah...

For May: more retired DS paper, and more Rosie's. This one is a duck dancing on a radio while wearing a sombrero. I saw it on a sample Rosie's card a few years ago, and I just had to borrow the idea.

June. What to do for June. How about a park? The tree and bench are A Muse images, and the bird and sun are Rosie's. I colored the birds blue in honor of Lydia over at understandblue, who has me thinking about blue all the time these days. And birds.

Oh, and the birds are a little tilt-y, so we'll just say they've been in Grandma's cough syrup again.


July is only one thing in my mind: a very patriotic month, so it is the one traditional holiday I will use here. I initiated my A Muse pinwheels, and colored them with glitter Gelly pens. Those blobs at the top are supposed to be sparkly stars, or maybe fireworks, or something. Maybe they were a mistake, but whatever they are, they are a permanent part of the page now.

I also used a whole 4" square of some patriotic paper, and 4" of specialty ribbon. At this rate, in another 8 years I'll have used the rest of both of them.

August in DC is traditionally stinkin' hot, so I made a desert with cacti. Hot. And a fan to cool things off a bit. To keep with the hot hot hot theme, I used a piece of some Western Sky paper.

Now that I think about it, I should have made a swamp, because it is hot and humid here, not hot and dry like a desert. Oh, well.


September is the beginning of Autumn, so I used a piece of Haiku paper. And yes, I cut out all of those little pieces of patterns and stuck them on. I even did three whole fleur things and popped them up on top of the DS paper. I am nuts.

Then we have October. What? YOU do not think of sea shells in October? Well *I* do. I have a 2-week time share in Florida, and for the past 15+ years, I have gone there every October. It's just a ritual. And since I drive down, I am gone for a sweet 2 1/2 weeks. Even at work, I tell people I cannot support them in October, so they'll have to change their plans. Really, I've done that! So in my mind, October = beach.

Okay, this year I did not go, and I think that is why I am out of sorts. Actually, BR #2 usually goes to FL this time of year, too, and she did not go this year either. Yesterday we decided that's why we are both out of sorts.

Also, I personally collected each and every one of those shells. I also cleaned, washed, bleached, washed again, dried and sealed them. I do not buy shells. I just wanted to make that clear. Oh, and if anyone wants some shells, I can supply you with many, many, many. I have plenty.


November. This month got some Autumn Vine paper and some lame little buttons that were still out on my table. Can you tell I was getting tired?

And last, but not least, we have December and some Figgy Pudding paper plus some lonely snow flake brads. I actually finished the silver ones and had to break into the white ones.

Phew, this project took a lot out of me, but I am glad it's done. This is why I do not scrapbook... it's too hard. ;-)

Friday, December 12, 2008

Packaging Completed

Last night I ignored the wise advise of my massaaaaage therapist, and instead of taking a hot bath, I made 24 toppers for my bags o'buckeyes. I had to, I just had to.

And the night before I finally decided on how to finish these jars of Mustard. I put a wimpy, but nicely tied bow of Mustard ribbon on the top of the jars, then I made tags so had something to wrap around the lid (I used elastic gold cord) to make it look less plain.

These babies are all now in the fridge, under all the bags o'buckeyes, waiting for delivery Saturday night.

And for one final touch, to class them up even more, I have these:

I'm thinking I'll staple one to the back of each tag. Now who would not want a free donut, hmm? Hey, I have class...it might be lower class, but it's still class. ;-)


For those who have asked, here is the recipe for the Mustard:

Homemade Grainy Mustard

3/4 C Yellow Mustard seeds
1/4 C Brown Mustard seeds
3 T Honey
1/3 C Sherry or Malt Vinegar
1/4 C Irish Whiskey
1 T Fine Sea Salt

Combine the yellow and brown mustard seeds in a bowl, cover with water, and leave to soak for 6 to 8 hours or as long as over night.

Drain the seeds well and pour them into a food processor. Process until the mixture begins to look creamy and emulsified. Add the honey, vinegar, whiskey and salt, and process again to mix.

Pour the mustard into a bowl, cover, and let stand over night at room temperature. The next day, check the consistency and flavor. If it is too thick and the taste is perfect, add a little more water. Adjust the other ingredients according to your taste. It will be hot!

Spoon the mustard into sterilized jars, cover, and store in the refrigerator, where it will keep almost indefinitely. Homemade mustard benefits from at least a week's rest before using to allow the flavors to blend.

I had more brown mustard seeds than yellow, so mine is even hotter. Look in ethnic (Asian/Indian) grocery stores for bags of the mustard seeds. I also asked if I could leave out the whiskey, and I was told the consistency of the finished product would not be right, so I obeyed the order to leave it in. But feel free to try leaving it out, and if you succeed, please report back on what you did!

Tuesday, December 9, 2008

More Packaging

I have decided: My life is an unending string of distractions. That really does explain a lot. Like why, if I have two cakes to bake, and toppers to make, and bags to fill with buckeyes, and another batch of buckeyes to make, and workshop projects to finish planning, and workshop kits to cut and bag, and ... and ... and..., then why in tarnation am I making mustard? Yes, I made mustard tonight.

This recent adventure began when a co-worker brought in some homemade mustard and some pretzels last week, thinking no one would eat it. Little did she know we actually lost a few pounds each with all the back and forth we did to the table holding the yummy concoction. And back, and back, and we got it out of the fridge the next day and commenced to eat even more of it, until all the pretzels were gone. Then I took it home.

Then we begged for, and received, The Recipe. This stuff was so stinkin' good that I had to try and make it. This week. My co-worker had actually planned to make the mustard, so she had ordered all her supplies online. Me? No, no, no, no. I am scrambling, big time, to find all this stuff. Do you know it is after canning season, so all those cute jars are no longer in stock, except maybe at WalMart, which is far from my home? And did you know that mustard seeds, both yellow and brown, in large quantities, are difficult to find? The little Aisan/Indian markets carry the brown seeds, but they were out of the yellow ones. I did find some at the megamart, but not enough, so I adapted the recipe and used more brown seeds than yellow - exacly the opposite of what the recipe called for. I mentioned this to my co-worker, and she said, "Oh, that stuff will be HOT!" And boy, oh boy, was she right! I think this stuff will peel paint. But it was terribly easy to make, once I had all the ingredients, that is.

So now that I have the mustardy goodness aging on the counter, I needed to work on my favorite thing to do: packaging. Not. This is the prototype I came up with tonight:

The Front. I printed the words on my computer, then cut out and embossed the label with one of my Nesties. The paper is a pretty piece from the SU Haiku package of DS papers. I just wrapped it around and taped it to the jar, then ran a piece of Mustard (how punny) ribbon through the label tag and taped it to the back at the paper's seam.

The Back. Not too exciting, but I thought people should know the ingredients, and I also needed to hide that seam. I thought about layering the circle, but decided it was an ingredients label and did not need to stand out.
The Top. Could this be any more boring unadorned plain simple? I wanted to tie a ribbon around the lid, but with that Mustard ribbon already there, no matter what I tried, it was too much. I wanted to layer some circles on the lid, but after staring at it for a while, I decided this coordinating piece of paper from the same Haiku pack was the best choice. I mean, after all, the Mustard will be the star of this show. I just wanted it to look like I'd tried, and I think I have achieved that.

Tomorrow, I need to sterilize all the jars I bought tonight so I can bottle the stuff, then make all the labels and decorate them. I am only going to make 6 or 7 for my Pot Luck dinner Saturday night. We no longer exchange gifts, but we are all crafty, so we make things. Like buckeyes, and mustard. Oh, and I am bringing dessert, so some time I'll need to make that, too. Just another distraction.

Monday, December 8, 2008

The Topper

Bag Toppers are not my forte...not even close. Every year I struggle with packaging, so this time I thought I'd go for "simple". And it really does not get any simpler than this!

I opened (!) my package of Pacific Point DS papers and pulled out this sheet. I cut the shape with the Top Note die and my Cuttlebug (Shhhhh! Don't tell Shelli!) I was going to trim the edge and layer it on another die-cut of Pacific Point card stock, but I figured the double-sided paper was thick enough to stand on its own. Think of all that trimming I just saved myself!

I wanted to use all current product ... or at least try to, so I used Silver Elastic Cord as ribbon (gotta have ribbon!), and one of the Cute & Curly stamps stamped in Pacific Point on Whisper White, and punched out with the Curly Label punch. Too easy!

I thought the small oval would fit in the center; not quite, but it's close enough for me! I stamped the sentiment from Warm Words with Riding Hood Red on Whisper White, punched it out and stuck it on. Done!

I used bags with those fold-over thingies to hold itself closed, so the topper is not really holding anything - it is just decorative. Soooo, I stapled the folded shape to the bag with a blue staple (I told you I had stuff!)

That's it! I'll bag these up on Saturday, as I need some for my Pot Luck dinner Saturday night, and also for my customers on Sunday and Monday. Between now and then I'll be making another batch of buckeyes, and baking two cakes. No days off from work, so it will be a bit nuts in the evenings around here, but I'll pop back in when I can to report on the sleep quotient, or lack thereof!

Sunday, December 7, 2008

Stamping On Candles (Not This Year!)

Busy day today at Chez Crooked Stamper, but I'll post later on that. I thought I'd actually show you something stamping-related, first. Crazy, I know!

This time of year, stamping on candles is quite popular. I tried it for the first time last year, and it is really too easy! You can check out the tutorial here on Splitcoast.

This was my first attempt - not too bad. I was encouraged enough to graduate to a larger candle and a stamp set that needed to be colored in.

Here I used the now-retired City Of David set. You can see where I messed up at the top and bottom of the candle where I failed to trim off enough of the tissue paper. I do not re-do these things...instead I show them to my customers as what NOT to do when they make theirs. ;-)

This is the back of the City Of David candle.


Here was option 2 for my customers last year - the Peaceful Wishes set (now also retired...sigh.) The next photo is the back of the Peaceful Wishes candle.


Okay - that was last year. I only did these for my workshops; I have yet to make candles to sell. I dunno know why...maybe it's that whole "if they do not sell, I'll need to store them for a year" thing that keeps me from doing it. Ya think?! :-)

I've told my customers I might include a candle project again, so I've been trying to make one that I felt would be workshop-worthy. It failed to happen. I wanted to use the Christmas Classics set I just HAD to have, but had yet to ink. I also wanted to try heat-embossing some of the images to see how they transferred to the candle. I inked the tree with Artichoke, and wiped off the star at the top. I then colored the star with my Versamarker and stamped it onto the tissue paper, then embossed the star with gold EP. As you can see - it transfers just fine! You can probably also see where I over-heated the candle and melted the bottom edge - not good.

Then I thought I'd get clever and stamp a bunch of gold-embossed stars on the rest of the candle, and you can see I cut some in half and attempted to line them up with the top and bottom edges. I am so not thrilled with this result, that we will NOT be making candles next weekend.

And now I have about 20 candles on my kitchen floor that will need to be stored. Oh, bother. Maybe I'll come up with something else later this week, but probably not.

Well, back to the excitement that is my life here. I'll be back later to share. Hint: Buckeyes in the works ... ;-)

Sunday, November 30, 2008

Marathon Post #11

One of the side projects I had going on here this weekend was making these clothespins. Well, okay, I did not make the clothespins, but I did decorate (alter) them. You are looking at something old and something new...the 'something new' is (are?) the clothespins, and the 'something old' is (are?) the paper and rub-ons. The paper is from last year's Prints Pack, and the rub-ons are part of my still-huge stash from SAB earlier this year. I may never use these up!

All I did to stick on the paper was slather some Tombo Multi on the side of the clothespin and set it on the diagonal of the 6x6 paper. I gave it a second or two to set, then I cut around it with my craft blade. Done!


You can see I did not do the sides, as that looked like work. Lucky for me these came pre-painted, so I just stuck on a few more rub-ons, and in some cases, wrapped them around from the front.

As most of you know by now, I do not 'alter' anything, and I pretty much do not own anything that does not earn its keep as a functional item. This place is just too small to have nic-nacs all around. So what am I doing with four of these?


THIS is what I am doing with four of these! These puppies will earn their keep as workshop project-holders. Yeppers! They'll hold the projects up and away from the table (several have tumbled into ink in the past), and elevate the project so people at the other end of the table who work so fast they get ahead of the rest of the gang can easily see what they should pull out of their bag next. See: functional.

And no, I did not make this up all by myself, but I did see it on someone else's blog and decided to try it.

I stayed up way too late last night...I was a woman driven. Driven to create, and I think I was actually speeding, or it sure felt like it. For some reason I decided to make boxes of my Peas On Earth cards for sale next weekend, so I made 18 of them - 3 boxes of 6. It took hours, but I did it. The good thing is, if they do not sell, then I have my holiday cards all made. ;-)

So far today I've put away some stamps (!), including some SU sets from my table and some of the loose stamps in The Other Room. I am trying, really, I am! I actually have an empty drawer I can use for the rest of the loose stamps, once I figure out how to organize them. Baby steps, here, baby steps!

I need to get back to real life today and do some laundry, clear out and re-fill the dishwasher ... you know, things. It is raining, though, and feels like a good day to continue my long-weekend cocooning.

Oh, and that alleged profit I saw the other day? Nope. I added in all my SU earnings, and the plus side got even bigger, but I successfully wiped that out (and then some) when I put in my Demo orders, so now I am pretty much even with money in and money out, and I feel much better. I was having palpitations about having to pay taxes on that money as the next dollar of my Day Job income, plus I think I'd need to pay Social Security, so it is just as well that I break even. BUT, I see where the money went out and how it came in, so if I ever need to make a profit, I think I could do it if I worked at it. Maybe. For now, it is still just for fun. I was going to say 'I spent all my earnings', but I think a more positive approach would be 'my hobby pays for itself'. Yep, I like that a lot better!

I have several more projects planned for today and into this week. Thanks for stopping by, and I'll report back later today on any stampin' progress.

Monday, November 17, 2008

Bookmark Central

As an avid reader and a general lover of books, there are two things I cannot ever see myself doing: (1) altering a book, even (especially) an old one, and (2) using a bookmark that is not flat. So when I see beautiful bookmarks that have brads and layers and embellishments - NOT! Those huge paper clips that people make into bookmarks? Nope! One of the vendors at my market has some lovely hand-made cross-stitched bookmarks, but they are also not flat, so I have not bought one.

With this as my going-in position, last year I set out to make a flat bookmark. And since last year SU had some scrumptious wide satin ribbon in both Chocolate Chip and Pomegranate, I made this for one of my workshop projects:

It is flat, and it is good. It was a hit on Splitcoast ("hit" meaning I got more than 3 comments.) It was also a hit at my workshops, except for that cutting-out part. There was much whining that day!

Because of all the cutting, I did not make any more than my serving-suggestion sample for the workshops.

Fast-forward to this year, and my new personal challenge to use up stuff I already have. Enter: this year's bookmark. I went through the hoarded ribbon and pulled out not only the open spools of the Chocolate Chip and Pomegranate satin ribbons (yes, I have un-opened spools of the stuff, too), but also a few of the other wide ribbons I have in the Retired SU Ribbon Box in The Other Room. Let's take a look at what I whipped up yesterday:

Here is the whole sampling. I made two of each, for no particular reason. I think they all came out a little boring, but I did not claim to be 100% finished. Yet.

On to some more detail...
.
.
.
.
.


This is what's on the end of the blue ribbon pieces. The ribbon is from one of the now-retired Ribbon Original packs. After some squinting, and failing to even attempt to look it up anywhere, I decide this was Brocade Blue. Or maybe Ballet Blue; I forget now. Hey, that was yesterday.

The blue die-cut is one of my new Nestabilities (yes, June, you would love these!) I stamped the A Muse image on Whisper White, colored it, then punched it out with my SU Curvy Label punch. I made a sandwich on both ends of the ribbon with one of these paired with another plain blue Nestie die-cut, and I used red sticky tape to hold the whole thing together. LOTS of red sticky tape. I tell you, I have never seen anything with more static cling than that red sticky tape! Between last weekend's workshops and these bookmarks, there is serious competition between the red sticky-tape things and the cat hair. Serious competition...there are red pieces floating around everywhere.

Yeah, these bookmarks are a little plain (read: boring), but very usable! A perfect stocking stuffer!

These are the brown versions. I found the piece of patterned paper in my embarrassingly-large stash of un-touched 12x12 papers, and I think it looks rather manly with the brown, don't you?

The die cuts on the right ribbon are my other new Nesties. I think I may be done buying Nesties for a while. I did briefly covet the new curly rectangles, but.I.resisted...

This is actually the first one I made on Sunday. I used a retired piece of SU DS paper from a year or two ago, and you will notice it looks like Cranberry, even though the ribbon and card stock are Pomegranate. But only you know that, right? I think it will pass muster.

The stamped image is from an SU Hostess set (retired, of course), which I stamped in Versamark and embossed with gold EP. That there thing in the center is a gold brad, in case you were wondering. ;-) I only put it through DS paper layer so the back of the brad is between the sandwich and does not show.


Then I thought about the bag of beads I have in my stash and how they might dress up the ends of the bookmarks. (Caution: Rambling brain alert!) Remember the premise of the movie Catch-22? Someone tried to get out of the Army by being crazy, but because he knew he could get out of the Army by being crazy, he had proven himself not crazy. Just think about Klinger in M*A*S*H and you'll get it. He did not qualify for a Section 8 (discharge because you are loony toons) because he was knowingly trying to get out of the Army by acting crazy. See: Catch-22.

Back to our program ... my personal Catch-22 was (were?) these beads. I wanted to use the Natural Hemp Twine with them because I knew it would be strong and it would make large-enough knots above and below the bead to hold it in place. But the twine was too fat to fit through the hole in the bead when I doubled it up, so I had to resort to using the Linen Thread, which is thin enough to fit through the hole in the bead, even doubled over, but I found it is too thin to make a knot that will hold the bead in place. Ugh. So I am still playing with that, and I may not add any beads to the remaining bookmarks. We'll see. I'll test-drive them at my last market this weekend and then I'll decide if I'll make any more of them.

That was yesterday. Tonight in The Crooked Stamper household, it was a real rip-roaring fun-filled evening! I am one of those people that starts the day with only paper money in my pocket...no change. So when I get home, I empty my pocket of all the loose change and put it into a receptical I have just for this purpose. When the receptical is full, I must take action. Since my bank is in Texas (not real convenient), and my Credit Union no longer has a coin machine, and since I refuse to pay the Safeway 9-cents-on-the-dollar price to use their machine (if it is even working when I get there), I do not have a lot of options. Turns out my Credit Union at work will take rolled coins if you put your name and account number on the side of each roll. This I can do! So tonight I dumped out my loose change, counted it, rolled it in the rolls I have on hand, made piles of the remaining coins all measured out by what fits in the various coin rolls (is the word anal-retentive hyphenated?), and made note of how many more rolls I need to finish the task. Yep, I lead a real, living-on-the-edge kind of life here. Yessiree! I am really looking forward to tomorrow night. It looks to be another crazy-good time.

But you know what? I counted up all that change, and it pays for my last two trips to Angela's, so it is soooo worth it! I did grab a UFO (Un-Finished Object) from The Other Room which I hope to get to tomorrow, so you can see some stampin'!

Thanks for stopping by!

Sunday, November 9, 2008

I Love My Customers!!!

Today at my workshops we made this box-in-a-bag using Baja Breeze DS paper and Baja Breeze card stock. Each person got one of a variety of different sheets of the two-sided paper, and each person made their own decision about which was the outside of the box, and how to decorate it. I like to leave that up to them when I can, so there is an element of creativity on their part. A few of my customers do not like to think too hard on weekends (I am so in agreement sometimes!), but most people embrace the freedom to step out of the suggested design of a project and go off on their own.

My customers amaze me with some of the ideas they come up with to change things around. You can almost see the wheels spinning. One of my workshop rules is: "if you do it differently, you must show everyone else what you did." I have yet to have anyone be too embarrassed to do that, plus some people decide to do it her way instead of my suggested way. I am okay with that! In fact, sometimes I slap myself in the forehead wondering why I was not that smart. See, we all learn from each other.

So this afternoon, while building the box-in-a-bag, one of my customers pondered aloud, "Wow, I'll bet this would look cool made out of vellum with a candle inside." Everyone immediately stopped dead in their tracks, stamps suspended mid-air, agape at the marvelous thought of home-made luminaries. I gave her full credit for the idea, and she would like to retire off the residuals. Yeah, right.

So after they all left, I made one. Yep, in about 5 minutes. Check it out:

Please excuse the poor quality of the photo. The bag is made out of SU card stock vellum (much heavier than paper vellum). The base and scallop border are made from SU Shimmer White card stock. Before I stuck the vellum to the base, I used a snowflake stamp inked with glue from a glue pad, then I dumped SU Dazzling Diamonds glitter on it. I left the top unadorned to allow more air for the flame, and to reduce the chance I'd burn my condo to the ground.

I have not lurked lately on any blogs or SCS, so I have not seen this done before, but I will say this was my cutomer's idea today, and not my own. I think it is pure genius!

Okay, gotto go clean up so I can go to the Day Job tomorrow and be ready for my Monday evening session. Thanks for stopping by!

Wednesday, October 29, 2008

Organizing, Crafting, and a G-I-V-E-A-W-A-Y!

It all started innocently enough on Sunday. I thought I'd go through the three+ boxes of stuff from SU I have piling up in here and take stock of what I forgot I had. The good news is I got it mostly down to one box. (yay) The bad news is I have an embarrassingly LARGE amount of stuff that I actually did forget I had. I decided to put away as much as I could, since The Other Room really does not have the space, which is why it was piling up in the Living Room in the first place. Wanna see the "after"?

Here we have a stack o' card stock:

Mostly Whisper White and Very Vanilla. One can never have too much White or Vanilla card stock. Well, maybe one can. You see, when I place a Demo order, I try to hit $150 to get some free stuff. Yes, I do the math, albeit Demo Math, but I will not take an order from $120 to $150 to get a free set I do not want. The numbers just don't work for me. So you see, I do have some level of restraint. ;-) So ANYway, for the times when I do hit $150 and get $15 in free merchandise, guess what? A pack of WW or VV card stock is $7.50, and twice that is an even $15.00. No muss, no fuss, no MATH. So I am not too surprised to have this much on hand, but I was a little surprised that I had ordered that much of it recently. I did put it away, mostly.

Next we have a pile o' adhesives, which I also try to use as order fillers:

We do go through a lot of Dimensionals and Glue Dots at my workshops, so I need a bunch on hand. And that Red Tape is (was) for a workshop project I never got to, but if I ever DO, I am READY!

Next we have the really embarrassing part - DS paper:

This is some from the retiring stuff from July & August that I stockpiled because I loved it, but mostly from the new catalog (read: since August). Ugh. I had forgotten I had some of it, which is not hard to do considering how much of it I have. I do have two or three packs of some of the patterns (I think for two of the papers) as I'd planned to use it for ... a workshop project that just never happened. You see, when I DO think up projects, it is usually the week before the workshops, and there would never be time to order the extra papers and get them in time. Soooo, when I think about it, I order three of something I like, with plans to use it. It's just the "using it" part that fails me.

And when it was all done, I was left with this partial box o' stuff:

There is a stack of Rub-ons there in the back, some of them from as far back as SAB. I have no repository in The Other Room for rub-ons, so here they languish. I also have some ribbon (surprise!), and several containers of Jumbo eyelets, um, from another planned-and-never-executed workshop project.

Oh, and that 3-pack of tins on the right side of the box? That was for an idea I had to use up some of the retired 3x3 Love Notes I have left over. I was going to make some number of Love Notes, all decorated nicely, and put them in the tins with a fancy, schmancy belly band and sell them at my holiday craft shows (all 2 of them this year.) But the tins cost $3.33 each, so I am not sure I'll be able to make any money on them, so I never pursued the project.

Ya know, if I could ever remember all these great ideas I have over the course of the year, I might have my next workshops' projects all planned out. HA HA HA HA HA! Oh, that's too funny. I crack myself up sometimes.

To celebrate the consolidation of all that stuff, I took out the pack of SU Chipboard Ornaments Kit I'd bought in a Good Demo moment and decided to assemble them. Many, many, many (many) hours later, I had made these:


Let's go through all of them, shall we? Here we have some words (all of the chipboard pieces, by the way, have patterned die-cut papers stuck to both sides of the chipboard):


And some more words, and some round things with star punch-outs in the middle:

And some plain ornament shapes:


And some funky-shaped ornaments:

And some long thingies:


And some Fleur de Lis (outers):


And some Fleur de Lis (inners):

And one heck of a lot of stars:


Phew! Man, oh man, but that's a lotta chipboard ornament parts! Unfinished chipboard ornament parts, in my case, because I stopped right there and put it all away. You see, I do not "do" Christmas, so I will never, ever use these things. But I can tell you, if you do Christmas, and you like to decorate your house and your tree and maybe even your packages with pretty things, and if you were to take these babies to the next level and make them pretty with glitter and some of those stars and some, oh, I dunno, ribbon, then punch holes in the tops so you can hang them easily, this would be one good deal. But not for me. I think I'll give them to my customers and maybe they can make something of them.

And if you are still reading (amazing ...), there is one more thing. You see, we (yes we) hit a new milestone in Blogland last week. Lookie:


Woo-hoo! You did it again! And to thank you (and I DO thank you!), I am having a real G-I-V-E-A-W-A-Y! By "real", I mean not some s-crap from The Other Room. No, siree! This is something from my Kitchen floor! Yes, I have overflow everywhere. Several months ago I bought these:


I had this idea that since I do not cook a lot, but when I do, I make a normal recipe, meaning I have a lot of left-overs, I thought I might prolong the life of these left-overs with a vacuum seal system. Needless to say that all never happened; I had to take these out of the bag to photograph them.

Here is the main attraction:

And this starter kit includes:

Plus a box of Quart and Gallon bags. Hey, when I shop, I shop, okay?

So, do you want to win these goodies? Yeah? Do I hear a YEAH, BABY!? Well, to win these, all you have to do is tell me why YOU deserve to win them over everyone else. That would be why YOU, one of my three (maybe four) beloved readers, is so much more deserving than the others. Got a sad story? Do tell! Do you cook a lot and hunker down for a long, cold, Winter, living off only the food you are able to preserve in your root cellar? Then tell us all about it!

So spill your sob story as a comment on this post before Sunday noon, and I'll pick a winner based on some as-yet-undecided non-scientific method.

See, good things can happen to you here in cyberspace! Comment on!!!!!! I cannot wait to read your answers! ;-)